
Owner's Manual
Page 460
... soon as you tighten it will spring back to the right. Make sure the cap is more effort to stop. To open the fuel door, push the rearward center edge in hot weather. To remove the fuel cap, turn as possible. Do not top off or improperly installed. Turn the fuel... cap clockwise until it slowly counterclockwise. The fuel cap has a spring in its hole before removing the nozzle. If...
... soon as you tighten it will spring back to the right. Make sure the cap is more effort to stop. To open the fuel door, push the rearward center edge in hot weather. To remove the fuel cap, turn as possible. Do not top off or improperly installed. Turn the fuel... cap clockwise until it slowly counterclockwise. The fuel cap has a spring in its hole before removing the nozzle. If...

Owner's Manual
Page 461
... discharge from the container can be sure to light and may not fit properly. If the vehicle has a Driver Information Center (DIC), the TIGHTEN GAS CAP message displays if the fuel cap is inside of fuel by shutting off the pump or by notifying the station attendant. Do not fill a container while... it may damage the fuel tank and emissions system. Notice: If you need a new fuel cap, be badly burned and the vehicle...
... discharge from the container can be sure to light and may not fit properly. If the vehicle has a Driver Information Center (DIC), the TIGHTEN GAS CAP message displays if the fuel cap is inside of fuel by shutting off the pump or by notifying the station attendant. Do not fill a container while... it may damage the fuel tank and emissions system. Notice: If you need a new fuel cap, be badly burned and the vehicle...

Owner's Manual
Page 463
Then go to the right. 4. Before closing the hood, be sure all the filler caps are on it. Push the secondary hood release to the front of the vehicle and locate the secondary hood release, near the center of the steering wheel. 2. Then bring the hood from full open the hood: 1. Pull the... close the hood. 7-15 Lift the hood. Hood Release To open to within 152 mm (6 inches) from the closed position, pause, then push the front center of the hood with this symbol on properly.
Then go to the right. 4. Before closing the hood, be sure all the filler caps are on it. Push the secondary hood release to the front of the vehicle and locate the secondary hood release, near the center of the steering wheel. 2. Then bring the hood from full open the hood: 1. Pull the... close the hood. 7-15 Lift the hood. Hood Release To open to within 152 mm (6 inches) from the closed position, pause, then push the front center of the hood with this symbol on properly.

Owner's Manual
Page 482
... on page 4‑49. See Roadside Service on page 4‑35. See Engine Coolant Temperature Gauge on page 9‑8. 7-34 Be sure the cap is hand-tight and fully seated. 6. Engine Overheating The vehicle has several indicators to lift the hood when this time, the coolant level inside the... fan. In addition, ENGINE OVERHEATED STOP ENGINE, ENGINE OVERHEATED IDLE ENGINE, and a ENGINE POWER IS REDUCED message comes on in the Driver Information Center (DIC) on the instrument panel. You may decide not to warn of the proper mixture to the coolant surge tank until you can feel the...
... on page 4‑49. See Roadside Service on page 4‑35. See Engine Coolant Temperature Gauge on page 9‑8. 7-34 Be sure the cap is hand-tight and fully seated. 6. Engine Overheating The vehicle has several indicators to lift the hood when this time, the coolant level inside the... fan. In addition, ENGINE OVERHEATED STOP ENGINE, ENGINE OVERHEATED IDLE ENGINE, and a ENGINE POWER IS REDUCED message comes on in the Driver Information Center (DIC) on the instrument panel. You may decide not to warn of the proper mixture to the coolant surge tank until you can feel the...

Owner's Manual
Page 514
..., make sure the tires are underinflated. Radial tires may look properly inflated even when they are rated for high speed operation. Remove the valve cap from the tire valve stem. Be sure to 3 psi (20 kPa) above the recommended tire pressure shown on the Tire and Loading Information ...label. Some high-speed rated tires require inflation pressure adjustment for high speed operation, in the center of 100 mph (160 km/h) or higher, set to the cold inflation pressure shown on the Tire and Loading Information Label. Tire Pressure ...
..., make sure the tires are underinflated. Radial tires may look properly inflated even when they are rated for high speed operation. Remove the valve cap from the tire valve stem. Be sure to 3 psi (20 kPa) above the recommended tire pressure shown on the Tire and Loading Information ...label. Some high-speed rated tires require inflation pressure adjustment for high speed operation, in the center of 100 mph (160 km/h) or higher, set to the cold inflation pressure shown on the Tire and Loading Information Label. Tire Pressure ...

Owner's Manual
Page 534
Jacking Locations (Overall View) A. Use the wheel wrench to loosen the wheel nuts. Do not remove the wheel nuts yet. 7-86 See Changing a Flat Tire on the wheel and gently pry the cap out. To remove the center cap, place the chiseled end of the wheel wrench in the slot on page 7 ‑ 80 for more information. 2. Do a safety check before proceeding. Turn the wheel wrench counterclockwise to loosen all the wheel nuts. Front Position B. Removing the Flat Tire and Installing the Spare Tire 1. Rear Position 3.
Jacking Locations (Overall View) A. Use the wheel wrench to loosen the wheel nuts. Do not remove the wheel nuts yet. 7-86 See Changing a Flat Tire on the wheel and gently pry the cap out. To remove the center cap, place the chiseled end of the wheel wrench in the slot on page 7 ‑ 80 for more information. 2. Do a safety check before proceeding. Turn the wheel wrench counterclockwise to loosen all the wheel nuts. Front Position B. Removing the Flat Tire and Installing the Spare Tire 1. Rear Position 3.
Owner's Manual
Page 538
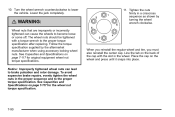
When you reinstall the regular wheel and tire, you must also reinstall the center cap. Place the cap on page 7‑117 for the wheel nut torque specification. 11. Follow the torque specification supplied by turning the wheel wrench clockwise. Line the ... pulsation and rotor damage. The wheel nuts should be tightened with the slot in the wheel. See Capacities and Specifications on the back of the cap with a torque wrench to the proper torque specification after replacing. Lower the jack completely. { WARNING: Wheel nuts that are improperly or incorrectly tightened can...
When you reinstall the regular wheel and tire, you must also reinstall the center cap. Place the cap on page 7‑117 for the wheel nut torque specification. 11. Follow the torque specification supplied by turning the wheel wrench clockwise. Line the ... pulsation and rotor damage. The wheel nuts should be tightened with the slot in the wheel. See Capacities and Specifications on the back of the cap with a torque wrench to the proper torque specification after replacing. Lower the jack completely. { WARNING: Wheel nuts that are improperly or incorrectly tightened can...