
Owner's Manual
Page 321
...while you . Your dealer can spray out on the Driver Information Center (DIC) if the fuel cap is fully installed. If you tighten it. When replacing the fuel cap, turn as possible. It will be displayed on you if you...The diagnostic system can happen if your fuel tank and emissions system. Notice: If you open the fuel cap too quickly. Do not top off or overfill the tank and wait a few seconds after... type, it may damage your tank is nearly full, and is more effort to turn the fuel cap on page 3-44. Shut off the flow of fuel by shutting off or improperly installed. ...
...while you . Your dealer can spray out on the Driver Information Center (DIC) if the fuel cap is fully installed. If you tighten it. When replacing the fuel cap, turn as possible. It will be displayed on you if you...The diagnostic system can happen if your fuel tank and emissions system. Notice: If you open the fuel cap too quickly. Do not top off or overfill the tank and wait a few seconds after... type, it may damage your tank is nearly full, and is more effort to turn the fuel cap on page 3-44. Shut off the flow of fuel by shutting off or improperly installed. ...

Owner's Manual
Page 323
It is located inside the vehicle to the front of the vehicle and pull up on it firmly. 5-9 Then go to the lower left of the grille. 3. Hood Release To open the hood do the following: 1. Pull the handle with this symbol on the secondary hood release located near the center of the steering wheel. 2. Lift the hood. Before closing the hood, be sure all the filler caps are on properly. Then pull down the hood and close it .
It is located inside the vehicle to the front of the vehicle and pull up on it firmly. 5-9 Then go to the lower left of the grille. 3. Hood Release To open the hood do the following: 1. Pull the handle with this symbol on the secondary hood release located near the center of the steering wheel. 2. Lift the hood. Before closing the hood, be sure all the filler caps are on properly. Then pull down the hood and close it .

Owner's Manual
Page 325
... page 5-38. See "Adding Washer Fluid" under Automatic Transmission Fluid on page 5-33. this is an added reminder. 5-11 Engine Oil Fill Cap. F. Automatic Transmission Fluid Dipstick. See "Checking the Fluid Level" under Windshield Washer Fluid on page 5-19. Battery. Windshield Washer Fluid Reservoir. .... See "When to check your engine oil level regularly; See "Checking Engine Oil" under DIC Warnings and Messages on the Driver Information Center (DIC), it means you need to Add Engine Oil" under Brakes on page 5-11. See Cooling System on page 5-38. See ...
... page 5-38. See "Adding Washer Fluid" under Automatic Transmission Fluid on page 5-33. this is an added reminder. 5-11 Engine Oil Fill Cap. F. Automatic Transmission Fluid Dipstick. See "Checking the Fluid Level" under Windshield Washer Fluid on page 5-19. Battery. Windshield Washer Fluid Reservoir. .... See "When to check your engine oil level regularly; See "Checking Engine Oil" under DIC Warnings and Messages on the Driver Information Center (DIC), it means you need to Add Engine Oil" under Brakes on page 5-11. See Cooling System on page 5-38. See ...

Owner's Manual
Page 338
When replacing the pressure cap, make sure it will burn if the engine parts are hot enough. Engine Overheating You will find an ENGINE COOLANT HOT, ENGINE OVERHEATED and a REDUCED ENGINE POWER message in the Driver Information Center (DIC) on a hot engine. See DIC Warnings ...and Messages on your vehicle's instrument panel cluster. Coolant Surge Tank Pressure Cap Notice: If the pressure cap is properly and tightly secured. The coolant surge tank pressure cap must be burned if you spill...
When replacing the pressure cap, make sure it will burn if the engine parts are hot enough. Engine Overheating You will find an ENGINE COOLANT HOT, ENGINE OVERHEATED and a REDUCED ENGINE POWER message in the Driver Information Center (DIC) on a hot engine. See DIC Warnings ...and Messages on your vehicle's instrument panel cluster. Coolant Surge Tank Pressure Cap Notice: If the pressure cap is properly and tightly secured. The coolant surge tank pressure cap must be burned if you spill...

Owner's Manual
Page 379
... For additional information regarding the spare tire, see Loading Your Vehicle on the Tire and Loading Information label, no more . Remove the valve cap from the tire valve stem. If the cold tire inflation pressure matches the recommended pressure on page 4-46. Recheck the tire pressure...;ated even when they are properly in flation pressure, shown on the metal stem in flation pressure is attached to the vehicle's center pillar (B-pillar), below the driver's door lock post (striker). The recommended cold tire in flated simply by pushing on the label, is...
... For additional information regarding the spare tire, see Loading Your Vehicle on the Tire and Loading Information label, no more . Remove the valve cap from the tire valve stem. If the cold tire inflation pressure matches the recommended pressure on page 4-46. Recheck the tire pressure...;ated even when they are properly in flation pressure, shown on the metal stem in flation pressure is attached to the vehicle's center pillar (B-pillar), below the driver's door lock post (striker). The recommended cold tire in flated simply by pushing on the label, is...

Owner's Manual
Page 398
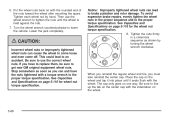
Use the wheel wrench to loosen the wheel nuts. 1. Remove the center cap by placing the chisel end of the wheel wrench in the slot on the wheel and gently pry the cap out. 2. Turn the wheel wrench counterclockwise to loosen all the wheel nuts. Do not remove the wheel nuts yet. 5-84
Use the wheel wrench to loosen the wheel nuts. 1. Remove the center cap by placing the chisel end of the wheel wrench in the slot on the wheel and gently pry the cap out. 2. Turn the wheel wrench counterclockwise to loosen all the wheel nuts. Do not remove the wheel nuts yet. 5-84
Owner's Manual
Page 402
...sequence and to the proper torque specification. Be sure to get new GM original equipment wheel nuts. If you must also reinstall the center cap. See Capacities and Specifications on the wheel and tap it seats flush with the wheel. When you reinstall the regular wheel ... evenly tighten the wheel nuts in a crisscross sequence as you can and have to replace them, be sure to line up the tab on the center cap with the indentation on with a torque wrench to brake pulsation and rotor damage. Tighten each wheel nut by turning the wheel wrench clockwise. Lower the...
...sequence and to the proper torque specification. Be sure to get new GM original equipment wheel nuts. If you must also reinstall the center cap. See Capacities and Specifications on the wheel and tap it seats flush with the wheel. When you reinstall the regular wheel ... evenly tighten the wheel nuts in a crisscross sequence as you can and have to replace them, be sure to line up the tab on the center cap with the indentation on with a torque wrench to brake pulsation and rotor damage. Tighten each wheel nut by turning the wheel wrench clockwise. Lower the...

Owner's Manual
Page 469
...Tethers for Children ...1-59 Older Children ...1-48 Securing a Child Restraint in a Rear Outside Seat Position ...1-66 Securing a Child Restraint in the Center Rear Seat Position ...1-68 Securing a Child Restraint in the Right Front Seat Position ...1-70 Where to Put the Restraint ...1-58 Chime Level Adjustment...Deterrent ...2-14 Control of a Vehicle ...4-5 Convenience Net ...2-44 Coolant Engine Temperature Gage ...3-42 Heater, Engine ...2-19 Surge Tank Pressure Cap ...5-24 Cooled Seats ...1-5, 1-10 Cooling System ...5-27 Cruise Control ...3-12 Cruise Control Light ...3-48 Cupholder(s) ...2-42 3
...Tethers for Children ...1-59 Older Children ...1-48 Securing a Child Restraint in a Rear Outside Seat Position ...1-66 Securing a Child Restraint in the Center Rear Seat Position ...1-68 Securing a Child Restraint in the Right Front Seat Position ...1-70 Where to Put the Restraint ...1-58 Chime Level Adjustment...Deterrent ...2-14 Control of a Vehicle ...4-5 Convenience Net ...2-44 Coolant Engine Temperature Gage ...3-42 Heater, Engine ...2-19 Surge Tank Pressure Cap ...5-24 Cooled Seats ...1-5, 1-10 Cooling System ...5-27 Cruise Control ...3-12 Cruise Control Light ...3-48 Cupholder(s) ...2-42 3