
Owner's Manual
Page 1
2005 Cadillac XLR Owner Manual Seats and Restraint Systems ...1-1 Front Seats ...1-2 Safety Belts ...1-5 Child Restraints ...1-19 Airbag System ...1-36 Restraint System Check ...1-48 Features and Controls ...2-1 Keys ...2-2 Doors and Locks ...2-9 Windows ...2-16 Theft-Deterrent Systems ...2-19 Starting and Operating Your Vehicle ...2-21 Mirrors ...2-34 OnStar® System ...2-36 HomeLink® Transmitter ...2-38 ...
2005 Cadillac XLR Owner Manual Seats and Restraint Systems ...1-1 Front Seats ...1-2 Safety Belts ...1-5 Child Restraints ...1-19 Airbag System ...1-36 Restraint System Check ...1-48 Features and Controls ...2-1 Keys ...2-2 Doors and Locks ...2-9 Windows ...2-16 Theft-Deterrent Systems ...2-19 Starting and Operating Your Vehicle ...2-21 Mirrors ...2-34 OnStar® System ...2-36 HomeLink® Transmitter ...2-38 ...

Owner's Manual
Page 23
... as for everyone, including pregnant women. When a safety belt is wearing them properly. 1-17 Safety Belt Use During Pregnancy Safety belts work for anyone, the key to protect the mother. The best way to protect the fetus is to making safety belts effective is worn properly, it , you slam the door...
... as for everyone, including pregnant women. When a safety belt is wearing them properly. 1-17 Safety Belt Use During Pregnancy Safety belts work for anyone, the key to protect the mother. The best way to protect the fetus is to making safety belts effective is worn properly, it , you slam the door...

Owner's Manual
Page 52
United States Canada To turn them back on to remind you know that the airbags are off position. The airbag off light on the center console will come on to the off . The airbag off light will remain off until you turn off the passenger's airbags, insert your vehicle key into the switch, push in, and move the switch to let you that the passenger's airbags are off. The passenger's airbags will stay on again. 1-46
United States Canada To turn them back on to remind you know that the airbags are off position. The airbag off light on the center console will come on to the off . The airbag off light will remain off until you turn off the passenger's airbags, insert your vehicle key into the switch, push in, and move the switch to let you that the passenger's airbags are off. The passenger's airbags will stay on again. 1-46

Owner's Manual
Page 53
... wrapped with yellow tape or yellow connectors. The airbag system does not need regular maintenance. 1-47 To turn the passenger's airbags on, insert your vehicle key into the switch, push in, and move the switch to the on your vehicle. You can still in several places around your vehicle and the...
... wrapped with yellow tape or yellow connectors. The airbag system does not need regular maintenance. 1-47 To turn the passenger's airbags on, insert your vehicle key into the switch, push in, and move the switch to the on your vehicle. You can still in several places around your vehicle and the...

Owner's Manual
Page 57
... Net ...2-44 Retractable Hardtop ...2-45 Lowering the Retractable Hardtop ...2-45 Raising the Retractable Hardtop ...2-46 Vehicle Personalization ...2-54 Memory Seat, Mirrors and Steering Wheel ...2-54 2-1 Keys ...2-2 Keyless Access System ...2-4 Keyless Access System Operation ...2-5 Doors and Locks ...2-9 Door Locks ...2-9 Power Door Locks ...2-11 Automatic Door Locks ...2-12 Programmable Automatic Door Unlock ...2-12...
... Net ...2-44 Retractable Hardtop ...2-45 Lowering the Retractable Hardtop ...2-45 Raising the Retractable Hardtop ...2-46 Vehicle Personalization ...2-54 Memory Seat, Mirrors and Steering Wheel ...2-54 2-1 Keys ...2-2 Keyless Access System ...2-4 Keyless Access System Operation ...2-5 Doors and Locks ...2-9 Door Locks ...2-9 Power Door Locks ...2-11 Automatic Door Locks ...2-12 Programmable Automatic Door Unlock ...2-12...

Owner's Manual
Page 58
A child or others could operate the power windows or other controls or even make the vehicle move. They could be badly injured or even killed. Do not leave the keyless access transmitter in the vehicle. If they started the engine and moved the shift lever out of PARK (P), that would release the parking brake. Keys {CAUTION: Leaving children unattended in a vehicle is dangerous, but it is even more dangerous if the keyless access transmitter is also left in a vehicle with children. 2-2
A child or others could operate the power windows or other controls or even make the vehicle move. They could be badly injured or even killed. Do not leave the keyless access transmitter in the vehicle. If they started the engine and moved the shift lever out of PARK (P), that would release the parking brake. Keys {CAUTION: Leaving children unattended in a vehicle is dangerous, but it is even more dangerous if the keyless access transmitter is also left in a vehicle with children. 2-2

Owner's Manual
Page 59
... has a keyless access system with the OnStar® system, OnStar® may even have a spare transmitter and/or key. So be sure you ever lose your transmitters and/or key. This key can also be used to get in. See OnStar® System on /off the passenger's airbags. You can help ...prevent theft. See Trunk on page 1-44. 2-3 In an emergency, contact Cadillac Roadside Assistance. There is a key that can have a lot of trouble getting into your vehicle if you have to damage your vehicle to turn on page 2-36 for...
... has a keyless access system with the OnStar® system, OnStar® may even have a spare transmitter and/or key. So be sure you ever lose your transmitters and/or key. This key can also be used to get in. See OnStar® System on /off the passenger's airbags. You can help ...prevent theft. See Trunk on page 1-44. 2-3 In an emergency, contact Cadillac Roadside Assistance. There is a key that can have a lot of trouble getting into your vehicle if you have to damage your vehicle to turn on page 2-36 for...

Owner's Manual
Page 62
... new transmitter, the lost or stolen, a replacement can have a recognized transmitter, do the following : 1. The vehicle must be off . 2. Turn the key five times within five seconds. 6. Place the new, unrecognized transmitter in the glove box transmitter pocket with the buttons facing to the right... the following : 1. Each vehicle can be purchased through your vehicle. Go to the rear of the vehicle and insert the vehicle key into the key cylinder located on the lower rear fascia on your vehicle when you go to your vehicle. The procedure will not work with your ...
... new transmitter, the lost or stolen, a replacement can have a recognized transmitter, do the following : 1. The vehicle must be off . 2. Turn the key five times within five seconds. 6. Place the new, unrecognized transmitter in the glove box transmitter pocket with the buttons facing to the right... the following : 1. Each vehicle can be purchased through your vehicle. Go to the rear of the vehicle and insert the vehicle key into the key cylinder located on the lower rear fascia on your vehicle when you go to your vehicle. The procedure will not work with your ...

Owner's Manual
Page 63
... MINUTES and will count down to the rear of the vehicle and insert the vehicle key into the key cylinder located on the lower rear fascia on the key cylinder. 4. The DIC will exit the programming mode. Turn the key five times within five seconds. 6. Press the ACC button. 14. At this...
... MINUTES and will count down to the rear of the vehicle and insert the vehicle key into the key cylinder located on the lower rear fascia on the key cylinder. 4. The DIC will exit the programming mode. Turn the key five times within five seconds. 6. Press the ACC button. 14. At this...

Owner's Manual
Page 68
... . These prompts allow the driver to choose various unlock settings. When the unlock portion of the button is pressed and the door is opened, the key in PARK (P) and the engine running, door unlocking can be programmed through prompts displayed on continuously. The vehicle will sound continuously. See DIC Vehicle Personalization...
... . These prompts allow the driver to choose various unlock settings. When the unlock portion of the button is pressed and the door is opened, the key in PARK (P) and the engine running, door unlocking can be programmed through prompts displayed on continuously. The vehicle will sound continuously. See DIC Vehicle Personalization...

Owner's Manual
Page 70
... button. To resume closing , do one of the following: • Press the trunk lock release button located on the instrument panel. • Use the vehicle key on the rear fascia. • Squeeze the trunk release sensor located on the rear of the trunk lid. • Press the button with the trunk...
... button. To resume closing , do one of the following: • Press the trunk lock release button located on the instrument panel. • Use the vehicle key on the rear fascia. • Squeeze the trunk release sensor located on the rear of the trunk lid. • Press the button with the trunk...

Owner's Manual
Page 71
... . 2-15 Use the emergency trunk release handle only to release the latch from the inside the trunk near the latch. Emergency Trunk Release Handle The key cylinder is a glow-in the trunk may damage it. Pull the release handle and push up on the driver's side of the vehicle. There is... on the lower rear fascia on the trunk lid to help you can still open the trunk using the key. This handle will glow following exposure to access the key cylinder. Use the key to pry open the door to light. If the vehicle has lost battery power, you open the trunk lid...
... . 2-15 Use the emergency trunk release handle only to release the latch from the inside the trunk near the latch. Emergency Trunk Release Handle The key cylinder is a glow-in the trunk may damage it. Pull the release handle and push up on the driver's side of the vehicle. There is... on the lower rear fascia on the trunk lid to help you can still open the trunk using the key. This handle will glow following exposure to access the key cylinder. Use the key to pry open the door to light. If the vehicle has lost battery power, you open the trunk lid...
Owner's Manual
Page 77
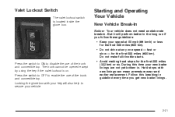
... convertible top. Locking the glove box with new linings can mean premature wear and earlier replacement. The trunk cannot be opened except by using the key if the valet lockout is located inside the glove box. Do not make full-throttle starts. Hard stops with your... key will perform better in guideline every time you follow these guidelines: • Keep your speed at 55 mph (88 km/h) or less for the fi...
... convertible top. Locking the glove box with new linings can mean premature wear and earlier replacement. The trunk cannot be opened except by using the key if the valet lockout is located inside the glove box. Do not make full-throttle starts. Hard stops with your... key will perform better in guideline every time you follow these guidelines: • Keep your speed at 55 mph (88 km/h) or less for the fi...

Owner's Manual
Page 103
... raised completely. The windows will automatically lower and the top will raise. If your radio is on page 2-13 for more information. 2-47 See Keys on page 2-2 and Trunk on , you can still raise the top manually by hand. 4. Find the hydraulic pump under the carpet on page ...until it stops. If your vehicle has a power loss, such as a dead battery, you may display a message regarding the retractable hardtop. Use the key to a new audio system equalization being loaded for more information. 3. If this happens, see DIC Warnings and Messages on the rear driver's side of ...
... raised completely. The windows will automatically lower and the top will raise. If your radio is on page 2-13 for more information. 2-47 See Keys on page 2-2 and Trunk on , you can still raise the top manually by hand. 4. Find the hydraulic pump under the carpet on page ...until it stops. If your vehicle has a power loss, such as a dead battery, you may display a message regarding the retractable hardtop. Use the key to a new audio system equalization being loaded for more information. 3. If this happens, see DIC Warnings and Messages on the rear driver's side of ...

Owner's Manual
Page 145
... time-out after about 20 seconds when the engine is opened , the interior lamps will go on when a door is turned off or the ignition key must be turned on individually by quickly turning the courtesy lamps on when entering the vehicle. You can turn on the courtesy lamps by pressing...
... time-out after about 20 seconds when the engine is opened , the interior lamps will go on when a door is turned off or the ignition key must be turned on individually by quickly turning the courtesy lamps on when entering the vehicle. You can turn on the courtesy lamps by pressing...

Owner's Manual
Page 197
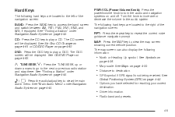
... Menu" under CD/DVD Player on page 4-45. I. ROUTE Key. L. C. DVD Key. See "Playing a DVD" under Navigation Audio System on page 4-63. TUNE/SEEK Key. Power-Volume Knob. G. Navigation System Screen H. See "Hard Keys" under Using the Navigation System on page 4-4. CD Key. E. RPT (Repeat) Key. J. See "Hard Keys" under Using the Navigation System on page 4-4. 4-3 B. D. See...
... Menu" under CD/DVD Player on page 4-45. I. ROUTE Key. L. C. DVD Key. See "Playing a DVD" under Navigation Audio System on page 4-63. TUNE/SEEK Key. Power-Volume Knob. G. Navigation System Screen H. See "Hard Keys" under Using the Navigation System on page 4-4. CD Key. E. RPT (Repeat) Key. J. See "Hard Keys" under Using the Navigation System on page 4-4. 4-3 B. D. See...

Owner's Manual
Page 198
... become familiar with voice prompts. Getting Started Before you can follow the directions given by -turn -by the system for the current conditions. 4-4 Use the keys located on page 4-45. • Plan a route with provided turn route and map guidance with it and to operate the system. See Plan Route on...
... become familiar with voice prompts. Getting Started Before you can follow the directions given by -turn -by the system for the current conditions. 4-4 Use the keys located on page 4-45. • Plan a route with provided turn route and map guidance with it and to operate the system. See Plan Route on...
Owner's Manual
Page 199
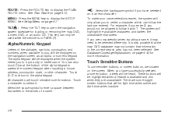
.... See Symbols on page 4-36. y TUNE/SEEK z: • Map scale. Press the audio/adjust key to view the map screen showing current vehicle position. MAP: Press the MAP key to view the main audio menu. e/ z: • Options you have selected for reaching your current destination.... • Driver Information. • Radio band and presets. 4-5 Hard Keys The following hard keys are located to the right of the navigation screen: BAND: Press the BAND key to destination. • GPS symbol if GPS signal is not being received.
.... See Symbols on page 4-36. y TUNE/SEEK z: • Map scale. Press the audio/adjust key to view the map screen showing current vehicle position. MAP: Press the MAP key to view the main audio menu. e/ z: • Options you have selected for reaching your current destination.... • Driver Information. • Radio band and presets. 4-5 Hard Keys The following hard keys are located to the right of the navigation screen: BAND: Press the BAND key to destination. • GPS symbol if GPS signal is not being received.
Owner's Manual
Page 200
... the alpha keypad to the alpha keypad. Z to return to access the numeric keypad when inputting a house address, punctuation mark, or other character. This key can follow it . See Database Coverage Explanations on page 4-45 for loading or removing the map DVD, a video DVD, or an audio CD. Touch ...space symbol to display the PLAN ROUTE menu. See Plan Route on the navigation screen as an alpha or numeric keypad. MENU: Press the MENU key to follow the last one entered. To make your name selections easier, the system will be heard. For example, if you enter Z, you ,...
... the alpha keypad to the alpha keypad. Z to return to access the numeric keypad when inputting a house address, punctuation mark, or other character. This key can follow it . See Database Coverage Explanations on page 4-45 for loading or removing the map DVD, a video DVD, or an audio CD. Touch ...space symbol to display the PLAN ROUTE menu. See Plan Route on the navigation screen as an alpha or numeric keypad. MENU: Press the MENU key to follow the last one entered. To make your name selections easier, the system will be heard. For example, if you enter Z, you ,...

Owner's Manual
Page 201
... SETUP MENU. Navigation Settings This menu allows you to the default values. Touch the Restore Default Settings screen button. 2. Setup Menu MENU: Press the MENU key located to the right of the navigation screen to exit this menu. 4-7
... SETUP MENU. Navigation Settings This menu allows you to the default values. Touch the Restore Default Settings screen button. 2. Setup Menu MENU: Press the MENU key located to the right of the navigation screen to exit this menu. 4-7


