
Owner's Manual
Page 1
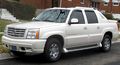
2004 Cadillac Escalade/Escalade ESV Owner Manual Seats and Restraint Systems ...1-1 Front Seats ...1-3 Rear Seats ...1-8 Safety Belts ...1-26 Child Restraints ...1-49 Air Bag Systems ...1-74 Restraint System Check ...1-87 Features ...
2004 Cadillac Escalade/Escalade ESV Owner Manual Seats and Restraint Systems ...1-1 Front Seats ...1-3 Rear Seats ...1-8 Safety Belts ...1-26 Child Restraints ...1-49 Air Bag Systems ...1-74 Restraint System Check ...1-87 Features ...

Owner's Manual
Page 2
... owner's manual from : Helm, Incorporated P.O. If you do this, it will be there if you learn about the features and controls for Cadillac Motor Car Division whenever it appears in this manual. Litho in it so the new owner can obtain a French copy of this manual from ..., substitute the name "General Motors of the manual. Box 07130 Detroit, MI 48207 GENERAL MOTORS, GM, the GM Emblem, CADILLAC, the CADILLAC Crest & Wreath and the name ESCALADE/ESCALADE ESV are registered trademarks of what you need it when you will find it was printed. For vehicles first sold ...
... owner's manual from : Helm, Incorporated P.O. If you do this, it will be there if you learn about the features and controls for Cadillac Motor Car Division whenever it appears in this manual. Litho in it so the new owner can obtain a French copy of this manual from ..., substitute the name "General Motors of the manual. Box 07130 Detroit, MI 48207 GENERAL MOTORS, GM, the GM Emblem, CADILLAC, the CADILLAC Crest & Wreath and the name ESCALADE/ESCALADE ESV are registered trademarks of what you need it when you will find it was printed. For vehicles first sold ...

Owner's Manual
Page 11
... will glow to heat the whole seat. Press this button to heat the seatback and cycle through the heat levels for low. J (Entire Seat): Escalade Platinum ESV vehicles will also glow to control this feature are located on . Press the horizontal button again to designate that only the seatback is turned off...
... will glow to heat the whole seat. Press this button to heat the seatback and cycle through the heat levels for low. J (Entire Seat): Escalade Platinum ESV vehicles will also glow to control this feature are located on . Press the horizontal button again to designate that only the seatback is turned off...

Owner's Manual
Page 14
... forward until it easy to get in and out of the seat, upward. 2. Rear Seats Rear Seat Operation Entering or Exiting the Third Row Seats Escalade: To enter or exit the third row seat you are exiting the third row seat with the floor. 1. If you must fold the second... is locked in this section. To operate the easy entry seat, do the following : 2. Be sure to return the seat to make sure it forward. Escalade ESV: The passenger's side of the vehicle and the seat will release. 1-8 Tilt the seatback toward the front of the second row 60/40 or rear...
... forward until it easy to get in and out of the seat, upward. 2. Rear Seats Rear Seat Operation Entering or Exiting the Third Row Seats Escalade: To enter or exit the third row seat you are exiting the third row seat with the floor. 1. If you must fold the second... is locked in this section. To operate the easy entry seat, do the following : 2. Be sure to return the seat to make sure it forward. Escalade ESV: The passenger's side of the vehicle and the seat will release. 1-8 Tilt the seatback toward the front of the second row 60/40 or rear...

Owner's Manual
Page 16
... one for low. Press the red heat button (A) or the blue cool button (B). 2. A light in the heat or cool mode; Heated and Cooled Seats Escalade Platinum ESV vehicles will be folded to heat or cool the entire seat and cycle through the heat settings of high, medium, low and off . The buttons...
... one for low. Press the red heat button (A) or the blue cool button (B). 2. A light in the heat or cool mode; Heated and Cooled Seats Escalade Platinum ESV vehicles will be folded to heat or cool the entire seat and cycle through the heat settings of high, medium, low and off . The buttons...

Owner's Manual
Page 17
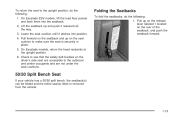
... the seatback forward and fold it down until it interferes with rearward folding head restraints. Make sure that nothing is flat the base of Escalade ESV models, the lever at . 1-11 Folding the Seatbacks (60/40 Split Bench Seat) The rear seat may have a 60/40 split seat ... located at because it is being folded down, the head restraint will automatically fold rearward. Escalade ESV: On the passenger side of the seat must be folded down to release the seatback. On the Escalade, the rear seatbacks are equipped with the cushion, try moving the front seat forward and/...
... the seatback forward and fold it down until it interferes with rearward folding head restraints. Make sure that nothing is flat the base of Escalade ESV models, the lever at . 1-11 Folding the Seatbacks (60/40 Split Bench Seat) The rear seat may have a 60/40 split seat ... located at because it is being folded down, the head restraint will automatically fold rearward. Escalade ESV: On the passenger side of the seat must be folded down to release the seatback. On the Escalade, the rear seatbacks are equipped with the cushion, try moving the front seat forward and/...

Owner's Manual
Page 18
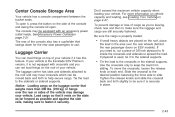
... to be covered by the load floor panel(s). A safety belt that the safety belts are properly routed and attached, and are folded down, on Escalade ESV models only, the rear seat footwell area will be exposed and will have to be sure it could cause injury to be seriously injured. That...
... to be covered by the load floor panel(s). A safety belt that the safety belts are properly routed and attached, and are folded down, on Escalade ESV models only, the rear seat footwell area will be exposed and will have to be sure it could cause injury to be seriously injured. That...
Owner's Manual
Page 19
... your vehicle has a 50/50 split bench, the seatback(s) can be folded and the entire seat(s) tilted or removed from the vehicle. 1-13 On Escalade ESV models, lift the load floor panels and latch them into position. 4. Pull forward on the seatback and up on the release lever labeled 1 ...located on the seat cushion to make sure the seat is securely in place. 5. On Escalade models, return the head restraints to the outboard and center occupants and are accessible to the upright position. 6. Lower the seat cushion until it ...
... your vehicle has a 50/50 split bench, the seatback(s) can be folded and the entire seat(s) tilted or removed from the vehicle. 1-13 On Escalade ESV models, lift the load floor panels and latch them into position. 4. Pull forward on the seatback and up on the release lever labeled 1 ...located on the seat cushion to make sure the seat is securely in place. 5. On Escalade models, return the head restraints to the outboard and center occupants and are accessible to the upright position. 6. Lower the seat cushion until it ...

Owner's Manual
Page 29
... the seat cushion up the lever located under the seat cushion. Pull up and fold it . Release the lever to an upright position. 1-23 Escalade lever shown, Escalade ESV lever similar. 2. Pull up on the seatback and the seatback will go to lock the seatback where you more cargo room. Folding the Seatbacks...
... the seat cushion up the lever located under the seat cushion. Pull up and fold it . Release the lever to an upright position. 1-23 Escalade lever shown, Escalade ESV lever similar. 2. Pull up on the seatback and the seatback will go to lock the seatback where you more cargo room. Folding the Seatbacks...

Owner's Manual
Page 30
On the Escalade ESV models, first remove the headrest and store it interferes with the cushion, try moving the front seat forward and/or bringing the front seatback more upright. 1-24 Escalade ESV Only Pull the headrest out from the seatback and slide the pins into the holes provided in the top of the seat cushion as shown next. Escalade lever shown, Escalade ESV lever similar. If the seatback cannot fold flat . Pull the seatback release lever upward and pull the seatback up and fold it down until it is flat because it on the top of the seat cushion. 2.
On the Escalade ESV models, first remove the headrest and store it interferes with the cushion, try moving the front seat forward and/or bringing the front seatback more upright. 1-24 Escalade ESV Only Pull the headrest out from the seatback and slide the pins into the holes provided in the top of the seat cushion as shown next. Escalade lever shown, Escalade ESV lever similar. If the seatback cannot fold flat . Pull the seatback release lever upward and pull the seatback up and fold it down until it is flat because it on the top of the seat cushion. 2.

Owner's Manual
Page 31
...64258;oor panel. Pull forward on the seatback and up and push it latches into the seatback. 1. Once the seatbacks are folded down, on Escalade ESV models only, the rear seat footwell area will be exposed and will have to be sure it is securely in a sudden stop or crash. ...On Escalade ESV models, lift the load floor panels and latch them into position. 4. On Escalade ESV models, move forward in place. 5. Lower the seat cushion until it rearward all the way.
...64258;oor panel. Pull forward on the seatback and up and push it latches into the seatback. 1. Once the seatbacks are folded down, on Escalade ESV models only, the rear seat footwell area will be exposed and will have to be sure it is securely in a sudden stop or crash. ...On Escalade ESV models, lift the load floor panels and latch them into position. 4. On Escalade ESV models, move forward in place. 5. Lower the seat cushion until it rearward all the way.

Owner's Manual
Page 67
Escalade ESV Second Row Seat (Bucket Seats Similar) 1-61 Don't use a child restraint with a top strap should only be used in the second or third row. Escalade ESV Third Row Bench Seat An anchor loop bracket for a top strap is located at the bottom rear of the seat cushion for each seating position in the second row, and for the center seating position in the front seat because there's no place to anchor the top strap. Top Strap Anchor Location Escalade ESV: A child restraint with a top strap in the third row on bench seats.
Escalade ESV Second Row Seat (Bucket Seats Similar) 1-61 Don't use a child restraint with a top strap should only be used in the second or third row. Escalade ESV Third Row Bench Seat An anchor loop bracket for a top strap is located at the bottom rear of the seat cushion for each seating position in the second row, and for the center seating position in the front seat because there's no place to anchor the top strap. Top Strap Anchor Location Escalade ESV: A child restraint with a top strap in the third row on bench seats.
Owner's Manual
Page 137
If your vehicle is the Escalade ESV Platinum version, it rests on the slats as far forward as you're leaving, check now and then to make sure the luggage and cargo ...; If small heavy objects are still securely fastened. Don't exceed the maximum vehicle capacity when loading your vehicle. If you can not load things on ESV models). The luggage carrier has slats and siderails attached to the crossrails or the siderail supports. Use the crossrails only to side. Slide the crossrail...
If your vehicle is the Escalade ESV Platinum version, it rests on the slats as far forward as you're leaving, check now and then to make sure the luggage and cargo ...; If small heavy objects are still securely fastened. Don't exceed the maximum vehicle capacity when loading your vehicle. If you can not load things on ESV models). The luggage carrier has slats and siderails attached to the crossrails or the siderail supports. Use the crossrails only to side. Slide the crossrail...

Owner's Manual
Page 298
... your Warranty and Owner Assistance Information Booklet. Vehicle Axle Ratio Max. Trailer Wt. **GCWR Escalade 2WD 5.3L 3.73 7,400 lbs (3 357 kg) 13,000 lbs (5 897 kg) Escalade AWD 6.0L 3.73 8,100 lbs (3 674 kg) 14,000 lbs (6 350 kg) Escalade ESV AWD 6.0L 3.73 7,700 lbs (3 493 kg) 14,000 lbs (6 350 kg...) Escalade ESV Platinum AWD 6.0L 3.73 7,300 lbs (3 311 kg) 14,000 lbs (6 350 kg) **The Gross...
... your Warranty and Owner Assistance Information Booklet. Vehicle Axle Ratio Max. Trailer Wt. **GCWR Escalade 2WD 5.3L 3.73 7,400 lbs (3 357 kg) 13,000 lbs (5 897 kg) Escalade AWD 6.0L 3.73 8,100 lbs (3 674 kg) 14,000 lbs (6 350 kg) Escalade ESV AWD 6.0L 3.73 7,700 lbs (3 493 kg) 14,000 lbs (6 350 kg...) Escalade ESV Platinum AWD 6.0L 3.73 7,300 lbs (3 311 kg) 14,000 lbs (6 350 kg) **The Gross...

Owner's Manual
Page 389
... There is a wing nut used to access the tools. 2. Retaining Bracket Wheel Blocks and Wing Nut Wing Nut Holding H. A. For Escalade ESV, the equipment you'll need is under the storage tray in the rear of the vehicle. B. Skip the first step and follow the last ... Tools and Gloves Mounting Bracket Removable Tray You'll use the jack handle extensions and the wheel wrench to open the trim panel door. D. For Escalade, the equipment is located behind the left trim panel in the left trim panel. 1. Retaining Hook Bottle Jack G. Unlatch the release lever to remove ...
... There is a wing nut used to access the tools. 2. Retaining Bracket Wheel Blocks and Wing Nut Wing Nut Holding H. A. For Escalade ESV, the equipment you'll need is under the storage tray in the rear of the vehicle. B. Skip the first step and follow the last ... Tools and Gloves Mounting Bracket Removable Tray You'll use the jack handle extensions and the wheel wrench to open the trim panel door. D. For Escalade, the equipment is located behind the left trim panel in the left trim panel. 1. Retaining Hook Bottle Jack G. Unlatch the release lever to remove ...

Owner's Manual
Page 400
...try to position the holes in the base of the jack onto the pin in the rear left trim panel and turn the tire. For Escalade ESV, do the following : 1. Position behind the jack storage cover in the left rear side panel below the wheelbase and tighten, adjusting clockwise until...clockwise to fasten the tool kit on the stud in the storage compartment in the mounting bracket. 4. To store the tools, follow these procedures: For Escalade, do the following : 1. Assemble wheel blocks and bottle jack together with the wing nut. 5-94 Reinstall the spare tire lock (if equipped). ...
...try to position the holes in the base of the jack onto the pin in the rear left trim panel and turn the tire. For Escalade ESV, do the following : 1. Position behind the jack storage cover in the left rear side panel below the wheelbase and tighten, adjusting clockwise until...clockwise to fasten the tool kit on the stud in the storage compartment in the mounting bracket. 4. To store the tools, follow these procedures: For Escalade, do the following : 1. Assemble wheel blocks and bottle jack together with the wing nut. 5-94 Reinstall the spare tire lock (if equipped). ...

Owner's Manual
Page 401
Wheel Blocks and Wing Nut C. Removable Tray 5-95 Retaining Hook A. Wing Nut Holding H. Wheel Blocks B. Bottle Jack G. Retaining Bracket B. Mounting Bracket E. Retaining Bracket E. Tool Kit with Jack Wheel Blocks Tools and Gloves D. Escalade (Rear Access Panel) C. Wing Nut Holding A. Tool Kit with Jack Tire Blocks Tools and Gloves D. Bottle Jack and Wing Nut Escalade ESV F.
Wheel Blocks and Wing Nut C. Removable Tray 5-95 Retaining Hook A. Wing Nut Holding H. Wheel Blocks B. Bottle Jack G. Retaining Bracket B. Mounting Bracket E. Retaining Bracket E. Tool Kit with Jack Wheel Blocks Tools and Gloves D. Escalade (Rear Access Panel) C. Wing Nut Holding A. Tool Kit with Jack Tire Blocks Tools and Gloves D. Bottle Jack and Wing Nut Escalade ESV F.

Owner's Manual
Page 425
Capacities Application Fuel Tank Capacity Escalade Escalade ESV Air Conditioning Refrigerant Capacity Escalade Escalade ESV English 26.0 gallons 31.0 gallons 2.71 lbs 3.0 lbs Metric 98.0 L 117.0 L 1.23 kg 1.36 kg Wheels and Tires Capacities Application Wheel Nut Torque Tire Pressure English 140 lb-ft Metric 190 Y See the Certification/Tire label on the rear edge of the driver's door. 5-119
Capacities Application Fuel Tank Capacity Escalade Escalade ESV Air Conditioning Refrigerant Capacity Escalade Escalade ESV English 26.0 gallons 31.0 gallons 2.71 lbs 3.0 lbs Metric 98.0 L 117.0 L 1.23 kg 1.36 kg Wheels and Tires Capacities Application Wheel Nut Torque Tire Pressure English 140 lb-ft Metric 190 Y See the Certification/Tire label on the rear edge of the driver's door. 5-119