
Owner's Manual
Page 135
... keep other things from the plug. If you can damage it . Pull the protective caps off of the center console. NOTICE: Adding some electrical equipment to reinstall the protective caps after you are designed for additional information on the back of the outlet to reinstall the... protective cap after you are done using the outlet. Accessory Power Outlets With accessory power outlets you...
... keep other things from the plug. If you can damage it . Pull the protective caps off of the center console. NOTICE: Adding some electrical equipment to reinstall the protective caps after you are designed for additional information on the back of the outlet to reinstall the... protective cap after you are done using the outlet. Accessory Power Outlets With accessory power outlets you...
Owner's Manual
Page 158
.... The diagnostic system can determine if the fuel cap has been left off , wait at least 10 seconds and restart the engine. A misfire increases vehicle emissions and may damage the emission control system on your vehicle. Dealer or qualified service center diagnosis and service may be wet. Find a ...steps, and drive the vehicle to do so, stop the vehicle. D Light Flashing -- If the light is safe to your dealer or qualified service center for service. If the light doesn't come on steady, see "If the Light Is On Steady" following . Avoiding steep uphill grades. See "Filling...
.... The diagnostic system can determine if the fuel cap has been left off , wait at least 10 seconds and restart the engine. A misfire increases vehicle emissions and may damage the emission control system on your vehicle. Dealer or qualified service center diagnosis and service may be wet. Find a ...steps, and drive the vehicle to do so, stop the vehicle. D Light Flashing -- If the light is safe to your dealer or qualified service center for service. If the light doesn't come on steady, see "If the Light Is On Steady" following . Avoiding steep uphill grades. See "Filling...
Owner's Manual
Page 264
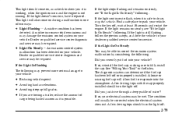
... four-way round pin connector, an adapter connector is included in place. 4-61 The cap on the wiring harness will lock onto the tab (arrow) and help hold the adapter in your dealer or a qualified service center. This harness is for an electric trailer brake controller and includes a trailer battery feed fuse...
... four-way round pin connector, an adapter connector is included in place. 4-61 The cap on the wiring harness will lock onto the tab (arrow) and help hold the adapter in your dealer or a qualified service center. This harness is for an electric trailer brake controller and includes a trailer battery feed fuse...

Owner's Manual
Page 289
Don't remove the wheel nuts yet. 5-25 Removing the Flat Tire and Installing the Spare Tire To remove the center cap place the chisel end of the wheel wrench in the slot on the wheel and gently pry out. 1. Turn the wheel wrench counterclockwise to loosen the wheel nuts.
Don't remove the wheel nuts yet. 5-25 Removing the Flat Tire and Installing the Spare Tire To remove the center cap place the chisel end of the wheel wrench in the slot on the wheel and gently pry out. 1. Turn the wheel wrench counterclockwise to loosen the wheel nuts.

Owner's Manual
Page 295
...tire where the spare tire was stored. 5-31 The cap can lead to brake pulsation and rotor damage. Be sure to the proper torque specification. Store all these in the proper sequence and to line up the tab on the center cap with the wheel. When you reinstall the full-size wheel... and tire, you must also reinstall the center cap. To avoid expensive brake repairs, evenly tighten the wheel nuts in the proper place. NOTICE: ...
...tire where the spare tire was stored. 5-31 The cap can lead to brake pulsation and rotor damage. Be sure to the proper torque specification. Store all these in the proper sequence and to line up the tab on the center cap with the wheel. When you reinstall the full-size wheel... and tire, you must also reinstall the center cap. To avoid expensive brake repairs, evenly tighten the wheel nuts in the proper place. NOTICE: ...

Owner's Manual
Page 310
Before closing the hood, be sure all filler caps are on the secondary hood release located near the center of the grill. Pull down the hood and close it firmly. 6-9 Lift the hood. Then go to the left of the steering wheel. Hood Release To open the hood, first pull the handle inside the vehicle located under and to the front of the vehicle and pull up on properly.
Before closing the hood, be sure all filler caps are on the secondary hood release located near the center of the grill. Pull down the hood and close it firmly. 6-9 Lift the hood. Then go to the left of the steering wheel. Hood Release To open the hood, first pull the handle inside the vehicle located under and to the front of the vehicle and pull up on properly.
Owner's Manual
Page 347
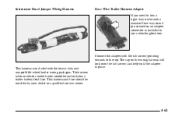
... the previous mentioned steps. Daytime Running Lamp C. Front Turn Signal, Sidemarker and Daytime Running Lamps 1. Reinstall the rubber, circular-shaped bulb cap to touch the bulb with your fingers or hands. (There is no lock for the sidemarker lamp.) 7. Front Turn Signal Lamp 8. ...that this component be replaced as described previously. 2. A. Remove the headlamp assembly as a unit. 6-46 Remove the rubber, circular-shaped bulb cap for the affected bulb from the bulb socket. 5. Remove the old bulb from the headlamp assembly. 3. Put the bulb socket into the ...
... the previous mentioned steps. Daytime Running Lamp C. Front Turn Signal, Sidemarker and Daytime Running Lamps 1. Reinstall the rubber, circular-shaped bulb cap to touch the bulb with your fingers or hands. (There is no lock for the sidemarker lamp.) 7. Front Turn Signal Lamp 8. ...that this component be replaced as described previously. 2. A. Remove the headlamp assembly as a unit. 6-46 Remove the rubber, circular-shaped bulb cap for the affected bulb from the bulb socket. 5. Remove the old bulb from the headlamp assembly. 3. Put the bulb socket into the ...

Owner's Manual
Page 399
...if they are completed at once. Inspect all pipes, fittings and clamps; replace as open seams, holes, loose connections or other qualified service center do these services may be performed at least once a year. To help ensure proper operation, a pressure test of the radiator and air ...as needed. Proper procedures to perform these jobs. See "Engine Exhaust" in the Index. Clean the outside of the cooling system and pressure cap is recommended at least twice a year (for broken, damaged, missing or out-of lubrication. Inspect the body near the exhaust system. Steering...
...if they are completed at once. Inspect all pipes, fittings and clamps; replace as open seams, holes, loose connections or other qualified service center do these services may be performed at least once a year. To help ensure proper operation, a pressure test of the radiator and air ...as needed. Proper procedures to perform these jobs. See "Engine Exhaust" in the Index. Clean the outside of the cooling system and pressure cap is recommended at least twice a year (for broken, damaged, missing or out-of lubrication. Inspect the body near the exhaust system. Steering...
