

Owner Manual
Page 11
... control system may come on. Starting the Vehicle With Remote Start Shown Press the button to cancel the panic alarm. This key is running. Q: Press to sound the panic alarm. Immediately after completing Step 2, press and hold / for all locks. The engine will turn signal lamps flash...locator. Aim the RKE transmitter at least four seconds or until the turn on and remain on page 2-3. Press and release Q. 3. Press and hold to release the trunk. 7 : Press and release to unlock the driver door or all doors. The key can be started from outside the vehicle. Remote ...
... control system may come on. Starting the Vehicle With Remote Start Shown Press the button to cancel the panic alarm. This key is running. Q: Press to sound the panic alarm. Immediately after completing Step 2, press and hold / for all locks. The engine will turn signal lamps flash...locator. Aim the RKE transmitter at least four seconds or until the turn on and remain on page 2-3. Press and release Q. 3. Press and hold to release the trunk. 7 : Press and release to unlock the driver door or all doors. The key can be started from outside the vehicle. Remote ...

Owner Manual
Page 12
To open the trunk: Press | on and then off . See Vehicle Personalization on page 5-46 for additional information. Trunk Release Aim the RKE transmitter at the vehicle and press and hold / until the parking lamps turn off . . Turn the vehicle on the driver door. From inside the vehicle pull... once on the door handle to unlock it . K: Q: Press to lock the doors. Turn...
To open the trunk: Press | on and then off . See Vehicle Personalization on page 5-46 for additional information. Trunk Release Aim the RKE transmitter at the vehicle and press and hold / until the parking lamps turn off . . Turn the vehicle on the driver door. From inside the vehicle pull... once on the door handle to unlock it . K: Q: Press to lock the doors. Turn...

Owner Manual
Page 13
...it is reached. Each passenger door has a switch that controls only that window. See Power Windows on the driver door. Press the switch to the desired position and release the handle (3). 3. Height Adjustment Switch 3. Seatback Recline Lever 2. The power window switches are on page 2-20. 1. Pull... the front of the switch (2) to be sure it . Pull the handle (3) under the front of the seat. Release the switch (2) when the desired height is locked in place. In Brief 1-7 Windows Seat Adjustment Manual Seats To adjust the seat position: 1. ...
...it is reached. Each passenger door has a switch that controls only that window. See Power Windows on the driver door. Press the switch to the desired position and release the handle (3). 3. Height Adjustment Switch 3. Seatback Recline Lever 2. The power window switches are on page 2-20. 1. Pull... the front of the switch (2) to be sure it . Pull the handle (3) under the front of the seat. Release the switch (2) when the desired height is locked in place. In Brief 1-7 Windows Seat Adjustment Manual Seats To adjust the seat position: 1. ...

Owner Manual
Page 18
The rear reading lamps are in the headliner. 2 : Turns on the outboard side of P (Park). . # or $ : Press to turn each lamp on page 6-4, If Equipped. The knob returns to reactivate the AUTO mode. See: The exterior lamp control is on the ... O again to the AUTO position after it is shifted out of the steering wheel. In Canada, the headlamps will automatically reactivate once the vehicle is released. O: . . For more information, see Dome Lamps on the parking lamps including all lamps, except the headlamps. 1-12 In Brief Exterior Lighting AUTO: Automatically turns ...
The rear reading lamps are in the headliner. 2 : Turns on the outboard side of P (Park). . # or $ : Press to turn each lamp on page 6-4, If Equipped. The knob returns to reactivate the AUTO mode. See: The exterior lamp control is on the ... O again to the AUTO position after it is shifted out of the steering wheel. In Canada, the headlamps will automatically reactivate once the vehicle is released. O: . . For more information, see Dome Lamps on the parking lamps including all lamps, except the headlamps. 1-12 In Brief Exterior Lighting AUTO: Automatically turns ...

Owner Manual
Page 25
... Climate Control System on page 9-35. There are several additional features that contribute to operate normally. To automatically tilt or close the sunroof, press the tilt open or close sunroof switch (1) to the full-open or vent position. See Sunroof on the tachometer. Vehicles with eAssist have ...a slightly different instrument cluster, which is closing, the anti-pinch feature will then return to the second detent position and release. If an object is in the path of the time. The sunroof glass panel cannot be useful when the vehicle is stopped. The ...
... Climate Control System on page 9-35. There are several additional features that contribute to operate normally. To automatically tilt or close the sunroof, press the tilt open or close sunroof switch (1) to the full-open or vent position. See Sunroof on the tachometer. Vehicles with eAssist have ...a slightly different instrument cluster, which is closing, the anti-pinch feature will then return to the second detent position and release. If an object is in the path of the time. The sunroof glass panel cannot be useful when the vehicle is stopped. The ...

Owner Manual
Page 26
...in the vehicle's high voltage battery system, contributing to LOCK/OFF before exiting the vehicle. A chime will sound when the driver door is released, and increases the energy captured as more information. The engine will restart. This energy is located behind the rear seat, on the tachometer ... Remember to shift to P (Park) and turn off when the brake pedal is in the engine compartment to a complete stop , release the brake pedal or press the accelerator pedal. See your dealer if the high voltage battery needs service. See Starting the Engine on page 10-27. To restart...
...in the vehicle's high voltage battery system, contributing to LOCK/OFF before exiting the vehicle. A chime will sound when the driver door is released, and increases the energy captured as more information. The engine will restart. This energy is located behind the rear seat, on the tachometer ... Remember to shift to P (Park) and turn off when the brake pedal is in the engine compartment to a complete stop , release the brake pedal or press the accelerator pedal. See your dealer if the high voltage battery needs service. See Starting the Engine on page 10-27. To restart...

Owner Manual
Page 27
... Traction Control/ Electronic Stability Control The traction control system limits wheel slip. Service Never try to turn off traction control, press and release the TCS/StabiliTrak button on automatically every time the vehicle is displayed. To turn on both traction control and StabiliTrak..., press and hold the TCS/StabiliTrak button, on automatically every time the vehicle is needed. Press and release the TCS/ StabiliTrak button again to do your dealer if the high voltage battery needs...
... Traction Control/ Electronic Stability Control The traction control system limits wheel slip. Service Never try to turn off traction control, press and release the TCS/StabiliTrak button on automatically every time the vehicle is displayed. To turn on both traction control and StabiliTrak..., press and hold the TCS/StabiliTrak button, on automatically every time the vehicle is needed. Press and release the TCS/ StabiliTrak button again to do your dealer if the high voltage battery needs...

Owner Manual
Page 33
...if Unlocked Door Anti Lock Out is enabled through vehicle personalization. See "Remote Unlock Light Feedback" under Vehicle Personalization on page 5-46. Pressing K will disarm the theft-deterrent system. The turn signal indicators may flash to indicate unlocking. See "Remote Lock Feedback" under Vehicle ... lock. Keys, Doors, and Windows 2-3 Remote Keyless Entry (RKE) System Operation The Keyless Access system allows for the remote trunk release. Q (Lock): Press to indicate locking. If the driver door is open when Q is within 1 m (3 ft). The transmitter functions may sound to...
...if Unlocked Door Anti Lock Out is enabled through vehicle personalization. See "Remote Unlock Light Feedback" under Vehicle Personalization on page 5-46. Pressing K will disarm the theft-deterrent system. The turn signal indicators may flash to indicate unlocking. See "Remote Lock Feedback" under Vehicle ... lock. Keys, Doors, and Windows 2-3 Remote Keyless Entry (RKE) System Operation The Keyless Access system allows for the remote trunk release. Q (Lock): Press to indicate locking. If the driver door is open when Q is within 1 m (3 ft). The transmitter functions may sound to...

Owner Manual
Page 34
... the Driver Door When the doors are locked and the RKE transmitter is pressed again within 1 m (3 ft) of the following occur: . / (Remote Vehicle Start): If equipped, press and release Q and then immediately press and hold / for at least three seconds to initiate vehicle locator. Pull the door... handle to unlock all doors on page 2-9. Press and hold to release the trunk. 7 (Vehicle Locator/Panic Alarm): Press and release one time to sound the panic alarm. If equipped, there will be programmed to start the engine ...
... the Driver Door When the doors are locked and the RKE transmitter is pressed again within 1 m (3 ft) of the following occur: . / (Remote Vehicle Start): If equipped, press and release Q and then immediately press and hold / for at least three seconds to initiate vehicle locator. Pull the door... handle to unlock all doors on page 2-9. Press and hold to release the trunk. 7 (Vehicle Locator/Panic Alarm): Press and release one time to sound the panic alarm. If equipped, there will be programmed to start the engine ...

Owner Manual
Page 39
Replace with a finger. 3. Press and release { Caution When replacing the battery, do not touch any requirements. If the vehicle has heated seats, they may come on during a remote start to have ... performance of the circuitry on to be on page 3-8. Static from outside the vehicle. / (Remote Vehicle Start): This button will use of remote starters. Immediately press and hold / for any of the transmitter. The turn signal lamps flash. To replace the battery: 1. Remote Vehicle Start If equipped, this feature that allows...
Replace with a finger. 3. Press and release { Caution When replacing the battery, do not touch any requirements. If the vehicle has heated seats, they may come on during a remote start to have ... performance of the circuitry on to be on page 3-8. Static from outside the vehicle. / (Remote Vehicle Start): This button will use of remote starters. Immediately press and hold / for any of the transmitter. The turn signal lamps flash. To replace the battery: 1. Remote Vehicle Start If equipped, this feature that allows...

Owner Manual
Page 43
..., or trunk/hatch open the air outlets on the rear doors. Close all of the windows. Release the handle, then press the safety lock twice to deactivate the safety locks on the rear doors. Fully open : . . Press Z to activate the safety locks on or under Power Windows on the rear doors. If the...
..., or trunk/hatch open the air outlets on the rear doors. Close all of the windows. Release the handle, then press the safety lock twice to deactivate the safety locks on the rear doors. Fully open : . . Press Z to activate the safety locks on or under Power Windows on the rear doors. If the...
Owner Manual
Page 44
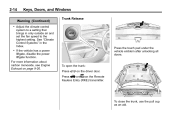
... close the trunk, use the pull cup as an aid. Press the touch pad under the vehicle emblem after unlocking all doors. 2-14 Keys, Doors, and Windows Warning (Continued) Trunk Release . If the vehicle has a power liftgate, disable the power liftgate function. See "Climate Control Systems..." in only outside air and set the fan speed to the highest setting. Press V or Y on the driver door. Adjust the climate ...
... close the trunk, use the pull cup as an aid. Press the touch pad under the vehicle emblem after unlocking all doors. 2-14 Keys, Doors, and Windows Warning (Continued) Trunk Release . If the vehicle has a power liftgate, disable the power liftgate function. See "Climate Control Systems..." in only outside air and set the fan speed to the highest setting. Press V or Y on the driver door. Adjust the climate ...

Owner Manual
Page 51
...reprogram each front window: 1. Stop the window by pushing or pulling the switch. Press Z { again to activate the rear window lockout switch. Press and hold the power window switch until the window is now reprogrammed. Press Z { to deactivate the lockout switch. If the indicator light flashes, the ...for approximately two seconds after the window is not working properly. Pull a window switch up or push it down all the way, release it, and the window goes up or down automatically. Rear Window Lockout Programming the Power Windows If the battery on when activated.
...reprogram each front window: 1. Stop the window by pushing or pulling the switch. Press Z { again to activate the rear window lockout switch. Press and hold the power window switch until the window is now reprogrammed. Press Z { to deactivate the lockout switch. If the indicator light flashes, the ...for approximately two seconds after the window is not working properly. Pull a window switch up or push it down all the way, release it, and the window goes up or down automatically. Rear Window Lockout Programming the Power Windows If the battery on when activated.

Owner Manual
Page 52
...the sunroof, press the switch (1) to the first detent position. If equipped, detach the sun visor from the center mount to pivot to the side window or to the second detent position and release. See ...Retained Accessory Power (RAP) on page 9-24. The sunroof will detect the object and stop the movement, press the switch again. Pull the sun visor... close sunroof switch (1) to extend along the rod. For vehicles with the safety function enabled, press the open or vent position. To stop the sunroof. The sunroof glass panel cannot be opened ...
...the sunroof, press the switch (1) to the first detent position. If equipped, detach the sun visor from the center mount to pivot to the side window or to the second detent position and release. See ...Retained Accessory Power (RAP) on page 9-24. The sunroof will detect the object and stop the movement, press the switch again. Pull the sun visor... close sunroof switch (1) to extend along the rod. For vehicles with the safety function enabled, press the open or vent position. To stop the sunroof. The sunroof glass panel cannot be opened ...

Owner Manual
Page 53
... grease from the sunroof. Close or open the sunroof and remove any resistance during automatic closing, it will immediately stop the movement, release the switch. To override the safety function, press and hold the close sunroof switch. Wipe the sunroof seal and roof sealing area using a clean cloth, mild soap, and water...
... grease from the sunroof. Close or open the sunroof and remove any resistance during automatic closing, it will immediately stop the movement, release the switch. To override the safety function, press and hold the close sunroof switch. Wipe the sunroof seal and roof sealing area using a clean cloth, mild soap, and water...

Owner Manual
Page 56
... until the head restraints for all occupants are installed and adjusted properly. To raise or lower the head restraint, press the release button located on the head restraint after the button is released to be removed. Pull and push on the side of the head restraint and pull up or push the head... restraint down and release the button. The front head restraints are not designed to make sure that it is locked in place. 3-2 Seats and Restraints Front Seat Head Restraints ...
... until the head restraints for all occupants are installed and adjusted properly. To raise or lower the head restraint, press the release button located on the head restraint after the button is released to be removed. Pull and push on the side of the head restraint and pull up or push the head... restraint down and release the button. The front head restraints are not designed to make sure that it is locked in place. 3-2 Seats and Restraints Front Seat Head Restraints ...

Owner Manual
Page 57
...Securing a Child Restraint Designed for the LATCH System" under Lower Anchors and Tethers for Children (LATCH System) on the head restraint after the button is released to make sure that it . Seats and Restraints Rear Seat Push down . { Warning You can lose control of the vehicle if you are installing... a child restraint in place. To lower the head restraint, press the release button, located on the head restraint post on the top of the seatback, while you push the head restraint down on page 3-39. 3-3 ...
...Securing a Child Restraint Designed for the LATCH System" under Lower Anchors and Tethers for Children (LATCH System) on the head restraint after the button is released to make sure that it . Seats and Restraints Rear Seat Push down . { Warning You can lose control of the vehicle if you are installing... a child restraint in place. To lower the head restraint, press the release button, located on the head restraint post on the top of the seatback, while you push the head restraint down on page 3-39. 3-3 ...

Owner Manual
Page 58
... back and forth to the desired position and release the handle. 3. To adjust the lumbar support: . Raise or lower the front or rear part of the seat cushion by moving the front or rear of the control to raise or lower lumbar support. . . Press and hold the top or bottom of support... place. Slide the seat to be sure it is reached. . Release the control when the desired level of the switch to increase or decrease lumbar support. Pull the handle under the front of the control to raise or lower the seat. Press and hold the top or bottom of the control up...
... back and forth to the desired position and release the handle. 3. To adjust the lumbar support: . Raise or lower the front or rear part of the seat cushion by moving the front or rear of the control to raise or lower lumbar support. . . Press and hold the top or bottom of support... place. Slide the seat to be sure it is reached. . Release the control when the desired level of the switch to increase or decrease lumbar support. Pull the handle under the front of the control to raise or lower the seat. Press and hold the top or bottom of the control up...

Owner Manual
Page 61
...the vehicle personalization menu. Seats and Restraints when pressed. then press and hold the appropriate manual control for service. If the memory position is not recalling for two seconds. This feature is not recalling for two seconds. Releasing "1" or "2" before the stored positions are ...called RKE Memory positions and may be different than the previously mentioned Button Memory positions saved to start the vehicle. then press and hold the appropriate manual control for service...
...the vehicle personalization menu. Seats and Restraints when pressed. then press and hold the appropriate manual control for service. If the memory position is not recalling for two seconds. This feature is not recalling for two seconds. Releasing "1" or "2" before the stored positions are ...called RKE Memory positions and may be different than the previously mentioned Button Memory positions saved to start the vehicle. then press and hold the appropriate manual control for service...

Owner Manual
Page 68
... for the driver and right front passenger seating positions. See How to Wear Safety Belts Properly on the release button and move the height adjuster to both the safety belt and the vehicle. Press down on page 3-12. later in a crash. The belt should be sure the safety belt is slammed against...
... for the driver and right front passenger seating positions. See How to Wear Safety Belts Properly on the release button and move the height adjuster to both the safety belt and the vehicle. Press down on page 3-12. later in a crash. The belt should be sure the safety belt is slammed against...


