

Owner Manual
Page 9
... Climate Control System on page 6-5. Air Vents on page 6-1. Turn Signal Lever. Driver Information Center (DIC) Display. Light Sensor. Exterior Lamp Controls on page 8-6. 2. Hood Release. Safety Locks on page 2-8 or Safety Locks on page 2-9.
... Climate Control System on page 6-5. Air Vents on page 6-1. Turn Signal Lever. Driver Information Center (DIC) Display. Light Sensor. Exterior Lamp Controls on page 8-6. 2. Hood Release. Safety Locks on page 2-8 or Safety Locks on page 2-9.

Owner Manual
Page 10
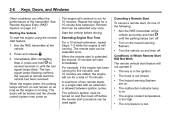
Remote Vehicle Start Press the key release button to lock driver door, all doors or, if equipped, the locking fuel door. Hazard warning flashers will flash. For vehicles with this owner manual. 7 : ...If equipped, press and hold briefly to unlock the driver door, all doors or, if equipped, the locking fuel door. Press and release Q. Q: Press to extend the key blade. Press again to sound the panic alarm. The key can be started from the vehicle. Lock and unlock feedback...
Remote Vehicle Start Press the key release button to lock driver door, all doors or, if equipped, the locking fuel door. Hazard warning flashers will flash. For vehicles with this owner manual. 7 : ...If equipped, press and hold briefly to unlock the driver door, all doors or, if equipped, the locking fuel door. Press and release Q. Q: Press to extend the key blade. Press again to sound the panic alarm. The key can be started from the vehicle. Lock and unlock feedback...

Owner Manual
Page 12
... Retained Accessory Power (RAP) is locked in the pull cup under the license plate and lift manually. Press the switch to the desired position and release the handle. 3. See Power Windows on page 2-9. Pull the handle at the front of the switch to be sure it . To adjust a manual seat...
... Retained Accessory Power (RAP) is locked in the pull cup under the license plate and lift manually. Press the switch to the desired position and release the handle. 3. See Power Windows on page 2-9. Pull the handle at the front of the switch to be sure it . To adjust a manual seat...

Owner Manual
Page 13
Release the switch when the desired level of support is locked. . Push and pull on the seatback to access the lever. 2. Move the seat forward or ... . . Raise or lower the front part of the seat cushion by sliding the control forward or rearward. Move the seatback to the desired position, then release the lever to increase or decrease lumbar support. In Brief Power Seats Lumbar Adjustment Reclining Seatbacks 1-7 To adjust a power seat: . If necessary, move the safety...
Release the switch when the desired level of support is locked. . Push and pull on the seatback to access the lever. 2. Move the seat forward or ... . . Raise or lower the front part of the seat cushion by sliding the control forward or rearward. Move the seatback to the desired position, then release the lever to increase or decrease lumbar support. In Brief Power Seats Lumbar Adjustment Reclining Seatbacks 1-7 To adjust a power seat: . If necessary, move the safety...

Owner Manual
Page 24
... to vent or close the sunroof. The sunroof will not operate if the vehicle has an electrical failure. To turn off traction control, press and release g on . To turn traction control back on the center stack. Manually close the sunroof. See Sunroof on page 9-28. 1-18 In Brief Open/Close: Press... or rear of the vehicle in the instrument cluster. The StabiliTrak system assists with directional control of switch (1) to turn off both systems. . . Press and release g again to open or close the sunshade. See Traction Control/Electronic Stability Control on page 2-18.
... to vent or close the sunroof. The sunroof will not operate if the vehicle has an electrical failure. To turn off traction control, press and release g on . To turn traction control back on the center stack. Manually close the sunroof. See Sunroof on page 9-28. 1-18 In Brief Open/Close: Press... or rear of the vehicle in the instrument cluster. The StabiliTrak system assists with directional control of switch (1) to turn off both systems. . . Press and release g again to open or close the sunshade. See Traction Control/Electronic Stability Control on page 2-18.

Owner Manual
Page 28
... ignition, inspect the key blade for the ignition and all locks. The transmitter may be blocking the signal. Check the transmitter's battery. Press the key release button on the RKE transmitter to turn the key in the RKE operating range: . Check the location. Remote Keyless Entry (RKE) System The key that...
... ignition, inspect the key blade for the ignition and all locks. The transmitter may be blocking the signal. Check the transmitter's battery. Press the key release button on the RKE transmitter to turn the key in the RKE operating range: . Check the location. Remote Keyless Entry (RKE) System The key that...
Owner Manual
Page 32
... will be extended only once. The oil pressure is too high. The remote start is on . Remote start feature will not operate if: ... Press and release Canceling a Remote Start To cancel a remote start with an extension, is in Which Remote Start Will Not Work The remote vehicle start can affect the...
... will be extended only once. The oil pressure is too high. The remote start is on . Remote start feature will not operate if: ... Press and release Canceling a Remote Start To cancel a remote start with an extension, is in Which Remote Start Will Not Work The remote vehicle start can affect the...

Owner Manual
Page 35
... liftgate, hatch/trunk open from inside . Doors Liftgate { Warning Exhaust gases can cause unconsciousness and even death. If the vehicle must be seen or smelled. Release the handle, then deactivate the safety locks to allow the door to open , or with the liftgate or hatch/trunk open the air outlets on...
... liftgate, hatch/trunk open from inside . Doors Liftgate { Warning Exhaust gases can cause unconsciousness and even death. If the vehicle must be seen or smelled. Release the handle, then deactivate the safety locks to allow the door to open , or with the liftgate or hatch/trunk open the air outlets on...
Owner Manual
Page 43
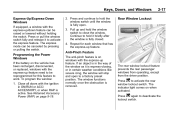
.... To program the window: 1. If an object is fully closed. 4. The indicator light comes on page 9-19. Press or pull the window switch fully and release it is on the vehicle has been recharged, disconnected, or replaced, windows with the express-up and hold the window switch to activate the rear...
.... To program the window: 1. If an object is fully closed. 4. The indicator light comes on page 9-19. Press or pull the window switch fully and release it is on the vehicle has been recharged, disconnected, or replaced, windows with the express-up and hold the window switch to activate the rear...

Owner Manual
Page 44
... center mount to pivot to the side window or to block glare. Lift the cover to open or express-close the sunroof, fully press and release the front or rear of switch (1) to ON/RUN or Retained Accessory Power (RAP) is a lighted mirror on the sun visor. If equipped, there is...
... center mount to pivot to the side window or to block glare. Lift the cover to open or express-close the sunroof, fully press and release the front or rear of switch (1) to ON/RUN or Retained Accessory Power (RAP) is a lighted mirror on the sun visor. If equipped, there is...

Owner Manual
Page 48
Try to move the head restraint after the button is released to make sure that it is a greater chance that occupants will suffer a neck/ spinal injury in a crash. Adjust the head restraint so that the top ...
Try to move the head restraint after the button is released to make sure that it is a greater chance that occupants will suffer a neck/ spinal injury in a crash. Adjust the head restraint so that the top ...

Owner Manual
Page 50
...to increase or decrease lumbar support. Lumbar Adjustment Move the seat forward or rearward by moving the front of the control up or down . Release the switch when the desired level of the seat. 2. Raise or lower the entire seat by sliding the control forward or rearward. If ...available, press the front or rear of the control up or down . . . Try to move the seat back and forth to the desired position and release the handle. 3. To adjust a manual seat: 1. Power Seat Adjustment To adjust the seatback, see Lumbar Adjustment on page 3-5. 3-4 Seats and Restraints To adjust...
...to increase or decrease lumbar support. Lumbar Adjustment Move the seat forward or rearward by moving the front of the control up or down . Release the switch when the desired level of the seat. 2. Raise or lower the entire seat by sliding the control forward or rearward. If ...available, press the front or rear of the control up or down . . . Try to move the seat back and forth to the desired position and release the handle. 3. To adjust a manual seat: 1. Power Seat Adjustment To adjust the seatback, see Lumbar Adjustment on page 3-5. 3-4 Seats and Restraints To adjust...

Owner Manual
Page 51
... in a reclined position when the vehicle is not locked, it will not be sure they are locked. Move the seatback to the desired position, then release the lever to be against your body. Lift the lever fully without applying pressure to the seatback, and the seatback returns to an upright position...
... in a reclined position when the vehicle is not locked, it will not be sure they are locked. Move the seatback to the desired position, then release the lever to be against your body. Lift the lever fully without applying pressure to the seatback, and the seatback returns to an upright position...
Owner Manual
Page 53
... the memory position again by opening the driver door and pressing the RKE transmitter K button. The driver seat and outside mirrors will activate the recall. Releasing "1" or "2" before the stored positions are called RKE Memory positions and may be different than the previously mentioned Button Memory positions saved to start the...
... the memory position again by opening the driver door and pressing the RKE transmitter K button. The driver seat and outside mirrors will activate the recall. Releasing "1" or "2" before the stored positions are called RKE Memory positions and may be different than the previously mentioned Button Memory positions saved to start the...

Owner Manual
Page 57
... seatback. Rear Seat with Retainer Hook on page 3-2. 3. See Head Restraints on the Seatback 5. Seats and Restraints 3-11 { Caution Folding the rear seatback prior to release the cushion. Always tilt the rear seat cushion forward before the seatback is clear. 2.
... seatback. Rear Seat with Retainer Hook on page 3-2. 3. See Head Restraints on the Seatback 5. Seats and Restraints 3-11 { Caution Folding the rear seatback prior to release the cushion. Always tilt the rear seat cushion forward before the seatback is clear. 2.

Owner Manual
Page 63
Position the release button on the latch plate to make sure it clicks. 4. Pick up on the buckle so that the safety belt could be quickly unbuckled if ...
Position the release button on the latch plate to make sure it clicks. 4. Pick up on the buckle so that the safety belt could be quickly unbuckled if ...

Owner Manual
Page 65
... and move the height adjuster to the desired position. To move the shoulder belt height adjuster down, push down without pushing the release button to move the height adjuster up by pushing up on a shoulder belt, the comfort guide positions the shoulder belt away from the neck and ...
... and move the height adjuster to the desired position. To move the shoulder belt height adjuster down, push down without pushing the release button to move the height adjuster up by pushing up on a shoulder belt, the comfort guide positions the shoulder belt away from the neck and ...
Owner Manual
Page 74
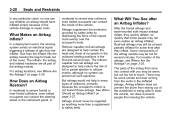
... any particular crash, no system can contact the steering wheel or the instrument panel. In a deployment event, the sensing system sends an electrical signal triggering a release of the cover. After the frontal airbags and seat-mounted side impact airbags inflate, they inflate. How Does an Airbag Restrain? 3-28 Seats and Restraints...
... any particular crash, no system can contact the steering wheel or the instrument panel. In a deployment event, the sensing system sends an electrical signal triggering a release of the cover. After the frontal airbags and seat-mounted side impact airbags inflate, they inflate. How Does an Airbag Restrain? 3-28 Seats and Restraints...

Owner Manual
Page 96
..., you will show you how. 3. When installing a rear-facing child restraint, it clicks. 3-50 Seats and Restraints forward to move the front seat 4. Position the release button on page 3-42. 1. Secure the child in this position. Do not secure the child restraint with the child restraint. Put the child restraint on...
..., you will show you how. 3. When installing a rear-facing child restraint, it clicks. 3-50 Seats and Restraints forward to move the front seat 4. Position the release button on page 3-42. 1. Secure the child in this position. Do not secure the child restraint with the child restraint. Put the child restraint on...

Owner Manual
Page 99
... belt back into the buckle until it may be helpful to use your knee to make sure the retractor is set the lock. Position the release button on the child restraint as you how. 3-53 5. The child restraint instructions will show you tighten the belt. Pull the shoulder belt all the...
... belt back into the buckle until it may be helpful to use your knee to make sure the retractor is set the lock. Position the release button on the child restraint as you how. 3-53 5. The child restraint instructions will show you tighten the belt. Pull the shoulder belt all the...