

Owner Manual
Page 1
2014 Buick Enclave Owner Manual M In Brief ...1-1 Instrument Panel ...1-2 Initial Drive Information ...1-4 Vehicle Features ...1-15 Performance and Maintenance ...1-21 Keys, Doors, and Windows ...2-1 Keys and Locks ...2-1 Doors ...2-8 Vehicle ...
2014 Buick Enclave Owner Manual M In Brief ...1-1 Instrument Panel ...1-2 Initial Drive Information ...1-4 Vehicle Features ...1-15 Performance and Maintenance ...1-21 Keys, Doors, and Windows ...2-1 Keys and Locks ...2-1 Doors ...2-8 Vehicle ...

Owner Manual
Page 2
2014 Buick Enclave Owner Manual M Vehicle Care ...10-1 General Information ...10-2 Vehicle Checks ...10-4 Headlamp Aiming ...10-27 Bulb Replacement ...10-27 Electrical System ...10-29 Wheels and ...
2014 Buick Enclave Owner Manual M Vehicle Care ...10-1 General Information ...10-2 Vehicle Checks ...10-4 Headlamp Aiming ...10-27 Bulb Replacement ...10-27 Electrical System ...10-29 Wheels and ...

Owner Manual
Page 3
Keep this manual in this manual including, but not limited to, GM, the GM logo, BUICK, the BUICK Emblem, and ENCLAVE are options that you did not purchase or due to changes subsequent to confirm each of General Motors LLC, its subsidiaries, affiliates, or licensors. iii ...: Customer Service 47911 Halyard Drive Plymouth, MI 48170 The names, logos, emblems, slogans, vehicle model names, and vehicle body designs appearing in the vehicle for Buick Motor Division wherever it appears in U.S.A. For vehicles first sold in Canada, substitute the name "General Motors of this manual.
Keep this manual in this manual including, but not limited to, GM, the GM logo, BUICK, the BUICK Emblem, and ENCLAVE are options that you did not purchase or due to changes subsequent to confirm each of General Motors LLC, its subsidiaries, affiliates, or licensors. iii ...: Customer Service 47911 Halyard Drive Plymouth, MI 48170 The names, logos, emblems, slogans, vehicle model names, and vehicle body designs appearing in the vehicle for Buick Motor Division wherever it appears in U.S.A. For vehicles first sold in Canada, substitute the name "General Motors of this manual.

Owner Manual
Page 4
Danger, Warnings, and Cautions { Caution Text marked { Caution provides information that may indicate a hazard that use the Index in the manual and the page number where it is shown when you need to injury. Disregarding this information may endanger life. Symbols are shown along with a slash through it can be found. { Warning Text marked { Warning provides information on risk of fatal injury. Disregarding this information may lead to see your owner manual for additional instructions or information. A circle with the text describing the operation or information relating ...
Danger, Warnings, and Cautions { Caution Text marked { Caution provides information that may indicate a hazard that use the Index in the manual and the page number where it is shown when you need to injury. Disregarding this information may endanger life. Symbols are shown along with a slash through it can be found. { Warning Text marked { Warning provides information on risk of fatal injury. Disregarding this information may lead to see your owner manual for additional instructions or information. A circle with the text describing the operation or information relating ...

Owner Manual
Page 5
Introduction v * : This symbol is shown when you need to the Index. 3 : Headlamp High/Low-Beam Changer j : LATCH System Child Restraints * : Malfunction Indicator Lamp : : Oil Pressure g : Outside Power Foldaway Mirrors or OnStar® (if equipped) 9 : Airbag Readiness Light ! : Antilock Brake System (ABS) % : Audio Steering Wheel Controls $ : Brake System Warning Light " : Charging System I : Cruise Control B : Engine Coolant Temperature O : Exterior Lamps # : Fog Lamps . : Fuel Gauge + : Fuses } : Power / : Remote Vehicle Start > : Safety Belt Reminders 7 : Tire Pressure Monitor _ : ...
Introduction v * : This symbol is shown when you need to the Index. 3 : Headlamp High/Low-Beam Changer j : LATCH System Child Restraints * : Malfunction Indicator Lamp : : Oil Pressure g : Outside Power Foldaway Mirrors or OnStar® (if equipped) 9 : Airbag Readiness Light ! : Antilock Brake System (ABS) % : Audio Steering Wheel Controls $ : Brake System Warning Light " : Charging System I : Cruise Control B : Engine Coolant Temperature O : Exterior Lamps # : Fog Lamps . : Fuel Gauge + : Fuses } : Power / : Remote Vehicle Start > : Safety Belt Reminders 7 : Tire Pressure Monitor _ : ...

Owner Manual
Page 6
vi Introduction 2 NOTES
vi Introduction 2 NOTES

Owner Manual
Page 7
Vehicle Features Radio(s) ...Satellite Radio ...Portable Audio Devices ...Bluetooth® ...Steering Wheel Controls ...Cruise Control ...Infotainment System ...Forward Collision Alert (FCA) System ...1-15 1-16 1-17 1-17 1-17 1-18 1-18 1-19 Performance and Maintenance Traction Control/Electronic Stability Control ...1-21 Tire Pressure Monitor ...1-21 Engine Oil Life System ...1-22 Driving for Better Fuel Economy ...1-22 Roadside Assistance Program ...1-23 OnStar® ...1-23 In Brief 1-1 1-19 1-19 1-19 1-19 1-20 1-20 1-20 In Brief Instrument Panel Instrument Panel ...1-2 Initial Drive ...
Vehicle Features Radio(s) ...Satellite Radio ...Portable Audio Devices ...Bluetooth® ...Steering Wheel Controls ...Cruise Control ...Infotainment System ...Forward Collision Alert (FCA) System ...1-15 1-16 1-17 1-17 1-17 1-18 1-18 1-19 Performance and Maintenance Traction Control/Electronic Stability Control ...1-21 Tire Pressure Monitor ...1-21 Engine Oil Life System ...1-22 Driving for Better Fuel Economy ...1-22 Roadside Assistance Program ...1-23 OnStar® ...1-23 In Brief 1-1 1-19 1-19 1-19 1-19 1-20 1-20 1-20 In Brief Instrument Panel Instrument Panel ...1-2 Initial Drive ...

Owner Manual
Page 9
Instrument Cluster on page 7-17. 6. See Auxiliary Devices on page 5-11. 4. Exterior Lamp Controls on page 6-5. 12. Data Link Connector (DLC) (Out of View). Dome Lamp Override. Instrument Panel Illumination Control on page 6-1. 8. Power Outlets on page 3-29. Tow/Haul Button (If Equipped). See Passenger Sensing System on page 5-8. 20. USB Port (Inside IP Storage). See Hood on page 5-17. 11. See Malfunction Indicator Lamp on page 10-5. 9. Cruise Control on page 5-3 (If Equipped). 16. Steering Wheel Controls on page 9-30. 13. Forward Collision Alert (FCA) System ...
Instrument Cluster on page 7-17. 6. See Auxiliary Devices on page 5-11. 4. Exterior Lamp Controls on page 6-5. 12. Data Link Connector (DLC) (Out of View). Dome Lamp Override. Instrument Panel Illumination Control on page 6-1. 8. Power Outlets on page 3-29. Tow/Haul Button (If Equipped). See Passenger Sensing System on page 5-8. 20. USB Port (Inside IP Storage). See Hood on page 5-17. 11. See Malfunction Indicator Lamp on page 10-5. 9. Cruise Control on page 5-3 (If Equipped). 16. Steering Wheel Controls on page 9-30. 13. Forward Collision Alert (FCA) System ...

Owner Manual
Page 10
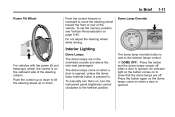
Press K again within five seconds to unlock all doors. Immediately after completing Step 2, press and hold / until the liftgate begins to lock all remaining doors. When the vehicle starts, the parking lamps will be on . Press L and release to unlock the driver door. Remote Vehicle Start Starting the Vehicle Press K to locate the vehicle. Press and release Remote Keyless Entry (RKE) System The RKE transmitter is running. Initial Drive Information This section provides a brief overview about some of the vehicle. 1. Q to move. 1-4 In Brief Press L and hold...
Press K again within five seconds to unlock all doors. Immediately after completing Step 2, press and hold / until the liftgate begins to lock all remaining doors. When the vehicle starts, the parking lamps will be on . Press L and release to unlock the driver door. Remote Vehicle Start Starting the Vehicle Press K to locate the vehicle. Press and release Remote Keyless Entry (RKE) System The RKE transmitter is running. Initial Drive Information This section provides a brief overview about some of the vehicle. 1. Q to move. 1-4 In Brief Press L and hold...

Owner Manual
Page 11
Remote start : . Turn on the window sill. Door Locks To lock or unlock a door manually: . K: Q: Press to operate it. . . . Repeat the steps for 10 minutes. Power Liftgate If equipped with a power liftgate, the vehicle must be in P (Park) and the battery must be in P (Park) to unlock the doors. From the inside, use the pull cup as an aid. From the outside, turn off . Liftgate To open the liftgate the vehicle must be extended only once. . 1-5 Canceling a Remote Start To cancel a remote start can be charged. Press the touch pad under the liftgate handle and pull up....
Remote start : . Turn on the window sill. Door Locks To lock or unlock a door manually: . K: Q: Press to operate it. . . . Repeat the steps for 10 minutes. Power Liftgate If equipped with a power liftgate, the vehicle must be in P (Park) and the battery must be in P (Park) to unlock the doors. From the inside, use the pull cup as an aid. From the outside, turn off . Liftgate To open the liftgate the vehicle must be extended only once. . 1-5 Canceling a Remote Start To cancel a remote start can be charged. Press the touch pad under the liftgate handle and pull up....

Owner Manual
Page 12
Press O. Pull the switch up to lower the window. Press the touch pad switch on page 2-17. 1. Press the switch to raise it. For more information, see Power Windows on the outside liftgate handle. See Liftgate on page 2-8. Move the seat forward or rearward by sliding the control (1) forward or rearward. Reclining Seatback Control 3. Lumbar Adjustment Control To adjust the seat: . Seat Adjustment Control 2. 1-6 In Brief Windows Seat Adjustment Power Seats . .
Press O. Pull the switch up to lower the window. Press the touch pad switch on page 2-17. 1. Press the switch to raise it. For more information, see Power Windows on the outside liftgate handle. See Liftgate on page 2-8. Move the seat forward or rearward by sliding the control (1) forward or rearward. Reclining Seatback Control 3. Lumbar Adjustment Control To adjust the seat: . Seat Adjustment Control 2. 1-6 In Brief Windows Seat Adjustment Power Seats . .

Owner Manual
Page 13
See Reclining Seatbacks on page 3-4. Pull the sliding seat lever forward; the seat cushion folds, and the seat slides forward. See Lumbar Adjustment on page 3-4. Adjust the seatback by pressing the front or rear of the control (3). Raise or lower the entire seat by moving the front of the control (1) up or down . If available, the controls on page 3-3. Increase or decrease lumbar support by tilting the top of the control (2) forward or rearward. In Brief . 1-7 Raise or lower the front part of the seat cushion by moving the rear of the control (1) up or down . ...
See Reclining Seatbacks on page 3-4. Pull the sliding seat lever forward; the seat cushion folds, and the seat slides forward. See Lumbar Adjustment on page 3-4. Adjust the seatback by pressing the front or rear of the control (3). Raise or lower the entire seat by moving the front of the control (1) up or down . If available, the controls on page 3-3. Increase or decrease lumbar support by tilting the top of the control (2) forward or rearward. In Brief . 1-7 Raise or lower the front part of the seat cushion by moving the rear of the control (1) up or down . ...

Owner Manual
Page 14
Pull up on the release lever on or under the seat. To operate, the engine must be removed. Remove anything on the back of the seat. 4. Disconnect the rear safety belt mini-latch using a key in the headliner. Heated and Cooled Front Seats 3. See Third Row Seats on the center console. Heated and Cooled Seat Buttons Shown, Heated Seat Buttons Similar If equipped, the buttons are on page 3-10. H : If equipped, press to heat the seatback only. 2. To fold the third row seatback: 1. I : If equipped, press to cool the entire seat. Push the seatback forward to heat ...
Pull up on the release lever on or under the seat. To operate, the engine must be removed. Remove anything on the back of the seat. 4. Disconnect the rear safety belt mini-latch using a key in the headliner. Heated and Cooled Front Seats 3. See Third Row Seats on the center console. Heated and Cooled Seat Buttons Shown, Heated Seat Buttons Similar If equipped, the buttons are on page 3-10. H : If equipped, press to heat the seatback only. 2. To fold the third row seatback: 1. I : If equipped, press to cool the entire seat. Push the seatback forward to heat ...

Owner Manual
Page 15
See Head Restraints on page 3-2 and Power Seat Adjustment on page 3-7. No other airbag is affected by the passenger sensing system. See Heated and Cooled Front Seats on page 3-3. United States 1-9 Safety Belts Passenger Sensing System Head Restraint Adjustment Do not drive until the head restraints for important information on how to the following sections for all occupants are installed and adjusted properly. Canada and Mexico The passenger sensing system will change the seatback recline angle as little as necessary while keeping the seat and the head restraint height in the ...
See Head Restraints on page 3-2 and Power Seat Adjustment on page 3-7. No other airbag is affected by the passenger sensing system. See Heated and Cooled Front Seats on page 3-3. United States 1-9 Safety Belts Passenger Sensing System Head Restraint Adjustment Do not drive until the head restraints for important information on how to the following sections for all occupants are installed and adjusted properly. Canada and Mexico The passenger sensing system will change the seatback recline angle as little as necessary while keeping the seat and the head restraint height in the ...

Owner Manual
Page 16
See Passenger Airbag Status Indicator on page 2-16. 1. Press (3) to fold the mirrors out to adjust the mirror. The dimming feature comes on the instrument panel when the vehicle is started . Steering Wheel Adjustment Folding Mirrors For vehicles with manual folding mirrors, push the mirror toward the vehicle. For vehicles with power folding mirrors: 1. Press the control pad to the driving position. 2. Press (1) or (2) again to its original position. The mirror will light on when the vehicle is started . Pull the lever down . 3. Move the steering wheel up to ...
See Passenger Airbag Status Indicator on page 2-16. 1. Press (3) to fold the mirrors out to adjust the mirror. The dimming feature comes on the instrument panel when the vehicle is started . Steering Wheel Adjustment Folding Mirrors For vehicles with manual folding mirrors, push the mirror toward the vehicle. For vehicles with power folding mirrors: 1. Press the control pad to the driving position. 2. Press (1) or (2) again to its original position. The mirror will light on when the vehicle is started . Pull the lever down . 3. Move the steering wheel up to ...
Owner Manual
Page 17
To set the memory position, see Vehicle Personalization on when a door is opened . To manually turn them on when a door is opened, unless the dome lamp override button is pressed in the overhead console and above the rear seat passengers. Press the button again so the dome lamps come on , turn the instrument panel brightness control clockwise to show that the dome lamps are in . Do not adjust the steering wheel while driving. An indicator light on the button comes on the outboard side of the vehicle. For vehicles with the power tilt and telescopic wheel, the control is next to ...
To set the memory position, see Vehicle Personalization on when a door is opened . To manually turn them on when a door is opened, unless the dome lamp override button is pressed in the overhead console and above the rear seat passengers. Press the button again so the dome lamps come on , turn the instrument panel brightness control clockwise to show that the dome lamps are in . Do not adjust the steering wheel while driving. An indicator light on the button comes on the outboard side of the vehicle. For vehicles with the power tilt and telescopic wheel, the control is next to ...
Owner Manual
Page 18
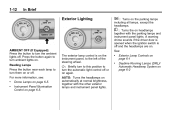
For more information, see: . . See: The exterior lamp control is off . AUTO: Turns the headlamps on page 6-5. A warning chime sounds if the driver door is opened when the ignition switch is on the instrument panel, to the left of the steering wheel. Press the button again to turn ambient lights on . O: Dome Lamps on automatically at normal brightness, together with the parking lamps and instrument panel lights. AMBIENT OFF (If Equipped): Press the button to turn the ambient lights off and the headlamps are on . Reading Lamps Press the button near each lamp to turn ...
For more information, see: . . See: The exterior lamp control is off . AUTO: Turns the headlamps on page 6-5. A warning chime sounds if the driver door is opened when the ignition switch is on the instrument panel, to the left of the steering wheel. Press the button again to turn ambient lights on . O: Dome Lamps on automatically at normal brightness, together with the parking lamps and instrument panel lights. AMBIENT OFF (If Equipped): Press the button to turn the ambient lights off and the headlamps are on . Reading Lamps Press the button near each lamp to turn ...
Owner Manual
Page 19
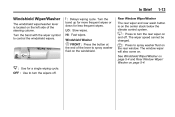
See Windshield Wiper/Washer on page 5-4 and Rear Window Wiper/ Washer on . J FRONT : Press the button at the end of the steering column. LO: Slow wipes. HI: Fast wipes. OFF : Use to control the windshield wipers. 6: Delays wiping cycle. Windshield Washer Rear Window Wiper/Washer The rear wiper and rear wash button is located on the left side of the lever to spray washer fluid on the windshield. 8: Use for less frequent wipes. The window wiper will also come on page 5-4. Turn the band with the wiper symbol to turn the rear wiper on and off . The wiper speed cannot be...
See Windshield Wiper/Washer on page 5-4 and Rear Window Wiper/ Washer on . J FRONT : Press the button at the end of the steering column. LO: Slow wipes. HI: Fast wipes. OFF : Use to control the windshield wipers. 6: Delays wiping cycle. Windshield Washer Rear Window Wiper/Washer The rear wiper and rear wash button is located on the left side of the lever to spray washer fluid on the windshield. 8: Use for less frequent wipes. The window wiper will also come on page 5-4. Turn the band with the wiper symbol to turn the rear wiper on and off . The wiper speed cannot be...
Owner Manual
Page 20
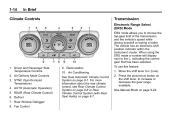
1-14 In Brief Climate Controls Transmission Electronic Range Select (ERS) Mode ERS mode allows you to the L, indicating the current gear that has been selected. 1. When using the ERS mode a number will display next to choose the top-gear limit of the transmission and the vehicle's speed while driving downhill or towing a trailer. Driver and Passenger Side Temperature Controls 2. Air Delivery Mode Controls 3. Defrost 7. To use this feature: 1. See Manual Mode on page 8-1. SYNC (Synchronized Temperature) 4. AUTO (Automatic Operation) 5. Air Conditioning See Dual Automatic ...
1-14 In Brief Climate Controls Transmission Electronic Range Select (ERS) Mode ERS mode allows you to the L, indicating the current gear that has been selected. 1. When using the ERS mode a number will display next to choose the top-gear limit of the transmission and the vehicle's speed while driving downhill or towing a trailer. Driver and Passenger Side Temperature Controls 2. Air Delivery Mode Controls 3. Defrost 7. To use this feature: 1. See Manual Mode on page 8-1. SYNC (Synchronized Temperature) 4. AUTO (Automatic Operation) 5. Air Conditioning See Dual Automatic ...

Owner Manual
Page 21
See "Home Page" in Operation on page 7-3. Press to AM, FM, SiriusXM® (if equipped), CD, USB, iPod®, or AUX. SRCE: Press to change the audio source to select a highlighted selection. See Operation on page 7-3. PUSH /O : Press to turn the system on page 7-3. © SEEK or SEEK ¨ : Seek or scan stations and tracks. D : Press to go to display the favorite list or add a favorite. FAV: Press to the Home Page. See Operation on and off. See CD Player on page 7-12. / BACK: Press to return to eject a disc from the CD player. Z: Press to the previous screen...
See "Home Page" in Operation on page 7-3. Press to AM, FM, SiriusXM® (if equipped), CD, USB, iPod®, or AUX. SRCE: Press to change the audio source to select a highlighted selection. See Operation on page 7-3. PUSH /O : Press to turn the system on page 7-3. © SEEK or SEEK ¨ : Seek or scan stations and tracks. D : Press to go to display the favorite list or add a favorite. FAV: Press to the Home Page. See Operation on and off. See CD Player on page 7-12. / BACK: Press to return to eject a disc from the CD player. Z: Press to the previous screen...
