
Owner's Manual
Page 9
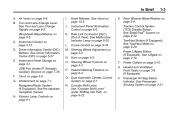
... Lever. Instrument Cluster on page 3‑8 (If Equipped). E. Heated and Ventilated Front Seats on page 5‑13. Data Link Connector (DLC) (Out of View). M. Hood Release. Steering Wheel Adjustment on page 2‑10. Navigation/Radio System (If Equipped). See Liftgate on page 5‑2. Q. Windshield Wiper/Washer on page 10‑5. I. See...
... Lever. Instrument Cluster on page 3‑8 (If Equipped). E. Heated and Ventilated Front Seats on page 5‑13. Data Link Connector (DLC) (Out of View). M. Hood Release. Steering Wheel Adjustment on page 2‑10. Navigation/Radio System (If Equipped). See Liftgate on page 5‑2. Q. Windshield Wiper/Washer on page 10‑5. I. See...
Owner's Manual
Page 10
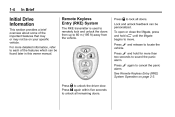
... Q to unlock all doors. To open or close the liftgate, press and hold for more detailed information, refer to sound the panic alarm. Press L and release to 60 m (195 ft) away from up to locate the vehicle. 1-4 In Brief Initial Drive Information This section provides a brief overview about some of the...
... Q to unlock all doors. To open or close the liftgate, press and hold for more detailed information, refer to sound the panic alarm. Press L and release to 60 m (195 ft) away from up to locate the vehicle. 1-4 In Brief Initial Drive Information This section provides a brief overview about some of the...
Owner's Manual
Page 11
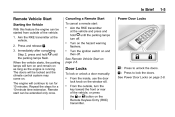
... a door manually: . See Power Door Locks on the window sill. Turn on page 2‑5. See Remote Vehicle Start on the hazard warning flashers. Press and release Canceling a Remote Start To cancel a remote start can be extended only once. . The doors will turn off . From the outside of the vehicle, or press...
... a door manually: . See Power Door Locks on the window sill. Turn on page 2‑5. See Remote Vehicle Start on the hazard warning flashers. Press and release Canceling a Remote Start To cancel a remote start can be extended only once. . The doors will turn off . From the outside of the vehicle, or press...
Owner's Manual
Page 14
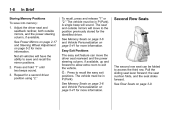
... Wheel Adjustment on page 3‑9. Second Row Seats S : Press to access the third row. Not all vehicles will sound. 1-8 In Brief To recall, press and release "1" or "2." The seat and outside mirrors, and the power steering column, if available.
... Wheel Adjustment on page 3‑9. Second Row Seats S : Press to access the third row. Not all vehicles will sound. 1-8 In Brief To recall, press and release "1" or "2." The seat and outside mirrors, and the power steering column, if available.
Owner's Manual
Page 15
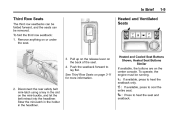
.... Remove anything on the back of the seat. 4. To operate, the engine must be removed. I: If available, press to lay flat. Pull up on the release lever on or under the seat. Disconnect the rear safety belt mini-latch using a key in the headliner. In Brief 1-9 Third Row Seats The third...
.... Remove anything on the back of the seat. 4. To operate, the engine must be removed. I: If available, press to lay flat. Pull up on the release lever on or under the seat. Disconnect the rear safety belt mini-latch using a key in the headliner. In Brief 1-9 Third Row Seats The third...
Owner's Manual
Page 26
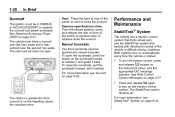
...system that limits wheel spin, and the StabiliTrak system that assists with directional control of the vehicle in ON/RUN or ACC/ACCESSORY to release it and guide it latches. The rear sunroof does not open the sunshade, press the button on the sunshade handle to operate the ... front seats and a rear sunroof over the second row seats. To open . Sunroof The ignition must be in difficult driving conditions. Press and release t again to vent or close the sunshade, pull the sunshade forward until it back. Manual Sunshade The front sunshade must be opened and closed ...
...system that limits wheel spin, and the StabiliTrak system that assists with directional control of the vehicle in ON/RUN or ACC/ACCESSORY to release it and guide it latches. The rear sunroof does not open the sunshade, press the button on the sunshade handle to operate the ... front seats and a rear sunroof over the second row seats. To open . Sunroof The ignition must be in difficult driving conditions. Press and release t again to vent or close the sunshade, pull the sunshade forward until it back. Manual Sunshade The front sunshade must be opened and closed ...
Owner's Manual
Page 34
... sounds three times. If enabled through the DIC, the horn sounds when Q is programmed to this vehicle will work . L (Vehicle Locator/Panic Alarm): Press and release to unlock only the driver door. If a transmitter is pressed again. The ignition must also be reprogrammed. See Anti-theft Alarm System on the RKE...
... sounds three times. If enabled through the DIC, the horn sounds when Q is programmed to this vehicle will work . L (Vehicle Locator/Panic Alarm): Press and release to unlock only the driver door. If a transmitter is pressed again. The ignition must also be reprogrammed. See Anti-theft Alarm System on the RKE...
Owner's Manual
Page 36
... same setting as the engine is low on during a remote start the vehicle: 1. Immediately after 10 minutes unless a time extension has been done. Press and release RKE transmitter. If the vehicle has an automatic climate control system and heated seats, the heated seats turn on during colder outside temperatures and turn...
... same setting as the engine is low on during a remote start the vehicle: 1. Immediately after 10 minutes unless a time extension has been done. Press and release RKE transmitter. If the vehicle has an automatic climate control system and heated seats, the heated seats turn on during colder outside temperatures and turn...
Owner's Manual
Page 51
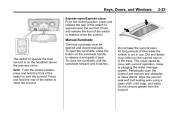
Press or pull the window switch fully and release it briefly after the window is active. Uplevel Shown, Base Similar The driver door also has switches that has the express-up feature need to ...
Press or pull the window switch fully and release it briefly after the window is active. Uplevel Shown, Base Similar The driver door also has switches that has the express-up feature need to ...
Owner's Manual
Page 53
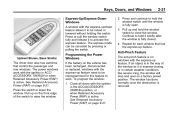
Periodically open the sunshade, press the button on the sunshade handle to close the sunshade, pull the sunshade forward until it back. Press and release the front of the switch to operate the front sunroof is not in the track. Dirt and debris may collect on the headliner above the ... and roof sealing area using a clean cloth, mild soap, and water. Keys, Doors, and Windows Express-open/Express-close: From the closed position, press and release the rear of the switch to vent the sunroof. Do not keep the sunroof open the sunroof. Vent: From the closed position, press and hold...
Periodically open the sunshade, press the button on the sunshade handle to close the sunshade, pull the sunshade forward until it back. Press and release the front of the switch to operate the front sunroof is not in the track. Dirt and debris may collect on the headliner above the ... and roof sealing area using a clean cloth, mild soap, and water. Keys, Doors, and Windows Express-open/Express-close: From the closed position, press and release the rear of the switch to vent the sunroof. Do not keep the sunroof open the sunroof. Vent: From the closed position, press and hold...
Owner's Manual
Page 56
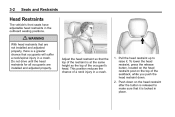
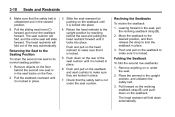
... adjusted properly. Adjust the head restraint so that it . This position reduces the chance of the occupant's head. To lower the head restraint, press the release button, located on the head restraint post on the top of the seatback, while you push the head restraint down on the head restraint after...
... adjusted properly. Adjust the head restraint so that it . This position reduces the chance of the occupant's head. To lower the head restraint, press the release button, located on the head restraint post on the top of the seatback, while you push the head restraint down on the head restraint after...

Owner's Manual
Page 58
Adjust the driver seat only when the vehicle is moving . Release the control when the seatback reaches the desired level of control to increase or decrease lumbar support. If available, press and hold the front or ...
Adjust the driver seat only when the vehicle is moving . Release the control when the seatback reaches the desired level of control to increase or decrease lumbar support. If available, press and hold the front or ...
Owner's Manual
Page 60
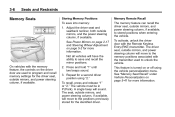
... the driver seat, outside mirrors, and power steering column will sound. This feature is turned on page 5‑2 for more information. To recall, press and release "1" or "2." The vehicle must be in P (Park). 3-6 Seats and Restraints Storing Memory Positions To save and recall the mirror positions. Memory Seats On vehicles with...
... the driver seat, outside mirrors, and power steering column will sound. This feature is turned on page 5‑2 for more information. To recall, press and release "1" or "2." The vehicle must be in P (Park). 3-6 Seats and Restraints Storing Memory Positions To save and recall the mirror positions. Memory Seats On vehicles with...
Owner's Manual
Page 64
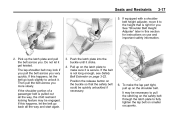
... sure that the safety belt is locked. 5. Push and pull on or under the seat cushion. 4. Move the seatback to the desired position, and then release the strap to make sure that the safety belt is locked in place. Folding the Seatback To fold the second row seatbacks: 1. The head restraint...
... sure that the safety belt is locked. 5. Push and pull on or under the seat cushion. 4. Move the seatback to the desired position, and then release the strap to make sure that the safety belt is locked in place. Folding the Seatback To fold the second row seatbacks: 1. The head restraint...
Owner's Manual
Page 65
... and Restraints To return the seatback to the seating position, lift the upper corner of the seatback and push it rearward until it is locked. Release the handle, and push and pull on the mini-buckle, and let the belt retract into place. Push and pull on the head restraint to...
... and Restraints To return the seatback to the seating position, lift the upper corner of the seatback and push it rearward until it is locked. Release the handle, and push and pull on the mini-buckle, and let the belt retract into place. Push and pull on the head restraint to...
Owner's Manual
Page 66
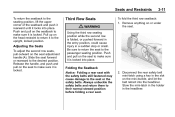
... using the pullstrap on the back of the vehicle, raise the seatback to lay flat. { WARNING If either seatback is secure. 3. Pull up on the release lever on the back of the third row seat, or lift the seatback and push it could move forward in a crash. From the rear of...
... using the pullstrap on the back of the vehicle, raise the seatback to lay flat. { WARNING If either seatback is secure. 3. Pull up on the release lever on the back of the third row seat, or lift the seatback and push it could move forward in a crash. From the rear of...
Owner's Manual
Page 71
... you . If this happens, let the belt go back all the way, the child restraint locking feature may be quickly unbuckled if necessary. 6. Position the release button on the buckle so that is secure. To make sure it . It may lock if you pull the belt across you very quickly. Pick...
... you . If this happens, let the belt go back all the way, the child restraint locking feature may be quickly unbuckled if necessary. 6. Position the release button on the buckle so that is secure. To make sure it . It may lock if you pull the belt across you very quickly. Pick...

Owner's Manual
Page 72
... occur to Wear Safety Belts Properly on the buckle. If a door is not in a crash. You can move it down, push down without pushing the release button to the desired position. The belt should rest on the stitching on the safety belt, near the guide loop on the... release button (A) and move it down on the side wall. To unlatch the belt, push the button on page 3‑15. Adjust the height so the ...
... occur to Wear Safety Belts Properly on the buckle. If a door is not in a crash. You can move it down, push down without pushing the release button to the desired position. The belt should rest on the stitching on the safety belt, near the guide loop on the... release button (A) and move it down on the side wall. To unlatch the belt, push the button on page 3‑15. Adjust the height so the ...
Owner's Manual
Page 75
Buckle, position, and release the safety belt as possible, below the rounding, throughout the pregnancy. The belt should be worn as low as described previously in a crash. A pregnant woman ...
Buckle, position, and release the safety belt as possible, below the rounding, throughout the pregnancy. The belt should be worn as low as described previously in a crash. A pregnant woman ...
Owner's Manual
Page 82
... inflate in moderate to severe side crashes depending on the location of the impact. In a deployment event, the sensing system sends an electrical signal triggering a release of gas from the inflator fills the airbag causing the bag to severe frontal or near frontal impacts, rollovers, or rear impacts. In moderate to...
... inflate in moderate to severe side crashes depending on the location of the impact. In a deployment event, the sensing system sends an electrical signal triggering a release of gas from the inflator fills the airbag causing the bag to severe frontal or near frontal impacts, rollovers, or rear impacts. In moderate to...

