

Owner's Manual
Page 1
2012 Buick Enclave Owner Manual M In Brief ...1-1 Instrument Panel ...1-2 Initial Drive Information ...1-4 Vehicle Features ...1-15 Performance and Maintenance ...1-20 Keys, Doors, and Windows ...2-1 ......4-1 Storage Compartments ...4-1 Additional Storage Features ...4-4 Roof Rack System ...4-5 Instruments and Controls ...5-1 Controls ...5-2 Warning Lights, Gauges, and Indicators ...5-12 Information Displays ...5-27 Vehicle Messages ...5-31 Vehicle Personalization ...5-41 Universal Remote System ...5-49 Lighting ...6-1 Exterior Lighting ...6-1 Interior Lighting ...6-6 Lighting Features ...6-7 ...
2012 Buick Enclave Owner Manual M In Brief ...1-1 Instrument Panel ...1-2 Initial Drive Information ...1-4 Vehicle Features ...1-15 Performance and Maintenance ...1-20 Keys, Doors, and Windows ...2-1 ......4-1 Storage Compartments ...4-1 Additional Storage Features ...4-4 Roof Rack System ...4-5 Instruments and Controls ...5-1 Controls ...5-2 Warning Lights, Gauges, and Indicators ...5-12 Information Displays ...5-27 Vehicle Messages ...5-31 Vehicle Personalization ...5-41 Universal Remote System ...5-49 Lighting ...6-1 Exterior Lighting ...6-1 Interior Lighting ...6-6 Lighting Features ...6-7 ...

Owner's Manual
Page 2
2012 Buick Enclave Owner Manual M Vehicle Care ...10-1 General Information ...10-2 Vehicle Checks ...10-4 Headlamp Aiming ...10-28 Bulb Replacement ...10-29 Electrical System ...10-31 Wheels and Tires ...10-38 Jump Starting ...10-79 Towing ...10-83 Appearance Care ...10-86 Service and Maintenance ...11-1 General Information...11-12 Maintenance Records ...11-15 Technical Data ...12-1 Vehicle Identification ...12-1 Vehicle Data ...12-2 Customer Information ...13-1 Customer Information ...13-1 Reporting Safety Defects ...13-19 Vehicle Data Recording and Privacy...13-21 OnStar ...14-1 OnStar Overview...
2012 Buick Enclave Owner Manual M Vehicle Care ...10-1 General Information ...10-2 Vehicle Checks ...10-4 Headlamp Aiming ...10-28 Bulb Replacement ...10-29 Electrical System ...10-31 Wheels and Tires ...10-38 Jump Starting ...10-79 Towing ...10-83 Appearance Care ...10-86 Service and Maintenance ...11-1 General Information...11-12 Maintenance Records ...11-15 Technical Data ...12-1 Vehicle Identification ...12-1 Vehicle Data ...12-2 Customer Information ...13-1 Customer Information ...13-1 Reporting Safety Defects ...13-19 Vehicle Data Recording and Privacy...13-21 OnStar ...14-1 OnStar Overview...
Owner's Manual
Page 4
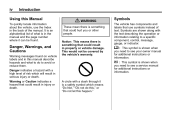
Symbols The vehicle has components and labels that could hurt you need to see your owner manual for additional instructions or information. * : This symbol is something that use the Index in the back of risk which means "Do Not," "Do not do to a specific component, ...control, message, gauge, or indicator. Symbols are shown along with the text describing the operation or information relating to avoid or reduce them. iv Introduction Using this Manual To quickly locate information about the vehicle, use symbols instead of text. This would not be found on vehicle labels and in...
Symbols The vehicle has components and labels that could hurt you need to see your owner manual for additional instructions or information. * : This symbol is something that use the Index in the back of risk which means "Do Not," "Do not do to a specific component, ...control, message, gauge, or indicator. Symbols are shown along with the text describing the operation or information relating to avoid or reduce them. iv Introduction Using this Manual To quickly locate information about the vehicle, use symbols instead of text. This would not be found on vehicle labels and in...

Owner's Manual
Page 5
... # : Fog Lamps . : Fuel Gauge } : Power / : Remote Vehicle Start > : Safety Belt Reminders 7 : Tire Pressure Monitor _ : Tow/Haul Mode t : Traction Control/StabiliTrak M : Windshield Washer Fluid For more information on the vehicle and what they mean. Introduction Vehicle Symbol Chart Here are some additional symbols that may be found on the symbol, refer to...
... # : Fog Lamps . : Fuel Gauge } : Power / : Remote Vehicle Start > : Safety Belt Reminders 7 : Tire Pressure Monitor _ : Tow/Haul Mode t : Traction Control/StabiliTrak M : Windshield Washer Fluid For more information on the vehicle and what they mean. Introduction Vehicle Symbol Chart Here are some additional symbols that may be found on the symbol, refer to...
Owner's Manual
Page 7
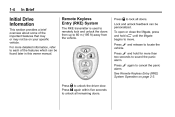
In Brief 1-1 1-18 1-18 1-19 1-19 1-19 1-20 In Brief Instrument Panel Instrument Panel ...1-2 Initial Drive Information Initial Drive Information ...1-4 Remote Keyless Entry (RKE) System ...1-4 Remote Vehicle Start ...1-5 Door Locks ...1-5 Liftgate ...1-6 Windows ...1-6 Seat Adjustment ...1-7 Memory Features ...1-7 Second Row Seats ...1-8 Third Row Seats ...1-9 Heated and Ventilated ...
In Brief 1-1 1-18 1-18 1-19 1-19 1-19 1-20 In Brief Instrument Panel Instrument Panel ...1-2 Initial Drive Information Initial Drive Information ...1-4 Remote Keyless Entry (RKE) System ...1-4 Remote Vehicle Start ...1-5 Door Locks ...1-5 Liftgate ...1-6 Windows ...1-6 Seat Adjustment ...1-7 Memory Features ...1-7 Second Row Seats ...1-8 Third Row Seats ...1-9 Heated and Ventilated ...
Owner's Manual
Page 9
...8209;34. H. Exterior Lamp Controls on page 5‑6. Rear Window Wiper/Washer on page 6‑1. U. Console Shift Lever. See Driver Information Center (DIC) on page 3‑31. Navigation/Radio System (If Equipped). I. V. See Passenger Sensing System on page 5‑27. ...and Ventilated Front Seats on page 8‑1. M. Dual Automatic Climate Control System on page 3‑8 (If Equipped). C. Driver Information Center (DIC) Buttons. Auxiliary Devices on page 7‑1. Infotainment on page 7‑38 F. J. See StabiliTrak® System on...
...8209;34. H. Exterior Lamp Controls on page 5‑6. Rear Window Wiper/Washer on page 6‑1. U. Console Shift Lever. See Driver Information Center (DIC) on page 3‑31. Navigation/Radio System (If Equipped). I. V. See Passenger Sensing System on page 5‑27. ...and Ventilated Front Seats on page 8‑1. M. Dual Automatic Climate Control System on page 3‑8 (If Equipped). C. Driver Information Center (DIC) Buttons. Auxiliary Devices on page 7‑1. Infotainment on page 7‑38 F. J. See StabiliTrak® System on...
Owner's Manual
Page 10
... features which can be on page 2‑3. Press Q to lock all remaining doors. To open or close the liftgate, press and hold for more detailed information, refer to unlock all doors. Press L and hold 8 until the liftgate begins to sound the panic alarm. Press L and release to cancel the panic alarm...
... features which can be on page 2‑3. Press Q to lock all remaining doors. To open or close the liftgate, press and hold for more detailed information, refer to unlock all doors. Press L and hold 8 until the liftgate begins to sound the panic alarm. Press L and release to cancel the panic alarm...
Owner's Manual
Page 12
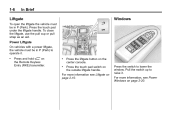
To close the liftgate, use the pull cup or pull strap as an aid. For more information, see Liftgate on page 2‑20. . Press the switch to raise it . . For more information see Power Windows on page 2‑10. 1-6 In Brief Liftgate To open the liftgate the vehicle must be in P (Park) to...
To close the liftgate, use the pull cup or pull strap as an aid. For more information, see Liftgate on page 2‑20. . Press the switch to raise it . . For more information see Power Windows on page 2‑10. 1-6 In Brief Liftgate To open the liftgate the vehicle must be in P (Park) to...
Owner's Manual
Page 14
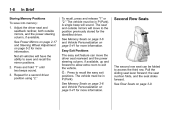
...identified driver. See Memory Seats on page 3‑6 and Vehicle Personalization on page 3‑9. See Rear Seats on page 5‑41 for more information. A single beep will move the driver seat rearward and the power steering column, if available, up and forward to allow extra room to ...to access the third row. See Power Mirrors on page 2‑17 and Steering Wheel Adjustment on page 5‑41 for more information. Repeat for more information. The second row seat can move to recall the easy exit positions. Pull the sliding seat lever forward; See Memory Seats ...
...identified driver. See Memory Seats on page 3‑6 and Vehicle Personalization on page 3‑9. See Rear Seats on page 5‑41 for more information. A single beep will move the driver seat rearward and the power steering column, if available, up and forward to allow extra room to ...to access the third row. See Power Mirrors on page 2‑17 and Steering Wheel Adjustment on page 5‑41 for more information. Repeat for more information. The second row seat can move to recall the easy exit positions. Pull the sliding seat lever forward; See Memory Seats ...
Owner's Manual
Page 15
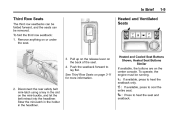
..., press to lay flat. Heated and Cooled Seat Buttons Shown, Heated Seat Buttons Similar If available, the buttons are on page 3‑11 for more information. Stow the mini-latch in the holder in the slot on or under the seat. Push the seatback forward to cool the entire seat. I: If...
..., press to lay flat. Heated and Cooled Seat Buttons Shown, Heated Seat Buttons Similar If available, the buttons are on page 3‑11 for more information. Stow the mini-latch in the holder in the slot on or under the seat. Push the seatback forward to cool the entire seat. I: If...
Owner's Manual
Page 16
See Heated and Ventilated Front Seats on page 3‑8 for important information on how to the following sections for more information see Head Restraints on page 3‑2 and Power Seat Adjustment on page 3‑3. For more information. Refer to use safety belts properly: . . The lights indicate three for the highest setting and one for...
See Heated and Ventilated Front Seats on page 3‑8 for important information on how to the following sections for more information see Head Restraints on page 3‑2 and Power Seat Adjustment on page 3‑3. For more information. Refer to use safety belts properly: . . The lights indicate three for the highest setting and one for...
Owner's Manual
Page 17
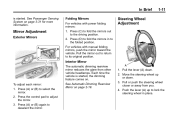
... dimming feature comes on. Press (A) or (B) again to adjust the mirror. 3. To adjust each mirror: 1. See Passenger Sensing System on page 3‑31 for more information. 1-11 Folding Mirrors For vehicles with manual folding mirrors, push the mirror toward the vehicle. In Brief is started . Press (A) or (B) to fold the mirrors...
... dimming feature comes on. Press (A) or (B) again to adjust the mirror. 3. To adjust each mirror: 1. See Passenger Sensing System on page 3‑31 for more information. 1-11 Folding Mirrors For vehicles with manual folding mirrors, push the mirror toward the vehicle. In Brief is started . Press (A) or (B) to fold the mirrors...

Owner's Manual
Page 19
...8209;6. ; : Manual operation of the parking lamps and other exterior lamps. 5 : Manual operation of the headlamps and other exterior lamps. For more information, see : . Daytime Running Lamps (DRL)/ Automatic Headlamp System on or off the fog lamps (if equipped). Turn the band with the wiper symbol ...each lamp to turn them on page 6‑5. Fog Lamps on or off . 6 : Delays wiping cycle. Dome Lamps on page 6‑6. For more information, see : . . 1-13 AUTO: Automatic operation of the headlamps at normal brightness and other exterior lamps. # : Use to turn on the left of...
...8209;6. ; : Manual operation of the parking lamps and other exterior lamps. 5 : Manual operation of the headlamps and other exterior lamps. For more information, see : . Daytime Running Lamps (DRL)/ Automatic Headlamp System on or off the fog lamps (if equipped). Turn the band with the wiper symbol ...each lamp to turn them on page 6‑5. Fog Lamps on or off . 6 : Delays wiping cycle. Dome Lamps on page 6‑6. For more information, see : . . 1-13 AUTO: Automatic operation of the headlamps at normal brightness and other exterior lamps. # : Use to turn on the left of...

Owner's Manual
Page 20
Z : Press to turn signal/lane change lever to spray washer fluid on page 8‑1. A. Power (On/Off) J. Driver Side Temperature Control H. For more information about the rear climate control, see Rear Climate Control System (Rear Climate Control Only) See Windshield Wiper/Washer on page 5‑5 and Rear Window Wiper/...
Z : Press to turn signal/lane change lever to spray washer fluid on page 8‑1. A. Power (On/Off) J. Driver Side Temperature Control H. For more information about the rear climate control, see Rear Climate Control System (Rear Climate Control Only) See Windshield Wiper/Washer on page 5‑5 and Rear Window Wiper/...

Owner's Manual
Page 22
...Station A maximum of programming and commercial-free music, coast to coast, and in the 48 contiguous United States and 10 Canadian provinces. For more information. XM Satellite Radio Service XM is off, press 4 to turn f clockwise or counterclockwise. XM satellite radio has a wide variety of 36 ... or ¨ : Seek or scan stations. 4 : Change the display between the radio station frequency and the time, if equipped. For more information refer to be stored as favorites using the six softkeys located below the radio station frequency tabs and by using the radio FAV button. 1-16...
...Station A maximum of programming and commercial-free music, coast to coast, and in the 48 contiguous United States and 10 Canadian provinces. For more information. XM Satellite Radio Service XM is off, press 4 to turn f clockwise or counterclockwise. XM satellite radio has a wide variety of 36 ... or ¨ : Seek or scan stations. 4 : Change the display between the radio station frequency and the time, if equipped. For more information refer to be stored as favorites using the six softkeys located below the radio station frequency tabs and by using the radio FAV button. 1-16...
Owner's Manual
Page 23
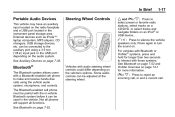
... depending on the radio faceplate and a USB port located in the vehicle. For vehicles with Bluetooth or OnStar® systems, press and hold for more information. Some audio controls can be adjusted at the steering wheel. c / x : Press to silence the vehicle speakers only. See Auxiliary Devices on page 14‑1 for...
... depending on the radio faceplate and a USB port located in the vehicle. For vehicles with Bluetooth or OnStar® systems, press and hold for more information. Some audio controls can be adjusted at the steering wheel. c / x : Press to silence the vehicle speakers only. See Auxiliary Devices on page 14‑1 for...
Owner's Manual
Page 24
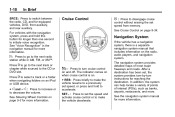
... front auxiliary, and rear auxiliary. The navigation system provides detailed maps of interest (POIs), such as banks, airports, restaurants, and more information. In addition, the system can help locate a variety of points of most major freeways and roads. T : Press to the next ...navigation system, press and hold to initiate voice recognition. The indicator comes on when cruise control is a separate navigation system manual that includes information on . + RES: Press briefly to set speed from memory. SET- : Press to make the vehicle decelerate. See "Voice Recognition"...
... front auxiliary, and rear auxiliary. The navigation system provides detailed maps of interest (POIs), such as banks, airports, restaurants, and more information. In addition, the system can help locate a variety of points of most major freeways and roads. T : Press to the next ...navigation system, press and hold to initiate voice recognition. The indicator comes on when cruise control is a separate navigation system manual that includes information on . + RES: Press briefly to set speed from memory. SET- : Press to make the vehicle decelerate. See "Voice Recognition"...
Owner's Manual
Page 25
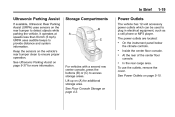
...power outlets are located: . For vehicles with a second row center console, press the buttons (B) or (C) to provide distance and system information. On the instrument panel below the climate controls. See Floor Console Storage on page 9‑37 for additional storage area. At the rear ...of the center floor console. See Power Outlets on (A) for more information. In Brief 1-19 Ultrasonic Parking Assist If available, Ultrasonic Rear Parking Assist (URPA) uses sensors on the rear bumper to ensure proper...
...power outlets are located: . For vehicles with a second row center console, press the buttons (B) or (C) to provide distance and system information. On the instrument panel below the climate controls. See Floor Console Storage on page 9‑37 for additional storage area. At the rear ...of the center floor console. See Power Outlets on (A) for more information. In Brief 1-19 Ultrasonic Parking Assist If available, Ultrasonic Rear Parking Assist (URPA) uses sensors on the rear bumper to ensure proper...
Owner's Manual
Page 26
1-20 In Brief Vent: Press the front or rear of the switch to express-open or express-close the sunroof. For more information, see Sunroof on the traction control system. See Retained Accessory Power (RAP) on the headliner above the rearview mirror. The vehicle may have a ...the StabiliTrak system that assists with directional control of the vehicle in ON/RUN or ACC/ACCESSORY to turn on page 9‑32. For more information see StabiliTrak® System on automatically every time the vehicle is on page 9‑21. Both systems turn on page 2‑22. The StabiliTrak...
1-20 In Brief Vent: Press the front or rear of the switch to express-open or express-close the sunroof. For more information, see Sunroof on the traction control system. See Retained Accessory Power (RAP) on the headliner above the rearview mirror. The vehicle may have a ...the StabiliTrak system that assists with directional control of the vehicle in ON/RUN or ACC/ACCESSORY to turn on page 9‑32. For more information see StabiliTrak® System on automatically every time the vehicle is on page 9‑21. Both systems turn on page 2‑22. The StabiliTrak...

Owner's Manual
Page 27
... inflated to a significant loss in the tread area of the vehicle's tires. The warning light will remain on page 10‑62 for complete operating information. The TPMS warning light alerts you to the proper pressure. See Tire Sealant and Compressor Kit on until the tire pressure is corrected. The TPMS... 1-21 Tire Pressure Monitor This vehicle may come with a spare tire and tire changing equipment, see If a Tire Goes Flat on the Tire and Loading Information label.
... inflated to a significant loss in the tread area of the vehicle's tires. The warning light will remain on page 10‑62 for complete operating information. The TPMS warning light alerts you to the proper pressure. See Tire Sealant and Compressor Kit on until the tire pressure is corrected. The TPMS... 1-21 Tire Pressure Monitor This vehicle may come with a spare tire and tire changing equipment, see If a Tire Goes Flat on the Tire and Loading Information label.
