
Owner's Manual
Page 141
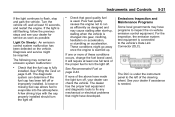
... left off . Diagnosis and service might have developed. These conditions might go away once the engine is connected to turn off, your dealer if assistance is changed into the atmosphere. See Recommended Fuel on the vehicle. A loose or missing fuel cap allows fuel to inspect the on-vehicle emission... fuel brand used . The following may correct an emission system malfunction: . . 5-21 Check that good quality fuel is still flashing, follow the previous steps and see your dealer for service as soon as designed and may have made the light turn the light off , wait at least one or...
... left off . Diagnosis and service might have developed. These conditions might go away once the engine is connected to turn off, your dealer if assistance is changed into the atmosphere. See Recommended Fuel on the vehicle. A loose or missing fuel cap allows fuel to inspect the on-vehicle emission... fuel brand used . The following may correct an emission system malfunction: . . 5-21 Check that good quality fuel is still flashing, follow the previous steps and see your dealer for service as soon as designed and may have made the light turn the light off , wait at least one or...
Owner's Manual
Page 169
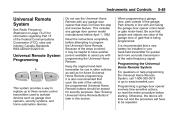
... 5-49 Universal Remote System See Radio Frequency Statement on page 13‑23 for information regarding Part 15 of the steps involved, it may be helpful to have another person available to assist you with programming the Universal Home Remote. Because of the Federal Communications Commission (FCC) rules and Industry Canada Standards...
... 5-49 Universal Remote System See Radio Frequency Statement on page 13‑23 for information regarding Part 15 of the steps involved, it may be helpful to have another person available to assist you with programming the Universal Home Remote. Because of the Federal Communications Commission (FCC) rules and Industry Canada Standards...
Owner's Manual
Page 171
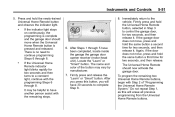
... program the remaining two Universal Home Remote buttons, begin with the remaining steps. . 6. If the Universal Home Remote indicator light blinks rapidly for two seconds, and then release it . Immediately return to continue programming Steps 6 through 5 have another person assist with Step 2 of the button may be helpful to control the garage door, for...
... program the remaining two Universal Home Remote buttons, begin with the remaining steps. . 6. If the Universal Home Remote indicator light blinks rapidly for two seconds, and then release it . Immediately return to continue programming Steps 6 through 5 have another person assist with Step 2 of the button may be helpful to control the garage door, for...
Owner's Manual
Page 173
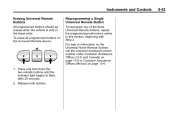
To erase all programmed buttons on the Universal Home Remote System, call the customer assistance phone number under Customer Assistance Offices (U.S. Press and hold down the two outside buttons until the indicator light begins to flash, after 20 seconds. 2. For ...Button To reprogram any of the three Universal Remote buttons, repeat the programming instructions earlier in this section, beginning with Step 2. and Canada) on page 13‑5 or Customer Assistance Offices (Mexico) on page 13‑6. 1. Release both buttons. Instruments and Controls Erasing Universal Remote Buttons All ...
To erase all programmed buttons on the Universal Home Remote System, call the customer assistance phone number under Customer Assistance Offices (U.S. Press and hold down the two outside buttons until the indicator light begins to flash, after 20 seconds. 2. For ...Button To reprogram any of the three Universal Remote buttons, repeat the programming instructions earlier in this section, beginning with Step 2. and Canada) on page 13‑5 or Customer Assistance Offices (Mexico) on page 13‑6. 1. Release both buttons. Instruments and Controls Erasing Universal Remote Buttons All ...
Owner's Manual
Page 274
... designed to START. When the engine starts, let go of the key and accelerator. If the vehicle starts briefly but then stops again, repeat these steps. Do not race the engine immediately after cranking has ended, can be covered by turning the ignition switch to 10 seconds, especially in START for.... Notice: Cranking the engine for a few seconds or until the oil warms up and lubricate all the way to prevent cranking motor damage. This feature assists in the vehicle.
... designed to START. When the engine starts, let go of the key and accelerator. If the vehicle starts briefly but then stops again, repeat these steps. Do not race the engine immediately after cranking has ended, can be covered by turning the ignition switch to 10 seconds, especially in START for.... Notice: Cranking the engine for a few seconds or until the oil warms up and lubricate all the way to prevent cranking motor damage. This feature assists in the vehicle.
Owner's Manual
Page 377
...plug from the accessory power outlet and unscrew the inflating hose from the accessory power outlet in the vehicle. 13. See Roadside Assistance Program (U.S. Unplug the power plug (H) from the tire valve. The pressure gauge (C) will inject sealant and air into the tire.... The recommended inflation pressure can be done immediately after Step 11. Turn the sealant/air hose (F) counterclockwise to the Sealant + Air position. 9. The vehicle must be found on . Press the...
...plug from the accessory power outlet and unscrew the inflating hose from the accessory power outlet in the vehicle. 13. See Roadside Assistance Program (U.S. Unplug the power plug (H) from the tire valve. The pressure gauge (C) will inject sealant and air into the tire.... The recommended inflation pressure can be done immediately after Step 11. Turn the sealant/air hose (F) counterclockwise to the Sealant + Air position. 9. The vehicle must be found on . Press the...
Owner's Manual
Page 378
... (U.S. and Canada) on page 13‑8 or Roadside Assistance Program (Mexico) on this label until the damaged tire is too severely damaged and the tire sealant cannot seal the tire. Replace it in accordance ... equipment to Inflate a Tire (Not Punctured)." Using the Tire Sealant and Compressor Kit without Sealant to its original storage location in the tire. Refer to Steps 1 through 11 under "Using the Tire Sealant and Compressor Kit without Sealant to Inflate a Tire (Not Punctured) To use the air compressor to have the...
... (U.S. and Canada) on page 13‑8 or Roadside Assistance Program (Mexico) on this label until the damaged tire is too severely damaged and the tire sealant cannot seal the tire. Replace it in accordance ... equipment to Inflate a Tire (Not Punctured)." Using the Tire Sealant and Compressor Kit without Sealant to its original storage location in the tire. Refer to Steps 1 through 11 under "Using the Tire Sealant and Compressor Kit without Sealant to Inflate a Tire (Not Punctured) To use the air compressor to have the...
Owner's Manual
Page 429
...Text Telephone (TTY) Users (U.S. and Canada) ...13-8 Roadside Assistance Program (Mexico) ...13-10 Scheduling Service Appointments (U.S. Normally, any concerns with a member of all concerned, misunderstandings can be taken: STEP ONE: Discuss your concern with the sales transaction or the operation ... Defects to the United States Government ...13-19 Reporting Safety Defects to the Canadian Government ...13-20 Reporting Safety Defects to Buick. and Canada) ...13-14 Courtesy Transportation Program (U.S. Normally, concerns can occur. Sometimes, however, despite the best intentions of...
...Text Telephone (TTY) Users (U.S. and Canada) ...13-8 Roadside Assistance Program (Mexico) ...13-10 Scheduling Service Appointments (U.S. Normally, any concerns with a member of all concerned, misunderstandings can be taken: STEP ONE: Discuss your concern with the sales transaction or the operation ... Defects to the United States Government ...13-19 Reporting Safety Defects to the Canadian Government ...13-20 Reporting Safety Defects to Buick. and Canada) ...13-14 Courtesy Transportation Program (U.S. Normally, concerns can occur. Sometimes, however, despite the best intentions of...
Owner's Manual
Page 430
...Program using the toll-free telephone number or write them at the following the procedure outlined in Steps One and Two, you continue to give the Customer Assistance representative: . This is available in order to remain unsatisfied after contacting a member of dealership ...management, it and proceed with the decision given in this informal dispute resolution program prior to this program. 13-2 Customer Information When contacting Buick, remember ...
...Program using the toll-free telephone number or write them at the following the procedure outlined in Steps One and Two, you continue to give the Customer Assistance representative: . This is available in order to remain unsatisfied after contacting a member of dealership ...management, it and proceed with the decision given in this informal dispute resolution program prior to this program. 13-2 Customer Information When contacting Buick, remember ...
Owner's Manual
Page 432
...Identification Number (VIN) Mileage Delivery date Description of the problem Dealership name Dealership address ... STEP THREE If your case is not resolved in your continual satisfaction. See Customer Assistance Offices (U.S. Normally, any problem with the transaction, sale, or usage of the vehicle must... be handled by your dealer, please call the General Motors Customer Assistance Center (CAC) and provide the following steps: STEP ONE Explain your case to ask for more information. However, we suggest the following information: ... They are ...
...Identification Number (VIN) Mileage Delivery date Description of the problem Dealership name Dealership address ... STEP THREE If your case is not resolved in your continual satisfaction. See Customer Assistance Offices (U.S. Normally, any problem with the transaction, sale, or usage of the vehicle must... be handled by your dealer, please call the General Motors Customer Assistance Center (CAC) and provide the following steps: STEP ONE Explain your case to ask for more information. However, we suggest the following information: ... They are ...