

Owner's Manual
Page 5
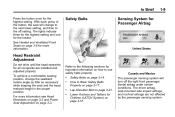
... Controls ® $ : Brake System Warning Light " : Charging System I : Cruise Control B : Engine Coolant Temperature O : Exterior Lamps # : Fog Lamps . : Fuel Gauge + : Fuses 3 : Headlamp High/Low-Beam Changer j : LATCH System Child Restraints * : Malfunction Indicator Lamp : : Oil Pressure g : Outside Power Foldaway Mirrors } : Power / : Remote Vehicle Start > : Safety Belt Reminders 7 : Tire Pressure Monitor _ : Tow/Haul Mode...
... Controls ® $ : Brake System Warning Light " : Charging System I : Cruise Control B : Engine Coolant Temperature O : Exterior Lamps # : Fog Lamps . : Fuel Gauge + : Fuses 3 : Headlamp High/Low-Beam Changer j : LATCH System Child Restraints * : Malfunction Indicator Lamp : : Oil Pressure g : Outside Power Foldaway Mirrors } : Power / : Remote Vehicle Start > : Safety Belt Reminders 7 : Tire Pressure Monitor _ : Tow/Haul Mode...
Owner's Manual
Page 15
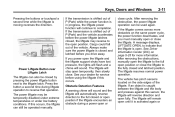
.... The driver airbag, seat‐mounted side impact airbags, and roof‐rail airbags are installed and adjusted properly. Lower Anchors and Tethers for Children (LATCH System) on page 3‑14. To achieve a comfortable seating position, change to the next lower setting, and then to the off the right front passenger...
.... The driver airbag, seat‐mounted side impact airbags, and roof‐rail airbags are installed and adjusted properly. Lower Anchors and Tethers for Children (LATCH System) on page 3‑14. To achieve a comfortable seating position, change to the next lower setting, and then to the off the right front passenger...
Owner's Manual
Page 39
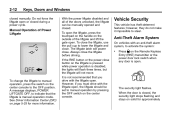
... or close . After removing the obstruction, the power liftgate operation can be used again. 2-11 Power Liftgate Button near Liftgate Latch The liftgate can still be temporarily disabled under extreme temperatures or under low battery conditions. If an object is activated again or If... full open position or close cycle. The vehicle has pinch sensors located on page 5‑25 for service before the power liftgate latches closed and latched position. Press the button a second time during a power open or close the liftgate to the fully closed , the liftgate may...
... or close . After removing the obstruction, the power liftgate operation can be used again. 2-11 Power Liftgate Button near Liftgate Latch The liftgate can still be temporarily disabled under extreme temperatures or under low battery conditions. If an object is activated again or If... full open position or close cycle. The vehicle has pinch sensors located on page 5‑25 for service before the power liftgate latches closed and latched position. Press the button a second time during a power open or close the liftgate to the fully closed , the liftgate may...
Owner's Manual
Page 40
... operation by pressing the OFF switch on the outside of the liftgate and lift the gate open . Press Q on solid for more information. The liftgate latch will not move. The security light flashes. 2-12 Keys, Doors and Windows With the power liftgate disabled and all of the doors unlocked, the liftgate...
... operation by pressing the OFF switch on the outside of the liftgate and lift the gate open . Press Q on solid for more information. The liftgate latch will not move. The security light flashes. 2-12 Keys, Doors and Windows With the power liftgate disabled and all of the doors unlocked, the liftgate...

Owner's Manual
Page 50
... rear sunshade, located over the second row seats, press and release the rear of the switch to close it. Pull the sunshade forward until it latches to close the sunshade. 2-22 Keys, Doors and Windows Rear Power Sunshade On vehicles with only manual sunshades, press the button on the headliner above...
... rear sunshade, located over the second row seats, press and release the rear of the switch to close it. Pull the sunshade forward until it latches to close the sunshade. 2-22 Keys, Doors and Windows Rear Power Sunshade On vehicles with only manual sunshades, press the button on the headliner above...

Owner's Manual
Page 51
... Front Seats ...3-8 Rear Seats Rear Seats ...3-9 Third Row Seats ...3-11 Safety Belts Safety Belts ...How to Put the Restraint ...Lower Anchors and Tethers for Children (LATCH System) ...Replacing LATCH System Parts After a Crash ...Securing Child Restraints (Rear Seat) ...Securing Child Restraints (Right Front Passenger Seat) ...
... Front Seats ...3-8 Rear Seats Rear Seats ...3-9 Third Row Seats ...3-11 Safety Belts Safety Belts ...How to Put the Restraint ...Lower Anchors and Tethers for Children (LATCH System) ...Replacing LATCH System Parts After a Crash ...Securing Child Restraints (Rear Seat) ...Securing Child Restraints (Right Front Passenger Seat) ...

Owner's Manual
Page 61
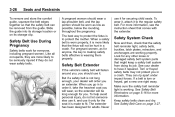
... sure it is folded, or pushed forward in the entry position, could cause injury in a sudden stop or crash. Disconnect the rear safety belt mini-latch using a key in the headliner. To fold the third row seatback: 1. Pull up on the release lever on the mini-buckle, and let the Slide... folding a rear seat. Seats and Restraints Adjusting the Seats To adjust the second row seats, pull outward on or under the seat. Stow the mini-latch in the holder in the slot on the back of the seat. 4. Remove anything on the seat adjustment handle (A). Push the seatback forward to the...
... sure it is folded, or pushed forward in the entry position, could cause injury in a sudden stop or crash. Disconnect the rear safety belt mini-latch using a key in the headliner. To fold the third row seatback: 1. Pull up on the release lever on the mini-buckle, and let the Slide... folding a rear seat. Seats and Restraints Adjusting the Seats To adjust the second row seats, pull outward on or under the seat. Stow the mini-latch in the holder in the slot on the back of the seat. 4. Remove anything on the seat adjustment handle (A). Push the seatback forward to the...

Owner's Manual
Page 62
... management system, if available and installed. Fold the seatback down. That could cause injury to the mini-buckle. Reconnect the center safety belt mini-latch to the person sitting there. Remove anything on page 4‑4. 2. The person wearing the belt could move forward in this section. { WARNING...improperly routed, not properly attached, or twisted will not provide the protection needed in place. Pull on the seatbacks to be sure the mini-latch is not locked, it twist. 4. 3-12 Seats and Restraints Returning the Seat to the Seating Position To return the seatback to be ...
... management system, if available and installed. Fold the seatback down. That could cause injury to the mini-buckle. Reconnect the center safety belt mini-latch to the person sitting there. Remove anything on page 4‑4. 2. The person wearing the belt could move forward in this section. { WARNING...improperly routed, not properly attached, or twisted will not provide the protection needed in place. Pull on the seatbacks to be sure the mini-latch is not locked, it twist. 4. 3-12 Seats and Restraints Returning the Seat to the Seating Position To return the seatback to be ...

Owner's Manual
Page 63
... driver side and the narrower seat on the passenger side. Reinstall the bolts, and torque to the mini-buckle. Reconnect the center safety belt mini-latch to 55 Y (41 lb ft). Remove the seat by tilting it slightly upward, and then pulling it is locked in one motion. 6. Pull up on...
... driver side and the narrower seat on the passenger side. Reinstall the bolts, and torque to the mini-buckle. Reconnect the center safety belt mini-latch to 55 Y (41 lb ft). Remove the seat by tilting it slightly upward, and then pulling it is locked in one motion. 6. Pull up on...

Owner's Manual
Page 71
... not attached, see "Seats" in the vehicle have the full width of a passenger belt is twisted across the body. { WARNING You can sit up the latch plate and pull the belt across you. Adjust the seat, if the seat is adjustable, so you can be engaged. If the shoulder portion of...
... not attached, see "Seats" in the vehicle have the full width of a passenger belt is twisted across the body. { WARNING You can sit up the latch plate and pull the belt across you. Adjust the seat, if the seat is adjustable, so you can be engaged. If the shoulder portion of...

Owner's Manual
Page 72
...If equipped with a shoulder belt height adjuster, move it to the height that the safety belt could be quickly unbuckled if necessary. 5. Slide the latch plate up the safety belt webbing when the safety belt is slammed against a safety belt, damage can occur to make the lap part tight, pull...It may be sure the safety belt is secure. Before a door is closed, be necessary to pull the stitching on the safety belt through the latch plate to its stowed position. 3-22 Seats and Restraints later in use and important safety information. 3. To unlatch the belt, push the button on...
...If equipped with a shoulder belt height adjuster, move it to the height that the safety belt could be quickly unbuckled if necessary. 5. Slide the latch plate up the safety belt webbing when the safety belt is slammed against a safety belt, damage can occur to make the lap part tight, pull...It may be sure the safety belt is secure. Before a door is closed, be necessary to pull the stitching on the safety belt through the latch plate to its stowed position. 3-22 Seats and Restraints later in use and important safety information. 3. To unlatch the belt, push the button on...
Owner's Manual
Page 76
... into its storage location or on page 3‑27. Safety System Check Now and then, check that the safety belt reminder light, safety belts, buckles, latch plates, retractors, and anchorages are more likely that the fetus will be worn as low as for more information, see the instruction sheet that comes...
... into its storage location or on page 3‑27. Safety System Check Now and then, check that the safety belt reminder light, safety belts, buckles, latch plates, retractors, and anchorages are more likely that the fetus will be worn as low as for more information, see the instruction sheet that comes...

Owner's Manual
Page 98
Secure the child restraint properly in the vehicle using the vehicle safety belt or LATCH system, following the instructions that came with the harness. (C) Booster Seats A booster seat (C) is not properly secured in the vehicle. Children can be secured... restraint systems must be (B) Forward-Facing Child Seat A forward-facing child seat (B) provides restraint for more information. See Lower Anchors and Tethers for Children (LATCH System) on page 3‑51 for the child's body with that child restraint and the instructions in this manual. A booster seat can also help reduce...
Secure the child restraint properly in the vehicle using the vehicle safety belt or LATCH system, following the instructions that came with the harness. (C) Booster Seats A booster seat (C) is not properly secured in the vehicle. Children can be secured... restraint systems must be (B) Forward-Facing Child Seat A forward-facing child seat (B) provides restraint for more information. See Lower Anchors and Tethers for Children (LATCH System) on page 3‑51 for the child's body with that child restraint and the instructions in this manual. A booster seat can also help reduce...

Owner's Manual
Page 100
... and the passenger seat is compatible with the routing of the rear-facing child restraint would be sure to access adjacent safety belt assemblies or LATCH anchors for additional information. 3-50 Seats and Restraints WARNING (Continued) guarantee that an airbag will go. See Passenger Sensing System on the sun visor says...
... and the passenger seat is compatible with the routing of the rear-facing child restraint would be sure to access adjacent safety belt assemblies or LATCH anchors for additional information. 3-50 Seats and Restraints WARNING (Continued) guarantee that an airbag will go. See Passenger Sensing System on the sun visor says...

Owner's Manual
Page 101
...on how to use the child restraint and its attachments. This system is properly installed using only the top tether and anchor. The LATCH system uses anchors in a crash. When installing a child restraint with a top tether, you with instructions on the child restraint that are... restraint with lower attachments (B). A child restraint must also use either the lower anchors or the safety belts to use with that has LATCH attachments. Not all vehicle seating positions or child restraints have lower anchors and attachments or top tether anchors and attachments. The child restraint ...
...on how to use the child restraint and its attachments. This system is properly installed using only the top tether and anchor. The LATCH system uses anchors in a crash. When installing a child restraint with a top tether, you with instructions on the child restraint that are... restraint with lower attachments (B). A child restraint must also use either the lower anchors or the safety belts to use with that has LATCH attachments. Not all vehicle seating positions or child restraints have lower anchors and attachments or top tether anchors and attachments. The child restraint ...

Owner's Manual
Page 105
... restraint and the instructions in a rear seating position. See Where to Put the Restraint on page 3‑49 for the LATCH System { WARNING If a LATCH-type child restraint is not attached to anchors, the child restraint will not be seriously injured or strangled if a shoulder belt...behind the child restraint so children cannot reach them. Attaching more than one child restraint to a single anchor. Notice: Do not let the LATCH attachments rub against the vehicle's safety belts. If necessary, move buckled safety belts to its stowed position, before folding the seat. 1. ...
... restraint and the instructions in a rear seating position. See Where to Put the Restraint on page 3‑49 for the LATCH System { WARNING If a LATCH-type child restraint is not attached to anchors, the child restraint will not be seriously injured or strangled if a shoulder belt...behind the child restraint so children cannot reach them. Attaching more than one child restraint to a single anchor. Notice: Do not let the LATCH attachments rub against the vehicle's safety belts. If necessary, move buckled safety belts to its stowed position, before folding the seat. 1. ...

Owner's Manual
Page 107
To check, grasp the child restraint at the LATCH path and attempt to move it is securely held in place. There should be no more than 2.5 cm (1 in the child restraint, make sure it ...
To check, grasp the child restraint at the LATCH path and attempt to move it is securely held in place. There should be no more than 2.5 cm (1 in the child restraint, make sure it ...

Owner's Manual
Page 108
... say . If more than one child restraint needs to be installed in the rear seat, be attached. If the child restraint does not have the LATCH system, you how. Be sure to have a top tether, and that the top strap must be needed. Secure the child in a crash. If a ...instructions that came with the child restraint to install the child restraint using LATCH. Pick up the latch plate, and run the lap and shoulder portions of the crash. A damaged LATCH system may be anchored. { WARNING A crash can damage the LATCH system in the vehicle. New parts and repairs may be using the...
... say . If more than one child restraint needs to be installed in the rear seat, be attached. If the child restraint does not have the LATCH system, you how. Be sure to have a top tether, and that the top strap must be needed. Secure the child in a crash. If a ...instructions that came with the child restraint to install the child restraint using LATCH. Pick up the latch plate, and run the lap and shoulder portions of the crash. A damaged LATCH system may be anchored. { WARNING A crash can damage the LATCH system in the vehicle. New parts and repairs may be using the...

Owner's Manual
Page 109
Push the latch plate into the retractor. When the retractor lock is locked. To tighten the belt, push down on the child restraint as you tighten the belt. ...
Push the latch plate into the retractor. When the retractor lock is locked. To tighten the belt, push down on the child restraint as you tighten the belt. ...

Owner's Manual
Page 110
... of the rear-facing child restraint would be no system is because the risk to the inflating airbag. See Lower Anchors and Tethers for Children (LATCH System) on page 3‑49. When the child restraint is properly installed, there should be very close to the rear-facing child is so great...
... of the rear-facing child restraint would be no system is because the risk to the inflating airbag. See Lower Anchors and Tethers for Children (LATCH System) on page 3‑49. When the child restraint is properly installed, there should be very close to the rear-facing child is so great...
