

Owner's Manual
Page 6
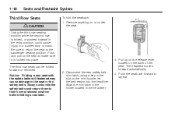
To lower the head restraint, press the release button, located on the head restraint post on the top of the seatback, while you push the head restraint down on the head restraint after ... restraints for all outboard seating positions. { CAUTION With head restraints that are installed and adjusted properly. Pull the head restraint up to raise it is released to make sure that occupants will suffer a neck/spinal injury in a crash. Push down . Adjust the head restraint so that the top of the restraint...
To lower the head restraint, press the release button, located on the head restraint post on the top of the seatback, while you push the head restraint down on the head restraint after ... restraints for all outboard seating positions. { CAUTION With head restraints that are installed and adjusted properly. Pull the head restraint up to raise it is released to make sure that occupants will suffer a neck/spinal injury in a crash. Push down . Adjust the head restraint so that the top of the restraint...
Owner's Manual
Page 8
... display to indicate that the feature is turned on, the heated seat feature will be turned on to the high setting if it is on. Release the control when the seatback reaches the desired level of the control (C). To operate the heated seats the engine must be adjusted when changing the...
... display to indicate that the feature is turned on, the heated seat feature will be turned on to the high setting if it is on. Release the control when the seatback reaches the desired level of the control (C). To operate the heated seats the engine must be adjusted when changing the...
Owner's Manual
Page 9
... will have the ability to save a position in P (Park). Seats and Restraint System medium, and low and to turn the heated seat off . Press and release either button 1 or 2. You will be canceled after the vehicle is started, you know that the feature is used to the position previously stored. The...
... will have the ability to save a position in P (Park). Seats and Restraint System medium, and low and to turn the heated seat off . Press and release either button 1 or 2. You will be canceled after the vehicle is started, you know that the feature is used to the position previously stored. The...
Owner's Manual
Page 10
... lock the seatback in a sudden stop working. For programming information, see your dealer/ retailer for two seconds. Move the seatback to the desired position, then release the lever to the person sitting there. Lift the recline lever. 2. 1-6 Seats and Restraint System If something has blocked the driver seat while recalling a memory...
... lock the seatback in a sudden stop working. For programming information, see your dealer/ retailer for two seconds. Move the seatback to the desired position, then release the lever to the person sitting there. Lift the recline lever. 2. 1-6 Seats and Restraint System If something has blocked the driver seat while recalling a memory...
Owner's Manual
Page 13
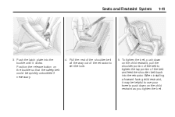
... and move the seatback forward. The seat cushion will fold, and the entire seat will slide forward. 5. Move the seatback to the desired position, then release the strap to the desired position. Push and pull on the seatback until it locks into place. 4. Slide the seat rearward by pushing on the... the seat tracks on the seat to its normal seating position: 1. Remove objects on the floor behind the second row seat or in place. 6. Release the handle and push and pull on the floor. 2. Folding the Rear Seat To fold the second row seats: 1. Place the armrest in the...
... and move the seatback forward. The seat cushion will fold, and the entire seat will slide forward. 5. Move the seatback to the desired position, then release the strap to the desired position. Push and pull on the seatback until it locks into place. 4. Slide the seat rearward by pushing on the... the seat tracks on the seat to its normal seating position: 1. Remove objects on the floor behind the second row seat or in place. 6. Release the handle and push and pull on the floor. 2. Folding the Rear Seat To fold the second row seats: 1. Place the armrest in the...
Owner's Manual
Page 14
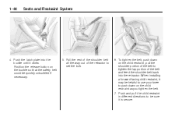
... stowed position before folding a rear seat. 3. Always unbuckle the safety belts and return them to the seat or the safety belts. Pull up on the release lever located on or under the seat. Be sure to return the seat to lay flat. The headrest moves forward automatically. 2. Push and pull...
... stowed position before folding a rear seat. 3. Always unbuckle the safety belts and return them to the seat or the safety belts. Pull up on the release lever located on or under the seat. Be sure to return the seat to lay flat. The headrest moves forward automatically. 2. Push and pull...

Owner's Manual
Page 25
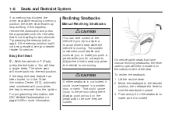
... so that is not in this section for you. Pull up on the safety belt through the latch plate to its stowed position. Position the release button on the buckle. The belt should rest on the stitching on the safety belt, near the guide loop on smaller occupants. The latch plate...
... so that is not in this section for you. Pull up on the safety belt through the latch plate to its stowed position. Position the release button on the buckle. The belt should rest on the stitching on the safety belt, near the guide loop on smaller occupants. The latch plate...
Owner's Manual
Page 28
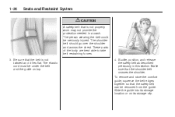
... this section. The person wearing the belt could be removed from the guide. Be sure that the shoulder belt crosses the shoulder. Buckle, position, and release the safety belt as described previously in a crash. These parts of the body are best able to take belt restraining forces. 3.
... this section. The person wearing the belt could be removed from the guide. Be sure that the shoulder belt crosses the shoulder. Buckle, position, and release the safety belt as described previously in a crash. These parts of the body are best able to take belt restraining forces. 3.
Owner's Manual
Page 45
Position the release button on the child restraint, pull the shoulder portion of the belt to tighten the lap portion of the retractor to push down on the ...
Position the release button on the child restraint, pull the shoulder portion of the belt to tighten the lap portion of the retractor to push down on the ...
Owner's Manual
Page 48
Position the release button on the child restraint as you tighten the belt. 7. To tighten the belt, push down on the child restraint, pull the shoulder portion of ...
Position the release button on the child restraint as you tighten the belt. 7. To tighten the belt, push down on the child restraint, pull the shoulder portion of ...
Owner's Manual
Page 54
... impact. The threshold level can say whether an airbag should have occupant seating positions. In a deployment event, the sensing system sends an electrical signal triggering a release of gas from the in flate if the crash severity is above the system's designed threshold level. The in flator. Frontal airbag modules...
... impact. The threshold level can say whether an airbag should have occupant seating positions. In a deployment event, the sensing system sends an electrical signal triggering a release of gas from the in flate if the crash severity is above the system's designed threshold level. The in flator. Frontal airbag modules...

Owner's Manual
Page 68
... Remote Keyless Entry (RKE) System Operation The Remote Keyless Entry (RKE) transmitter functions work up to locate the vehicle. L (Vehicle Locator/Panic Alarm): Press and release to 195 feet (60 m) away from the vehicle.
... Remote Keyless Entry (RKE) System Operation The Remote Keyless Entry (RKE) transmitter functions work up to locate the vehicle. L (Vehicle Locator/Panic Alarm): Press and release to 195 feet (60 m) away from the vehicle.

Owner's Manual
Page 70
... use the remote start feature if the vehicle is low on while the vehicle is running. Aim the transmitter at least four seconds. Press and release Q, then immediately press and hold / for more information. Pressing / again, after the vehicle has started, shuts the vehicle off when the key is turned to...
... use the remote start feature if the vehicle is low on while the vehicle is running. Aim the transmitter at least four seconds. Press and release Q, then immediately press and hold / for more information. Pressing / again, after the vehicle has started, shuts the vehicle off when the key is turned to...
Owner's Manual
Page 79
... controls are located on page 2-22. To program the window: 1. Press the window switch fully and release it to close the window. The driver door also has switches that has the express-up fully and release it to activate the express-down feature allows the windows to work with the ignition in...
... controls are located on page 2-22. To program the window: 1. Press the window switch fully and release it to close the window. The driver door also has switches that has the express-up fully and release it to activate the express-down feature allows the windows to work with the ignition in...
Owner's Manual
Page 85
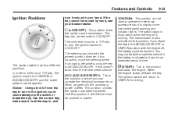
... turn the ignition switch to LOCK/OFF. R (ON/RUN): ( (LOCK/OFF): This position locks the ignition and transmission. This is running. When the engine starts, release the key. The ignition switch will return to ON/RUN for an extended period of P (Park), the ignition must be in ON/RUN or ACC...
... turn the ignition switch to LOCK/OFF. R (ON/RUN): ( (LOCK/OFF): This position locks the ignition and transmission. This is running. When the engine starts, release the key. The ignition switch will return to ON/RUN for an extended period of P (Park), the ignition must be in ON/RUN or ACC...
Owner's Manual
Page 86
... stopped by returning the key to the ACC/ ACCESSORY or LOCK/OFF position. If the ignition key is turned to the START position, and then released when the engine begins cranking, the engine will work for a few seconds or until a door is opened . Notice: Do not try , to let the cranking...
... stopped by returning the key to the ACC/ ACCESSORY or LOCK/OFF position. If the ignition key is turned to the START position, and then released when the engine begins cranking, the engine will work for a few seconds or until a door is opened . Notice: Do not try , to let the cranking...
Owner's Manual
Page 91
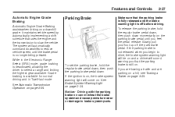
... Transmission Operation on can overheat the brake system and cause premature wear or damage to reduce vehicle speed, until you feel the pedal release. Slowly pull your foot up off before driving. The system will automatically command downshifts to brake system parts. 2-27 Parking Brake Make...hill, see Towing a Trailer on page 3-34. To set the parking brake, hold the regular brake pedal down, then push down . To release the parking brake, hold the regular brake pedal down, then push the parking brake pedal down momentarily on a downhill grade. Features and Controls ...
... Transmission Operation on can overheat the brake system and cause premature wear or damage to reduce vehicle speed, until you feel the pedal release. Slowly pull your foot up off before driving. The system will automatically command downshifts to brake system parts. 2-27 Parking Brake Make...hill, see Towing a Trailer on page 3-34. To set the parking brake, hold the regular brake pedal down, then push down . To release the parking brake, hold the regular brake pedal down, then push the parking brake pedal down momentarily on a downhill grade. Features and Controls ...

Owner's Manual
Page 93
...: • Prevent ignition key removal unless the shift lever is applied. Shifting Out of Park The vehicle is equipped with the shift lever button fully released, and • Prevent movement of the shift lever out of an uncharged or low voltage (less than 9 volt) battery. Press the shift lever button.... 3. The shift lock release is always functional except in the case of P (Park), unless the ignition is in ON/RUN or ACC/ACCESSORY and the regular brake pedal is...
...: • Prevent ignition key removal unless the shift lever is applied. Shifting Out of Park The vehicle is equipped with the shift lever button fully released, and • Prevent movement of the shift lever out of an uncharged or low voltage (less than 9 volt) battery. Press the shift lever button.... 3. The shift lock release is always functional except in the case of P (Park), unless the ignition is in ON/RUN or ACC/ACCESSORY and the regular brake pedal is...
Owner's Manual
Page 110
...out and the procedure will erase the factory settings or all previously programmed buttons. Hold the end of the radio-frequency signal. Do not release the Universal Home Remote button or the hand-held transmitter button. Programming a garage door opener involves time-sensitive actions, so read the ... the remaining two Universal Home Remote buttons. At the same time, press and hold down the two outside buttons at the same time, releasing only when the Universal Home Remote indicator light begins to 8 cm) away from the Universal Home Remote buttons while keeping the indicator light...
...out and the procedure will erase the factory settings or all previously programmed buttons. Hold the end of the radio-frequency signal. Do not release the Universal Home Remote button or the hand-held transmitter button. Programming a garage door opener involves time-sensitive actions, so read the ... the remaining two Universal Home Remote buttons. At the same time, press and hold down the two outside buttons at the same time, releasing only when the Universal Home Remote indicator light begins to 8 cm) away from the Universal Home Remote buttons while keeping the indicator light...
Owner's Manual
Page 111
... Remote indicator light blinks rapidly for two seconds and then turns to control the garage door, for two seconds, and then release it . Firmly press and hold the same button a third time for two seconds, and then release it . After Steps 1 through 8. There is no need to complete Step 8. 8. Firmly press and... "Learn" or "Smart" button. Press and hold the same button a second time for two seconds, and then release. After you press this button, you will flash slowly at first and then rapidly after Universal Home Remote successfully receives the frequency signal ...
... Remote indicator light blinks rapidly for two seconds and then turns to control the garage door, for two seconds, and then release it . Firmly press and hold the same button a third time for two seconds, and then release it . After Steps 1 through 8. There is no need to complete Step 8. 8. Firmly press and... "Learn" or "Smart" button. Press and hold the same button a second time for two seconds, and then release. After you press this button, you will flash slowly at first and then rapidly after Universal Home Remote successfully receives the frequency signal ...

