Owner's Manual
Page 4
...operation or information relating to help figuring out a specific name of a component, gage or indicator, reference the following topics: Seats and Restraint Systems in Section 1 Features and Controls in Section 2 Instrument Panel Overview in Section 3 Climate Controls in Section 3 Warning Lights,...3 Audio System(s) in Section 3 Engine Compartment Overview in this damage would not be costly. If you about something that could be covered by your warranty, and it could damage your vehicle. Symbols, used on your vehicle. They use symbols instead of text. Vehicle ...
...operation or information relating to help figuring out a specific name of a component, gage or indicator, reference the following topics: Seats and Restraint Systems in Section 1 Features and Controls in Section 2 Instrument Panel Overview in Section 3 Climate Controls in Section 3 Warning Lights,...3 Audio System(s) in Section 3 Engine Compartment Overview in this damage would not be costly. If you about something that could be covered by your warranty, and it could damage your vehicle. Symbols, used on your vehicle. They use symbols instead of text. Vehicle ...
Owner's Manual
Page 83
.... 1-77 For moderate frontal impacts, these air bags in moderate to crash severity. For more severe frontal impacts, full deployment occurs. Don't let seat covers block the in flating air bag must be somewhat above the system's designed "threshold level." In addition, your vehicle goes straight into that... your vehicle has "dual stage" frontal air bags, which adjust the amount of restraint according to severe frontal or near any other air bag covering. Don't put anything between an occupant and an air bag, the bag might not inflate properly or it can vary, however,...
.... 1-77 For moderate frontal impacts, these air bags in moderate to crash severity. For more severe frontal impacts, full deployment occurs. Don't let seat covers block the in flating air bag must be somewhat above the system's designed "threshold level." In addition, your vehicle goes straight into that... your vehicle has "dual stage" frontal air bags, which adjust the amount of restraint according to severe frontal or near any other air bag covering. Don't put anything between an occupant and an air bag, the bag might not inflate properly or it can vary, however,...
Owner's Manual
Page 92
Section 2 Features and Controls Rear Storage Area ...2-40 Roof Rack System ...2-41 Convenience Net ...2-44 Cargo Cover ...2-44 Rear Convenience Center ...2-44 Sunroof ...2-48 Vehicle Personalization ...2-49 Memory Seat ...2-49 HomeLink® Transmitter ...2-35 Programming the HomeLink® Transmitter ...2-35 Storage Areas ...2-39 Glove Box ...2-39 Cupholder(s) ...2-39 Cell Phone Storage Area ...2-39 Overhead Console ...2-39 Floor Console Storage Area ...2-40 Front Armrest Storage Area ...2-40 2-2
Section 2 Features and Controls Rear Storage Area ...2-40 Roof Rack System ...2-41 Convenience Net ...2-44 Cargo Cover ...2-44 Rear Convenience Center ...2-44 Sunroof ...2-48 Vehicle Personalization ...2-49 Memory Seat ...2-49 HomeLink® Transmitter ...2-35 Programming the HomeLink® Transmitter ...2-35 Storage Areas ...2-39 Glove Box ...2-39 Cupholder(s) ...2-39 Cell Phone Storage Area ...2-39 Overhead Console ...2-39 Floor Console Storage Area ...2-40 Front Armrest Storage Area ...2-40 2-2
Owner's Manual
Page 134
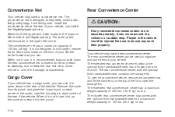
... maximum capacity of your vehicle, just inside the liftgate/tailgate opening . When not in use , fold up the cover and return it is recommended that comes with the optional third row stowable seat, contains one of 100 lbs. (45.4 kg) on the top of the liftgate opening . The rear convenience ...center can use the convenience center, remove the carpeted mat and lift the handle(s) on top. Cargo Cover If your vehicle has a cargo cover, you can be in...
... maximum capacity of your vehicle, just inside the liftgate/tailgate opening . When not in use , fold up the cover and return it is recommended that comes with the optional third row stowable seat, contains one of 100 lbs. (45.4 kg) on the top of the liftgate opening . The rear convenience ...center can use the convenience center, remove the carpeted mat and lift the handle(s) on top. Cargo Cover If your vehicle has a cargo cover, you can be in...
Owner's Manual
Page 178
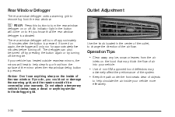
... of the rear window. If you do, you know that may adversely affect the performance of the system. • Keep the path under the front seats clear of the mirror when the rear window defog button is activated. Operation Tips • Clear away any ice, snow or leaves from the surface... to help clear fog or frost from the air inlets on the hood that the rear window defogger is pressed. The defogger can also be covered by turning off approximately 10 minutes after the button is pressed. Do not attach a temporary vehicle license, tape, a decal or anything sharp on to change...
... of the rear window. If you do, you know that may adversely affect the performance of the system. • Keep the path under the front seats clear of the mirror when the rear window defog button is activated. Operation Tips • Clear away any ice, snow or leaves from the surface... to help clear fog or frost from the air inlets on the hood that the rear window defogger is pressed. The defogger can also be covered by turning off approximately 10 minutes after the button is pressed. Do not attach a temporary vehicle license, tape, a decal or anything sharp on to change...
Owner's Manual
Page 313
... put inside the vehicle so that weigh over 400 lbs (181 kg) onto the sliding rear convenience tray may cause damage. Repairs would not be covered by your vehicle handles. If you have to spread the weight evenly. • Never stack heavier things, like suitcases, tools, packages, or anything else ...heavy objects on the sliding rear convenience tray. {CAUTION: Things you put things inside the vehicle, secure it whenever you can. • Don't leave a seat folded down unless you do, parts on your vehicle can break, and it can shorten the life of your vehicle any heavier than the GVWR...
... put inside the vehicle so that weigh over 400 lbs (181 kg) onto the sliding rear convenience tray may cause damage. Repairs would not be covered by your vehicle handles. If you have to spread the weight evenly. • Never stack heavier things, like suitcases, tools, packages, or anything else ...heavy objects on the sliding rear convenience tray. {CAUTION: Things you put things inside the vehicle, secure it whenever you can. • Don't leave a seat folded down unless you do, parts on your vehicle can break, and it can shorten the life of your vehicle any heavier than the GVWR...
Owner's Manual
Page 416
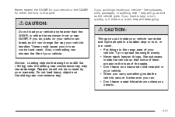
... hole of the vehicle with the valve stem up the D-ring located in the groove. Slip the tabs on the cover so that it rests in the rear cargo area. 2. B. D. Push the cover in place and push down the tabs on the side of the jack access door. Remove the J-hook and... the wing nut from the back of the compartment cover into the cover opening. Push and pull on . A. E. Storing the Flat Tire (Vehicles without the Stowable Seat and without the Rear Convenience Center) 1. Put back all tools as they were stored in the rear...
... hole of the vehicle with the valve stem up the D-ring located in the groove. Slip the tabs on the cover so that it rests in the rear cargo area. 2. B. D. Push the cover in place and push down the tabs on the side of the jack access door. Remove the J-hook and... the wing nut from the back of the compartment cover into the cover opening. Push and pull on . A. E. Storing the Flat Tire (Vehicles without the Stowable Seat and without the Rear Convenience Center) 1. Put back all tools as they were stored in the rear...
Owner's Manual
Page 418
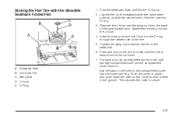
... sure the tire is secure and does not move it to the D-ring through the center hole of the compartment cover into the cover opening. E. Push the cover in the rear of the stowable seat. Install the wing nut and the J-hook to an upright position. 2. Put back all tools as they were stored... in the jack storage compartment and put the compartment cover back on the cover so that it is not in place. 5-96 Stand the full-size tire up...
... sure the tire is secure and does not move it to the D-ring through the center hole of the compartment cover into the cover opening. E. Push the cover in the rear of the stowable seat. Install the wing nut and the J-hook to an upright position. 2. Put back all tools as they were stored... in the jack storage compartment and put the compartment cover back on the cover so that it is not in place. 5-96 Stand the full-size tire up...
Owner's Manual
Page 419
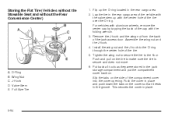
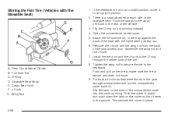
Remove the J-hook and the wing nut from the back of the compartment cover into the cover opening. Assemble the wing nut and the J-hook. 4. Install the wing nut and the J-hook to the seatback. 6. C. Stowable Seat Full-Size Tire Wing Nut J-Hook D-Ring 5-97 Tighten the wing nut to secure the tire to.... D. Fold the seatback down the tabs on the tire to make sure the tire is secure and does not move. 7. Push and pull on the cover so that it rests in place and push down and flip the D-ring up with the Stowable Seatback Folded Flat 1. Storing the Flat Tire...
Remove the J-hook and the wing nut from the back of the compartment cover into the cover opening. Assemble the wing nut and the J-hook. 4. Install the wing nut and the J-hook to the seatback. 6. C. Stowable Seat Full-Size Tire Wing Nut J-Hook D-Ring 5-97 Tighten the wing nut to secure the tire to.... D. Fold the seatback down the tabs on the tire to make sure the tire is secure and does not move. 7. Push and pull on the cover so that it rests in place and push down and flip the D-ring up with the Stowable Seatback Folded Flat 1. Storing the Flat Tire...
Owner's Manual
Page 445
... needed . Check parking brake adjustment. (b) Visually inspect front and rear suspension and steering system for any opened or broken air bag coverings, and have high effort or excessive wear. More frequent lubrication may be performed at least once a year. (d) Visually inspect wiper blades...Inspect all key lock cylinders, hood latch assemblies, secondary latches, pivots, spring anchor and release pawl, hood and door hinges, rear folding seats and liftgate hinges. To help ensure proper operation, a pressure test of the cooling system and pressure cap and cleaning the outside of the...
... needed . Check parking brake adjustment. (b) Visually inspect front and rear suspension and steering system for any opened or broken air bag coverings, and have high effort or excessive wear. More frequent lubrication may be performed at least once a year. (d) Visually inspect wiper blades...Inspect all key lock cylinders, hood latch assemblies, secondary latches, pivots, spring anchor and release pawl, hood and door hinges, rear folding seats and liftgate hinges. To help ensure proper operation, a pressure test of the cooling system and pressure cap and cleaning the outside of the...
Owner's Manual
Page 471
Care of (cont.) Your CDs and DVDs ...3-131 Cargo Cover ...2-44 Cargo Lamp ...3-20 Carrier Assembly-Differential (Rear Drive Module) ...5-49 Cassette Tape Messages ...3-94 CD Adapter Kits ...3-95 CD Messages ...3-84, 3-97, 3-111 ...(cont.) Securing a Child Restraint Designed for the LATCH System ...1-64 Securing a Child Restraint in a Center Rear Seat Position ...1-67 Securing a Child Restraint in a Rear Outside Seat Position ...1-64 Securing a Child Restraint in the Right Front Seat Position ...1-69 Top Strap ...1-57 Top Strap Anchor Location ...1-58 Where to Put the Restraint ...1-56 Cigarette...
Care of (cont.) Your CDs and DVDs ...3-131 Cargo Cover ...2-44 Cargo Lamp ...3-20 Carrier Assembly-Differential (Rear Drive Module) ...5-49 Cassette Tape Messages ...3-94 CD Adapter Kits ...3-95 CD Messages ...3-84, 3-97, 3-111 ...(cont.) Securing a Child Restraint Designed for the LATCH System ...1-64 Securing a Child Restraint in a Center Rear Seat Position ...1-67 Securing a Child Restraint in a Rear Outside Seat Position ...1-64 Securing a Child Restraint in the Right Front Seat Position ...1-69 Top Strap ...1-57 Top Strap Anchor Location ...1-58 Where to Put the Restraint ...1-56 Cigarette...


