

Owner's Manual
Page 143
... may be able to inspect the emission control equipment on your vehicle. If so, your dealer or qualified service center check the vehicle. The system can determine if the fuel cap has been left off . If none of these conditions, change the fuel brand you put fuel into gear, misfiring...Programs Some state/provincial and local governments have your electrical system may be corrected when the electrical system dries out. If so, reinstall the fuel cap, making sure to turn the light off , have or may notice this condition. See Filling Your Tank on page 5-7. The diagnostic system ...
... may be able to inspect the emission control equipment on your vehicle. If so, your dealer or qualified service center check the vehicle. The system can determine if the fuel cap has been left off . If none of these conditions, change the fuel brand you put fuel into gear, misfiring...Programs Some state/provincial and local governments have your electrical system may be corrected when the electrical system dries out. If so, reinstall the fuel cap, making sure to turn the light off , have or may notice this condition. See Filling Your Tank on page 5-7. The diagnostic system ...
Owner's Manual
Page 206
...12 Engine Oil ...5.15 Supercharger Oil ...5.20 Engine Air CleanedFilter ...5.20 Automatic Transaxle Fluid ...-5-22 Engine Coolant ...5.24 Radiator Pressure Cap ...5.27 Engine Overheating ...5.27 Cooling System ...5.30 5- 1 Section 5 Service and Appearance Care Power Steering Fluid ...5.38 Windshield Washer... ...-5-45 Headlamp Aiming ...5-50 Bulb Replacement ...5.52 Halogen Bulbs ...5.52 Headlamps ...5.52 Front Turn Signal and Parking Lamps ...5-53 Center High-Mounted Stoplamp (CHMSL) ...5.54 Taillamps, Turn Signal, and Stoplamps ...5.55 Back-up Lamps ...5-56 Replacement Bulbs ...5-56 ...
...12 Engine Oil ...5.15 Supercharger Oil ...5.20 Engine Air CleanedFilter ...5.20 Automatic Transaxle Fluid ...-5-22 Engine Coolant ...5.24 Radiator Pressure Cap ...5.27 Engine Overheating ...5.27 Cooling System ...5.30 5- 1 Section 5 Service and Appearance Care Power Steering Fluid ...5.38 Windshield Washer... ...-5-45 Headlamp Aiming ...5-50 Bulb Replacement ...5.52 Halogen Bulbs ...5.52 Headlamps ...5.52 Front Turn Signal and Parking Lamps ...5-53 Center High-Mounted Stoplamp (CHMSL) ...5.54 Taillamps, Turn Signal, and Stoplamps ...5.55 Back-up Lamps ...5-56 Replacement Bulbs ...5-56 ...
Owner's Manual
Page 220
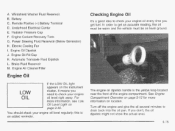
...order to check your engine oil level regularly; this is the yellow loop located near the front of the engine compartment. Underhood Electrical Center E. Electric Cooling Fan I. Battery C. Engine Oil Dipstick J. The engine oil dipstick handle is an added reminder. If you need to ...get fuel. Radiator Pressure Cap F. Engine Oil Fill Cap K. Engine Air Cleaner/Filter Checking Engine Oil It's a good idea to drain back into the oil pan. See Engine Comparfment ...
...order to check your engine oil level regularly; this is the yellow loop located near the front of the engine compartment. Underhood Electrical Center E. Electric Cooling Fan I. Battery C. Engine Oil Dipstick J. The engine oil dipstick handle is an added reminder. If you need to ...get fuel. Radiator Pressure Cap F. Engine Oil Fill Cap K. Engine Air Cleaner/Filter Checking Engine Oil It's a good idea to drain back into the oil pan. See Engine Comparfment ...
Owner's Manual
Page 240
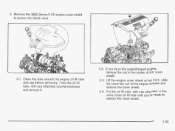
... the valve cover oil fill hole until you're ready to access the bleed valve. 3.1. Clean the area around the engine oil fill tube and cap before removing. Lift the engine cover shield at the front, slide the catch tab out of the cover shield. 3.3. Remove the 3800 Series I1 V6... engine cover shield to replace the cover shield. 5-35 Put the oil fill tube, with cap attached, counterclockwise and remove it. 3.2. Twist the oil fill tube, with cap attached, in the center of the engine bracket and remove the cover shield. 3.4.
... the valve cover oil fill hole until you're ready to access the bleed valve. 3.1. Clean the area around the engine oil fill tube and cap before removing. Lift the engine cover shield at the front, slide the catch tab out of the cover shield. 3.3. Remove the 3800 Series I1 V6... engine cover shield to replace the cover shield. 5-35 Put the oil fill tube, with cap attached, counterclockwise and remove it. 3.2. Twist the oil fill tube, with cap attached, in the center of the engine bracket and remove the cover shield. 3.4.
Owner's Manual
Page 241
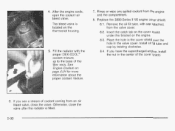
... under the bracket on page 5-24 for more information about the proper coolant mixture. 8. See Engine Coolant on the engine. 8.3. Install oil fill tube and cap by twisting clockwise. 8.4. 4. Remove the oil fill tube, with the proper DEX-COOL@ coolant mixture, up to the base of the cover shield. 6. If you... the valve cover. After the engine cools, open the coolant air bleed valve. Place the hole in the cover shield over the hole in the center of the filler neck. The bleed valve is filled. 5-36 Replace the 3800 Series II V6 engine cover shield. 8.1.
... under the bracket on page 5-24 for more information about the proper coolant mixture. 8. See Engine Coolant on the engine. 8.3. Install oil fill tube and cap by twisting clockwise. 8.4. 4. Remove the oil fill tube, with the proper DEX-COOL@ coolant mixture, up to the base of the cover shield. 6. If you... the valve cover. After the engine cools, open the coolant air bleed valve. Place the hole in the cover shield over the hole in the center of the filler neck. The bleed valve is filled. 5-36 Replace the 3800 Series II V6 engine cover shield. 8.1.
Owner's Manual
Page 275
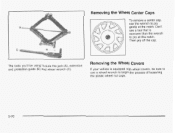
1 Removing the Wheel Center Caps To remove a center cap, use the wrench to pry gently at this notch. Don't use a wheel wrench to begin the process of loosening the plastic wheel nut caps. 5-70 c L The tools you'll be sure to pry at the notch. Then pry off the cap. Removing the Wheel Covers If your vehicle is narrower than the wrench to use a tool that is equipped with wheel covers, be using include the jack (A), extension and protection guide (B) and wheel wrench (C).
1 Removing the Wheel Center Caps To remove a center cap, use the wrench to pry gently at this notch. Don't use a wheel wrench to begin the process of loosening the plastic wheel nut caps. 5-70 c L The tools you'll be sure to pry at the notch. Then pry off the cap. Removing the Wheel Covers If your vehicle is narrower than the wrench to use a tool that is equipped with wheel covers, be using include the jack (A), extension and protection guide (B) and wheel wrench (C).
Owner's Manual
Page 314
... Inspect the hoses and have them replaced if they are completed at once. replace as open seams, holes, loose connections or other qualified service center do these services may be performed at least once a year. 6-13 Proper procedures to perform these jobs. Look for damage or leaks. Clean...system for broken, damaged, missing or out-of lubrication. Inspect all pipes, fittings and clamps; Clean the outside of the cooling system and pressure cap is recommended at least twice a year (for damaged, loose or missing parts, signs of wear or lack of -position parts as well as needed...
... Inspect the hoses and have them replaced if they are completed at once. replace as open seams, holes, loose connections or other qualified service center do these services may be performed at least once a year. 6-13 Proper procedures to perform these jobs. Look for damage or leaks. Clean...system for broken, damaged, missing or out-of lubrication. Inspect all pipes, fittings and clamps; Clean the outside of the cooling system and pressure cap is recommended at least twice a year (for damaged, loose or missing parts, signs of wear or lack of -position parts as well as needed...
Owner's Manual
Page 339
...15 Power Steering ...4-12 Programmable Automatic Door Locks ...2-10 Programmable Modes ...2-10 Q Questions and Answers About Safety Belts ...1-11 Radiator Pressure Cap ...Radios ...Care of Your Cassette Tape Player ...Care ofYourCD Player ...Care ofYour CDs ...Radio with Cassette ...Radio with Cassette and ... ...2-12 Removing the Flat Tire and Installing the Spare Tire ...5-71 Removing the Spare Tire and Tools ...5-68 Removing the Wheel Center Caps ...5-70 Removing the Wheel Covers ...5-70 Replacement Bulbs ...5-56 5-44 Replacing Brake System Parts ...Replacing Restraint System Parts After a ...
...15 Power Steering ...4-12 Programmable Automatic Door Locks ...2-10 Programmable Modes ...2-10 Q Questions and Answers About Safety Belts ...1-11 Radiator Pressure Cap ...Radios ...Care of Your Cassette Tape Player ...Care ofYourCD Player ...Care ofYour CDs ...Radio with Cassette ...Radio with Cassette and ... ...2-12 Removing the Flat Tire and Installing the Spare Tire ...5-71 Removing the Spare Tire and Tools ...5-68 Removing the Wheel Center Caps ...5-70 Removing the Wheel Covers ...5-70 Replacement Bulbs ...5-56 5-44 Replacing Brake System Parts ...Replacing Restraint System Parts After a ...


