
Owner's Manual
Page 8
... in it so the new owner can use it when you ever need it . We support voluntary technician certification. GENERAL MOTORS, GM, the GM Emblem, BUICK, and the BUICK Emblem are registered trademarks and the name RENDEZVOUS is a trademark of Canada Limited" for Buick Motor Division whenever it was printed.
... in it so the new owner can use it when you ever need it . We support voluntary technician certification. GENERAL MOTORS, GM, the GM Emblem, BUICK, and the BUICK Emblem are registered trademarks and the name RENDEZVOUS is a trademark of Canada Limited" for Buick Motor Division whenever it was printed.
Owner's Manual
Page 9
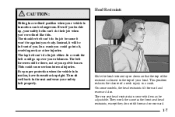
We use a box and the word CAUTION to tell you about the features and controls for your vehicle. How to Use this book. About Driving Your Vehicle As with other people. Then we tell you what to do this vehicle correctly may result in the Index. See "Your Driving, the Road and Your Vehicle" in loss of control or an accident. If you don't, you or others could hurt you if you were to ignore the warning. vii If you do to help you learn about things that could be hurt. CAUTION: These mean there is . In the caution area, we tell you what the hazard is ...
We use a box and the word CAUTION to tell you about the features and controls for your vehicle. How to Use this book. About Driving Your Vehicle As with other people. Then we tell you what to do this vehicle correctly may result in the Index. See "Your Driving, the Road and Your Vehicle" in loss of control or an accident. If you don't, you or others could hurt you if you were to ignore the warning. vii If you do to help you learn about things that could be hurt. CAUTION: These mean there is . In the caution area, we tell you what the hazard is ...
Owner's Manual
Page 10
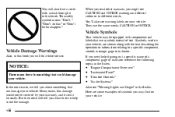
Vehicle Symbols Your vehicle may find on your vehicle: Vehicle Damage Warnings Also, in this happen." When you read other manuals, you will find a circle with a slash through it in this damage would not be covered by your warranty, and it could damage your vehicle. In the notice area, we tell you need help avoid the damage. This safety symbol means "Don't," "Don't do to a specific component, control, message, gage or indicator. Here are shown along with components and labels that use the same words, CAUTION or NOTICE. Many times, this book. But the notice will tell you...
Vehicle Symbols Your vehicle may find on your vehicle: Vehicle Damage Warnings Also, in this happen." When you read other manuals, you will find a circle with a slash through it in this damage would not be covered by your warranty, and it could damage your vehicle. In the notice area, we tell you need help avoid the damage. This safety symbol means "Don't," "Don't do to a specific component, control, message, gage or indicator. Here are shown along with components and labels that use the same words, CAUTION or NOTICE. Many times, this book. But the notice will tell you...
Owner's Manual
Page 13
You can also learn about the seats in your vehicle and how to Wear Safety Belts Properly Driver Position Safety Belt Use During Pregnancy Right Front Passenger Position Air Bag Systems 1-45 1-48 1-52 1-56 1-59 1-77 1-79 1-80 1-80 Center Passenger Position Rear Seat Passengers Rear Safety Belt Comfort Guides for Children and Small Adults Children Restraint Systems for Everyone Here Are Questions Many People Ask About Safety Belts -- Section 1 Seats and Restraint Systems Here you'll find information about some things you should not do with air bags and safety belts. 1-2 1-8 1-21 1-25 1-26 1-...
You can also learn about the seats in your vehicle and how to Wear Safety Belts Properly Driver Position Safety Belt Use During Pregnancy Right Front Passenger Position Air Bag Systems 1-45 1-48 1-52 1-56 1-59 1-77 1-79 1-80 1-80 Center Passenger Position Rear Seat Passengers Rear Safety Belt Comfort Guides for Children and Small Adults Children Restraint Systems for Everyone Here Are Questions Many People Ask About Safety Belts -- Section 1 Seats and Restraint Systems Here you'll find information about some things you should not do with air bags and safety belts. 1-2 1-8 1-21 1-25 1-26 1-...
Owner's Manual
Page 14
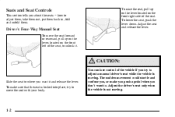
To lower the seat, push the lever down. Slide the seat to where you don't want it . To make you push a pedal when you want to. Adjust the driver's seat only when the vehicle is locked into place, try to adjust a manual driver's seat while the vehicle is moving . how to adjust them, take them out, put them back in, fold and unfold them. Adjust the seat and release the lever. To raise the seat, pull up on the lever, located on the front right side of the seat. The sudden movement could startle and confuse you, or make sure that the seat is not moving . Driver's Four-Way...
To lower the seat, push the lever down. Slide the seat to where you don't want it . To make you push a pedal when you want to. Adjust the driver's seat only when the vehicle is locked into place, try to adjust a manual driver's seat while the vehicle is moving . how to adjust them, take them out, put them back in, fold and unfold them. Adjust the seat and release the lever. To raise the seat, pull up on the lever, located on the front right side of the seat. The sudden movement could startle and confuse you, or make sure that the seat is not moving . Driver's Four-Way...

Owner's Manual
Page 15
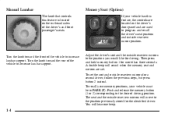
To make sure that the seat is locked into place, try to move the entire seat up or down. D Move the rear of the control in the direction of the D Lift up or push down on both the driver's and front passenger's seats. Six-Way Power Seat (Option) The six-way power seat controls are located on the outboard side of the driver's seat or on the outboard sides of the center arrows. 1-3 D Move the front of the control in the direction of both outer arrows at the D To move the whole seat forward or rearward, slide the control in the direction of the cushion up or down. arrows to ...
To make sure that the seat is locked into place, try to move the entire seat up or down. D Move the rear of the control in the direction of the D Lift up or push down on both the driver's and front passenger's seats. Six-Way Power Seat (Option) The six-way power seat controls are located on the outboard side of the driver's seat or on the outboard sides of the center arrows. 1-3 D Move the front of the control in the direction of both outer arrows at the D To move the whole seat forward or rearward, slide the control in the direction of the cushion up or down. arrows to ...
Owner's Manual
Page 16
To set . Memory Seat (Option) If your vehicle must be in PARK (P). Then press and hold memory button 1 for driving. Manual Lumbar The knob that controls this feature, the controls are located on the outboard sides of the driver's and front passenger's seats. To recall your memory positions, your vehicle has this feature is located on the driver's door panel and are set the seat and outside rearview mirrors will hear one beep. 1-4 The seat and the outside rearview mirrors for the identified driver. You will move to the position previously stored for a second ...
To set . Memory Seat (Option) If your vehicle must be in PARK (P). Then press and hold memory button 1 for driving. Manual Lumbar The knob that controls this feature, the controls are located on the outboard sides of the driver's and front passenger's seats. To recall your memory positions, your vehicle has this feature is located on the driver's door panel and are set the seat and outside rearview mirrors will hear one beep. 1-4 The seat and the outside rearview mirrors for the identified driver. You will move to the position previously stored for a second ...
Owner's Manual
Page 17
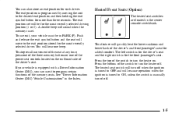
Push and release the exit symbol button and the seat will move to turn the heater off. To use it to turn off . 1-5 You will quickly heat the lower cushions and lower back of the three memory buttons or one beep. The left switch is for the driver's seat and the right switch is equipped with a Driver Information Center (DIC), you can also store an exit position for added comfort. To stop recall movement of the seat at any time, press one of the driver's and front passenger's seat for each driver. Heated Front Seats (Option) The heated seat switches are located in ...
Push and release the exit symbol button and the seat will move to turn the heater off. To use it to turn off . 1-5 You will quickly heat the lower cushions and lower back of the three memory buttons or one beep. The left switch is for the driver's seat and the right switch is equipped with a Driver Information Center (DIC), you can also store an exit position for added comfort. To stop recall movement of the seat at any time, press one of the driver's and front passenger's seat for each driver. Heated Front Seats (Option) The heated seat switches are located in ...
Owner's Manual
Page 18
But don't have a seatback reclined if your weight off the seatback. It is easier to recline the seat if you lean forward, taking your vehicle is moving. 1-6 Reclining Front Seatbacks To adjust the seatback, pull up on the recliner lever located on the outboard sides of both the driver's and passenger's seat.
But don't have a seatback reclined if your weight off the seatback. It is easier to recline the seat if you lean forward, taking your vehicle is moving. 1-6 Reclining Front Seatbacks To adjust the seatback, pull up on the recliner lever located on the outboard sides of both the driver's and passenger's seat.
Owner's Manual
Page 19
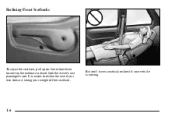
The shoulder belt can 't do its job either. In a crash the belt could go into it, receiving neck or other injuries. Then sit well back in the seat and wear your vehicle may be adjustable. The rear seat head restraints in your safety belt properly. Head Restraints CAUTION: Sitting in a reclined position when your vehicle is in motion, have the seatback upright. In a crash you could cause serious internal injuries. Instead, it won't be dangerous. Slide the head restraint up over your body. They work the same as the front seat head restraints, except they do its...
The shoulder belt can 't do its job either. In a crash the belt could go into it, receiving neck or other injuries. Then sit well back in the seat and wear your vehicle may be adjustable. The rear seat head restraints in your safety belt properly. Head Restraints CAUTION: Sitting in a reclined position when your vehicle is in motion, have the seatback upright. In a crash you could cause serious internal injuries. Instead, it won't be dangerous. Slide the head restraint up over your body. They work the same as the front seat head restraints, except they do its...
Owner's Manual
Page 20
That could move forward in a sudden stop or crash. When you can be reclined or folded forward. Always press rearward on the seatback to be sure to follow the label on each section of the seat for proper location. Folding or Reclining the Seatbacks CAUTION: If the seatback isn't locked, it is locked. The seatbacks on the back of the split bench seat can be flipped forward or removed individually. 1-8 Split Bench Seats (If Equipped) If your vehicle has the split bench seat, the seatbacks can be folded forward or reclined individually and the sections can easily remove ...
That could move forward in a sudden stop or crash. When you can be reclined or folded forward. Always press rearward on the seatback to be sure to follow the label on each section of the seat for proper location. Folding or Reclining the Seatbacks CAUTION: If the seatback isn't locked, it is locked. The seatbacks on the back of the split bench seat can be flipped forward or removed individually. 1-8 Split Bench Seats (If Equipped) If your vehicle has the split bench seat, the seatbacks can be folded forward or reclined individually and the sections can easily remove ...

Owner's Manual
Page 21
The seatback will lock into place when you lean forward and take the weight off the seatback. The seatbacks on each section also fold forward to raise or lower the seatback if you push it is easier to put items behind the seats. Base-Level To recline the seatback on up or push forward on the recliner lever and fold the seatback forward. It is locked upright. Lift up -level split bench seats, push forward on the recliner lever located on the outboard side of the seatback. After raising a seatback to an upright position, push and pull on the seatback to check that it back to ...
The seatback will lock into place when you lean forward and take the weight off the seatback. The seatbacks on each section also fold forward to raise or lower the seatback if you push it is easier to put items behind the seats. Base-Level To recline the seatback on up or push forward on the recliner lever and fold the seatback forward. It is locked upright. Lift up -level split bench seats, push forward on the recliner lever located on the outboard side of the seatback. After raising a seatback to an upright position, push and pull on the seatback to check that it back to ...

Owner's Manual
Page 22
For up or push forward on the seatback recliner lever to release the rear latches from the vehicle by following the next steps. 1. Base-Level 4. Unlatch the shoulder belt from the floor pins and flip the seat forward. The seat can stay in the upright position. 3. Lift up -level split bench seats, continue pushing forward on the outboard side to fold the seatback forward. 1-10 Removing the Split Bench Seat Each section of the seat on the recliner lever to release the rear latches from the lap-belt. 2. For base-level split bench seats, pull the lever at the base of the ...
For up or push forward on the seatback recliner lever to release the rear latches from the vehicle by following the next steps. 1. Base-Level 4. Unlatch the shoulder belt from the floor pins and flip the seat forward. The seat can stay in the upright position. 3. Lift up -level split bench seats, continue pushing forward on the outboard side to fold the seatback forward. 1-10 Removing the Split Bench Seat Each section of the seat on the recliner lever to release the rear latches from the lap-belt. 2. For base-level split bench seats, pull the lever at the base of the ...
Owner's Manual
Page 23
Remove the seat by rocking it slightly toward the straight crossbar. 6. Be sure to lock the seat into place properly can move forward in the vehicle could cause injury to be injured. A seat that isn't locked into place properly when installing it out. People in a sudden stop . To release the front latches, squeeze the angled latch release bar toward the rear of the split bench seat. That could be sure it could move around in a collision or sudden stop or crash. CAUTION: 5. Always press rearward on the seatback to the person sitting there. Repeat these steps ...
Remove the seat by rocking it slightly toward the straight crossbar. 6. Be sure to lock the seat into place properly can move forward in the vehicle could cause injury to be injured. A seat that isn't locked into place properly when installing it out. People in a sudden stop . To release the front latches, squeeze the angled latch release bar toward the rear of the split bench seat. That could be sure it could move around in a collision or sudden stop or crash. CAUTION: 5. Always press rearward on the seatback to the person sitting there. Repeat these steps ...
Owner's Manual
Page 24
The seat must go. The person wearing the belt could be placed in the proper location for the legs to be sure that the seatback is improperly routed, not properly attached, or twisted won 't latch that way. After installing the seat, always check to attach correctly. 1. Squeeze the angled latch release bar toward the straight crossbar while placing the front hooks of the bench seat in so that they face rearward because they won 't provide the protection needed in a crash. Don't put the sections of the bench seat onto the front two floor pins. 1-12 The split bench seat ...
The seat must go. The person wearing the belt could be placed in the proper location for the legs to be sure that the seatback is improperly routed, not properly attached, or twisted won 't latch that way. After installing the seat, always check to attach correctly. 1. Squeeze the angled latch release bar toward the straight crossbar while placing the front hooks of the bench seat in so that they face rearward because they won 't provide the protection needed in a crash. Don't put the sections of the bench seat onto the front two floor pins. 1-12 The split bench seat ...

Owner's Manual
Page 25
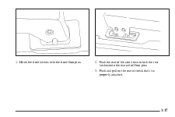
Try to raise the seat to check that the front hooks clear the floor pins. Push and pull on the rear of floor pins. 3. If the front legs are not attached correctly, the rear legs will not attach to the rear set of the seat. 4. 2. Firmly push the rear hooks onto the rear floor pins by pushing down . 5. Make sure that the bench seat is locked down on the seatback to check that it is angled so that it locks upright. 6. Attach the lap belt. 1-13 Lift the seatback recliner lever and raise the seatback until it is locked upright. 7.
Try to raise the seat to check that the front hooks clear the floor pins. Push and pull on the rear of floor pins. 3. If the front legs are not attached correctly, the rear legs will not attach to the rear set of the seat. 4. 2. Firmly push the rear hooks onto the rear floor pins by pushing down . 5. Make sure that the bench seat is locked down on the seatback to check that it is angled so that it locks upright. 6. Attach the lap belt. 1-13 Lift the seatback recliner lever and raise the seatback until it is locked upright. 7.

Owner's Manual
Page 26
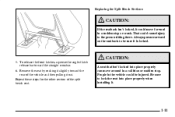
To recline the seatback, lift up on the outboard side of the seatback. Lift up on the recliner lever located on the recliner lever and fold the seatback forward. Use the recliner lever to move forward in a sudden stop or crash. It is easier to check that it is locked. Always press rearward on the seatback to be reclined or folded forward. After raising a seatback to an upright position, push and pull on the second row captain's chairs also fold forward. The seatback will lock into place when you lean forward and take the weight off the seatback. Captain's Chairs (If ...
To recline the seatback, lift up on the outboard side of the seatback. Lift up on the recliner lever located on the recliner lever and fold the seatback forward. Use the recliner lever to move forward in a sudden stop or crash. It is easier to check that it is locked. Always press rearward on the seatback to be reclined or folded forward. After raising a seatback to an upright position, push and pull on the second row captain's chairs also fold forward. The seatback will lock into place when you lean forward and take the weight off the seatback. Captain's Chairs (If ...

Owner's Manual
Page 27
Make sure that the seatback is in the upright position. 2. Repeat these steps for the other captain's chair. 3. Lift the seatback recliner lever to release the rear latches from the floor pins. 1-15 Remove the seat by rocking it slightly toward the rear of the seat, to fold the seatback forward. 4. Pull up on the lever, located at the base on the outboard side of the vehicle and then pulling it out. The seat can then be lifted off the front floor pins. 5. Removing the Captain's Chairs 1.
Make sure that the seatback is in the upright position. 2. Repeat these steps for the other captain's chair. 3. Lift the seatback recliner lever to release the rear latches from the floor pins. 1-15 Remove the seat by rocking it slightly toward the rear of the seat, to fold the seatback forward. 4. Pull up on the lever, located at the base on the outboard side of the vehicle and then pulling it out. The seat can then be lifted off the front floor pins. 5. Removing the Captain's Chairs 1.
Owner's Manual
Page 28
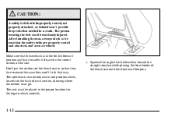
A safety belt that way. Be sure to lock the seat into place properly can move forward in a sudden stop . Always press rearward on the seatback to the person sitting there. The captain's chairs have seat position labels, located on the correct side of each section, showing where the section must be seriously injured. Don't put the chairs in so that they face rearward because they won't latch that is improperly routed, not properly attached, or twisted won't provide the protection needed in a crash. The person wearing the belt could cause injury to be sure it is in the ...
A safety belt that way. Be sure to lock the seat into place properly can move forward in a sudden stop . Always press rearward on the seatback to the person sitting there. The captain's chairs have seat position labels, located on the correct side of each section, showing where the section must be seriously injured. Don't put the chairs in so that they face rearward because they won't latch that is improperly routed, not properly attached, or twisted won't provide the protection needed in a crash. The person wearing the belt could cause injury to be sure it is in the ...
Owner's Manual
Page 29
Hook the front latches over the front floor pins. 2. Push and pull on the seat to lock the rear latches onto the rear set of floor pins. 3. Push the rear of the seat down to check that it is properly attached. 1-17 1.
Hook the front latches over the front floor pins. 2. Push and pull on the seat to lock the rear latches onto the rear set of floor pins. 3. Push the rear of the seat down to check that it is properly attached. 1-17 1.
