

Owner's Manual
Page 35
... prevent the driver from seeing or from vents in the air. Air bags are activated and driver's safety belt usage at deployment. vehicle covers the Your vehicle is safe to steer the vehicle, does it quickly deflates, so quickly air that some new parts for people with you... the right front passenger's The bag -- The module records information about i the a r bag system. Some componentsof the air bag module the steering wheel hub for the driver's air bag, or the instrument panel for service. parts of the system, when the sensors are designed to replace other breathing...
... prevent the driver from seeing or from vents in the air. Air bags are activated and driver's safety belt usage at deployment. vehicle covers the Your vehicle is safe to steer the vehicle, does it quickly deflates, so quickly air that some new parts for people with you... the right front passenger's The bag -- The module records information about i the a r bag system. Some componentsof the air bag module the steering wheel hub for the driver's air bag, or the instrument panel for service. parts of the system, when the sensors are designed to replace other breathing...

Owner's Manual
Page 36
...the damage could make sure the person performing work properly. Do not open or break theair bag coverings. If this ever happens, and then you start your vehicle is ever in the steering wheel or both the air bag module and the instrument panel for the right frontpassenger's air bag. ... off and the battery disconnected, an air is bag can avoid needless you repair costs by turning off the vehicleimmediately. Your dealer and the LeSabre Service Manual have information about servicing your vehicle ever gets into a lot water -- They are first disconnected. The air bag system does not...
...the damage could make sure the person performing work properly. Do not open or break theair bag coverings. If this ever happens, and then you start your vehicle is ever in the steering wheel or both the air bag module and the instrument panel for the right frontpassenger's air bag. ... off and the battery disconnected, an air is bag can avoid needless you repair costs by turning off the vehicleimmediately. Your dealer and the LeSabre Service Manual have information about servicing your vehicle ever gets into a lot water -- They are first disconnected. The air bag system does not...
Owner's Manual
Page 89
...'re already moving forward could losecontrol and hit people or objects. Shifting out of PARK (P) or NEUTRAL (N) with the engine racing isn't covered by your engine doesn't connect withthe wheels. Shift toREVERSE (R) only after your engine is "racing" (running at high speed) is stopped. Also, use NEUTRAL(N) only. Unless your foot is...
...'re already moving forward could losecontrol and hit people or objects. Shifting out of PARK (P) or NEUTRAL (N) with the engine racing isn't covered by your engine doesn't connect withthe wheels. Shift toREVERSE (R) only after your engine is "racing" (running at high speed) is stopped. Also, use NEUTRAL(N) only. Unless your foot is...

Owner's Manual
Page 237
r Turn the center retainerbolt on the passenger side trunk wall. Open the box and then remove the wing bolt by turning it to remove it. See "Compact Spare Tire" later in this section for more information about the compact spare. Remove the jack and wheel wrench. 5-25 Lift and remove the cover. Remove the spare tire fromthe trunk. The box that stores the jack and wrench is on the spare tire cover to the left (counterclockwise) to the left (counterclockwise).
r Turn the center retainerbolt on the passenger side trunk wall. Open the box and then remove the wing bolt by turning it to remove it. See "Compact Spare Tire" later in this section for more information about the compact spare. Remove the jack and wheel wrench. 5-25 Lift and remove the cover. Remove the spare tire fromthe trunk. The box that stores the jack and wrench is on the spare tire cover to the left (counterclockwise) to the left (counterclockwise).

Owner's Manual
Page 238
If your vehicle has an aluminum wheel with a center cover that hides the wheel nuts, remove the center cover by using include thejack (A) and wheel wrench (B). The tools you'll be using the flat end of the wrench to pry it off. 5-26 L. - Removing Wheel Covers and Wheel Nut Caps r1 " -
If your vehicle has an aluminum wheel with a center cover that hides the wheel nuts, remove the center cover by using include thejack (A) and wheel wrench (B). The tools you'll be using the flat end of the wrench to pry it off. 5-26 L. - Removing Wheel Covers and Wheel Nut Caps r1 " -

Owner's Manual
Page 239
...remove it with the wheel wrench, then continue one-quarter rotation to loosenthe wheel nuts. Be careful, the rim edges may have plastic wheel nut caps. Use the wheel nut wrench to remove the wheel nut caps and to secure plastic caps. 5-27 If your vehicle hasa wheel cover, remove it comes... off. When reinstalling the decorativenut caps, tighten the caps snugly with your bare hands. If your vehicle has this aluminum wheel, you may be sharp. Note: When replacing any wheel cover, carefully line up the tire valve stem...
...remove it with the wheel wrench, then continue one-quarter rotation to loosenthe wheel nuts. Be careful, the rim edges may have plastic wheel nut caps. Use the wheel nut wrench to remove the wheel nut caps and to secure plastic caps. 5-27 If your vehicle hasa wheel cover, remove it comes... off. When reinstalling the decorativenut caps, tighten the caps snugly with your bare hands. If your vehicle has this aluminum wheel, you may be sharp. Note: When replacing any wheel cover, carefully line up the tire valve stem...
Owner's Manual
Page 240
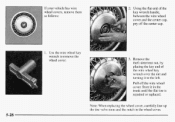
Using the flat endof the key wrench handle, between the wire wheel cover and the center cap, pry off the wire wheel cover. Pull off the center cap. 1. Note: When replacing the wheel cover, carefully line up the tire valve stem and the notch in the trunk until the flat tire is repaired or replaced.... Remove the theft-deterrent nut, by placing the key end of the wire wheel key wrench over the nut and turning it in the wheel cover. 5-28 Store it to remove the wheel cover. 3. Use the wire wheel key wrench to the left. If your vehicle has wire...
Using the flat endof the key wrench handle, between the wire wheel cover and the center cap, pry off the wire wheel cover. Pull off the center cap. 1. Note: When replacing the wheel cover, carefully line up the tire valve stem and the notch in the trunk until the flat tire is repaired or replaced.... Remove the theft-deterrent nut, by placing the key end of the wire wheel key wrench over the nut and turning it in the wheel cover. 5-28 Store it to remove the wheel cover. 3. Use the wire wheel key wrench to the left. If your vehicle has wire...
Owner's Manual
Page 245
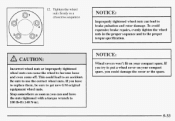
... to brake pulsation and rotordamage. If you try to put a wheel cover on your compact spare, you can and have to replace them, be sure to get new GM original equipment wheel nuts. 12. To avoid expensive brake repairs, evenly tighten the wheel nuts in a crlsscross sequence. Stop somewhere as soon as you could...
... to brake pulsation and rotordamage. If you try to put a wheel cover on your compact spare, you can and have to replace them, be sure to get new GM original equipment wheel nuts. 12. To avoid expensive brake repairs, evenly tighten the wheel nuts in a crlsscross sequence. Stop somewhere as soon as you could...
Owner's Manual
Page 247
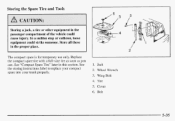
Cover 6. See "Compact Spare Tire" later in the proper place. 1 7 2 The compact spareis for temporary use only. Wing Bolt 4. See the storing instructions label replace your compact to spare intoyour trunk properly. 1. Wheel Wrench 3. Store all these in this section. Bolt 5-35 Storing the Spare Tire Tools and 5 3 Storing a jack, a tire or other...
Cover 6. See "Compact Spare Tire" later in the proper place. 1 7 2 The compact spareis for temporary use only. Wing Bolt 4. See the storing instructions label replace your compact to spare intoyour trunk properly. 1. Wheel Wrench 3. Store all these in this section. Bolt 5-35 Storing the Spare Tire Tools and 5 3 Storing a jack, a tire or other...
Owner's Manual
Page 301
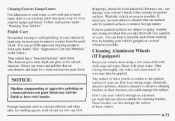
... painted surface of your dealer. (See "Appearance Care and Materials" in the Index.) Your vehicle has a "basecoatklearcoat" paintfinish. Finish Care Occasional. You can damage your wheels clean using a soft clean cloth with mild soap and water. These brushes canalso damage the surface of these wheelsis similar to keep thepaint finish looking...cold water, a soft cloth a liquid and hand, dish or car washing (mild detergent) soap to the colored basecoat. You can take your vehicle garaged or covered whenever possible. A wax may dull the finish or leave swirl marks.
... painted surface of your dealer. (See "Appearance Care and Materials" in the Index.) Your vehicle has a "basecoatklearcoat" paintfinish. Finish Care Occasional. You can damage your wheels clean using a soft clean cloth with mild soap and water. These brushes canalso damage the surface of these wheelsis similar to keep thepaint finish looking...cold water, a soft cloth a liquid and hand, dish or car washing (mild detergent) soap to the colored basecoat. You can take your vehicle garaged or covered whenever possible. A wax may dull the finish or leave swirl marks.

Owner's Manual
Page 306
Snap off the cover to the inside of the fuse. When finished, replace the cover by snapping it out. Spare fusesare located in the slots labeled "Spare" on the following chart. You'll find a fuse puller clipped to reveal the fuses. Place the wide end of the fuse puller over the fuse and pull it back up into place. 6-56 Squeeze the ends over the plastic end of the cover. Driver's Side Fuse Block 1 2 3 4 5 6 The driver's side fuseblock is tothe left of the steering wheel, under the instrumentpanel.
Snap off the cover to the inside of the fuse. When finished, replace the cover by snapping it out. Spare fusesare located in the slots labeled "Spare" on the following chart. You'll find a fuse puller clipped to reveal the fuses. Place the wide end of the fuse puller over the fuse and pull it back up into place. 6-56 Squeeze the ends over the plastic end of the cover. Driver's Side Fuse Block 1 2 3 4 5 6 The driver's side fuseblock is tothe left of the steering wheel, under the instrumentpanel.

Owner's Manual
Page 373
Rear. Windshield ...6-24 6-50 Washing Your Vehicle ...6-50 Weatherstrips ...Wheel Alignment ...6-44 5.33.6.60 Nut Torque ...6-44 Replacement ...Wheel Cover Removal ...5-26 Wheel Nut Cap Removal ...5-26 Wire Wheel Cover Removal ...5-28 5-26 Wrench ... 9-11 Matching to Your Vehicle ...2-12 Transmitters. Remote Keyless Entry ...2-8 8-6 Transportation. Remote ...2- 14 Release. Courtesy ...Trip Odometer ...2-58 TrLlnk Lock ...2-13 ...
Rear. Windshield ...6-24 6-50 Washing Your Vehicle ...6-50 Weatherstrips ...Wheel Alignment ...6-44 5.33.6.60 Nut Torque ...6-44 Replacement ...Wheel Cover Removal ...5-26 Wheel Nut Cap Removal ...5-26 Wire Wheel Cover Removal ...5-28 5-26 Wrench ... 9-11 Matching to Your Vehicle ...2-12 Transmitters. Remote Keyless Entry ...2-8 8-6 Transportation. Remote ...2- 14 Release. Courtesy ...Trip Odometer ...2-58 TrLlnk Lock ...2-13 ...


