Owner's Manual
Page 10
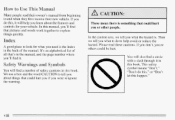
... you 'll find anumber of the manual. Safety Warnings and Symbols You will help you learn about things that pictures and words work together to end when they first receive their owner's manual from beginning to explain things quickly. This safety symbol means "Don't,'' "Don't do this book. In this manual...
... you 'll find anumber of the manual. Safety Warnings and Symbols You will help you learn about things that pictures and words work together to end when they first receive their owner's manual from beginning to explain things quickly. This safety symbol means "Don't,'' "Don't do this book. In this manual...
Owner's Manual
Page 21
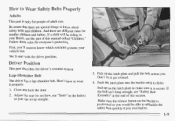
... so you would be able to . 1-9 Driver Position This part describes the driver's restraint system. How to know which restraint systems your Buick, see "Safety Belt Extender" at the end this manual called "Children." Follow those rules for everyone's protection. Adjust the seat (to make sure secure. P l up the latch plate, pull...
... so you would be able to . 1-9 Driver Position This part describes the driver's restraint system. How to know which restraint systems your Buick, see "Safety Belt Extender" at the end this manual called "Children." Follow those rules for everyone's protection. Adjust the seat (to make sure secure. P l up the latch plate, pull...

Owner's Manual
Page 36
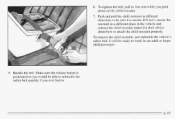
... the beltis snug. To make thebelt shorter, pull its .free endshown until as the lap part of a lap-shoulder belt. Rear Seat Outside Passenger Positions. end Make sure the release button on the buckle is positioned so you would be thrown out of this section. U .- If the belt isn't long enoug...
... the beltis snug. To make thebelt shorter, pull its .free endshown until as the lap part of a lap-shoulder belt. Rear Seat Outside Passenger Positions. end Make sure the release button on the buckle is positioned so you would be thrown out of this section. U .- If the belt isn't long enoug...

Owner's Manual
Page 38
The lap part of the belt shouldbe worn low and snug on the shoulder part. And you slid under thelap belt. The shoulder belt should go over the shoulder and across the chest. This could cause serious or even fatal injuries. If you 'd be likely less to slide under it, the belt would apply force at your abdomen. To make the lap part tight, pull down on the buckle end of the body are best able to the strong pelvic bones. Ina crash, this applies force to take belt restrainingforces. 3. These parts of the belt as you pull up on the hips, just touching the thighs.
The lap part of the belt shouldbe worn low and snug on the shoulder part. And you slid under thelap belt. The shoulder belt should go over the shoulder and across the chest. This could cause serious or even fatal injuries. If you 'd be likely less to slide under it, the belt would apply force at your abdomen. To make the lap part tight, pull down on the buckle end of the body are best able to the strong pelvic bones. Ina crash, this applies force to take belt restrainingforces. 3. These parts of the belt as you pull up on the hips, just touching the thighs.
Owner's Manual
Page 49
To tighten the belt, pull its free end while you would be ready to work for their advice about how to . Buckle the belt. To remove the child restraint, justunbuckle the vehicle's safety ...
To tighten the belt, pull its free end while you would be ready to work for their advice about how to . Buckle the belt. To remove the child restraint, justunbuckle the vehicle's safety ...
Owner's Manual
Page 84
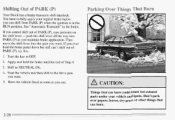
You have to the drive gear you ever hold the brake until the end of the shift lever -- Shift to OFF. 2. Have the vehicle fixed as soon as you cannot shift out PARK (P), easepressure on of Step 4. 3. See "Automatic ... ignition is in the Index. If you want . push the shift lever all the way into the gear you can 't shift out of PARK (P) Your Buick has a brake-transaxle shift interlock. If you maintain brake application. Don't park and over papers, leaves, drygrass or other things that can burn could touch...
You have to the drive gear you ever hold the brake until the end of the shift lever -- Shift to OFF. 2. Have the vehicle fixed as soon as you cannot shift out PARK (P), easepressure on of Step 4. 3. See "Automatic ... ignition is in the Index. If you want . push the shift lever all the way into the gear you can 't shift out of PARK (P) Your Buick has a brake-transaxle shift interlock. If you maintain brake application. Don't park and over papers, leaves, drygrass or other things that can burn could touch...
Owner's Manual
Page 92
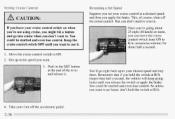
... release it . But you apply the brake. Remember that if you want to go into cruise whenyou don't want to your cruise control at the end of course, shutsoff the cruise control. So unless you hold the switch at R/A longer than half a second, the vehicle will keep going about 25 mph...
... release it . But you apply the brake. Remember that if you want to go into cruise whenyou don't want to your cruise control at the end of course, shutsoff the cruise control. So unless you hold the switch at R/A longer than half a second, the vehicle will keep going about 25 mph...
Owner's Manual
Page 93
... is erased. 0 2-37 When you want , and then release the switch. Push the button at the end of the lever, then release the button and the accelerator pedal.You'll now cruise at the end of the hills. Move the cruise switch from ON to be too much trouble and don't use... or ignition, the your speed while using cruise control: 0 Push in very small amounts, push the button for less thanhalf a second and then release it . Ending Cruise Control There are two ways to OFF.
... is erased. 0 2-37 When you want , and then release the switch. Push the button at the end of the lever, then release the button and the accelerator pedal.You'll now cruise at the end of the hills. Move the cruise switch from ON to be too much trouble and don't use... or ignition, the your speed while using cruise control: 0 Push in very small amounts, push the button for less thanhalf a second and then release it . Ending Cruise Control There are two ways to OFF.

Owner's Manual
Page 157
... other driversare going to be ready for their mistakes. Rear-end collisions areabout the most preventable of accidents. Yet they might do. You never know when the vehicle in both city and rural driving. Please start with a very important safety device inyour Buick: Buckle up. (See "Safety Belts" in the Index.) Defensive...
... other driversare going to be ready for their mistakes. Rear-end collisions areabout the most preventable of accidents. Yet they might do. You never know when the vehicle in both city and rural driving. Please start with a very important safety device inyour Buick: Buckle up. (See "Safety Belts" in the Index.) Defensive...
Owner's Manual
Page 158
... (355 ml) bottles of beer in every U.S. Police records show that is a national tragedy. For persons under 2 1, it's against the law in an hour will end up with a BAC of about 0.06 percent. Theperson would reach the same BAC by some 18,000 annual motor vehicle-related deaths have been associated...
... (355 ml) bottles of beer in every U.S. Police records show that is a national tragedy. For persons under 2 1, it's against the law in an hour will end up with a BAC of about 0.06 percent. Theperson would reach the same BAC by some 18,000 annual motor vehicle-related deaths have been associated...
Owner's Manual
Page 197
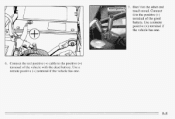
Connect the red positive (+) cable to the positive (+) terminal of the vehicle with the dead battery. Use a remote positive (+) terminal if the vehicle has one. 5-5 7 . Use a remote positive (+) terminal if 6. Don't let the other end touch metal. Connect it to the positive (+) terminal of the good battery.
Connect the red positive (+) cable to the positive (+) terminal of the vehicle with the dead battery. Use a remote positive (+) terminal if the vehicle has one. 5-5 7 . Use a remote positive (+) terminal if 6. Don't let the other end touch metal. Connect it to the positive (+) terminal of the good battery.
Owner's Manual
Page 198
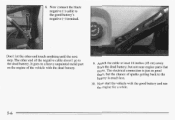
... next step. Now connect the black negative (-) cable to the dead battery. It goes to the battery is much less. 10. Don't let the other end of sparks getting back to a heavy unpainted metal part on theengine of the vehicle with the good battery and run the engine for a while. ' Attach...
... next step. Now connect the black negative (-) cable to the dead battery. It goes to the battery is much less. 10. Don't let the other end of sparks getting back to a heavy unpainted metal part on theengine of the vehicle with the good battery and run the engine for a while. ' Attach...

Owner's Manual
Page 202
L Attach a separate safety chain around the outboard end of the rear wheels on both sides. No 4 " x 4 " wood beam is needed. 5-10 Rear Towing Tow Limits -- 55 mph (88 kmlh), 500 miles (800 km) Attach T-hook chains to slots in the bottom of the floor pan directly ahead of each control arm.
L Attach a separate safety chain around the outboard end of the rear wheels on both sides. No 4 " x 4 " wood beam is needed. 5-10 Rear Towing Tow Limits -- 55 mph (88 kmlh), 500 miles (800 km) Attach T-hook chains to slots in the bottom of the floor pan directly ahead of each control arm.

Owner's Manual
Page 203
Attach a separate safety chain around the outboard end of the rearbumper cover. Position the lower sling crossbardirectly behind and at the lower edge of each lower control arm. 5ll
Attach a separate safety chain around the outboard end of the rearbumper cover. Position the lower sling crossbardirectly behind and at the lower edge of each lower control arm. 5ll
Owner's Manual
Page 213
... by driving slowly to use in PARK (P). 3. But if you or other side the of the traffic lane. The vehicle can put blocks at theopposite end. 5-21 Changing a tire can still steer. Take your tire.To help prevent the vehicle from the one being changed. In any rear blowout, remove your...
... by driving slowly to use in PARK (P). 3. But if you or other side the of the traffic lane. The vehicle can put blocks at theopposite end. 5-21 Changing a tire can still steer. Take your tire.To help prevent the vehicle from the one being changed. In any rear blowout, remove your...

Owner's Manual
Page 216
Removing wheel clovers and Wheel Nut Caps : ." The tools you'll be using the flat end of the wheel wrench to access the wheel nuts. 5-24 If your vehicle has an aluminum wheel with a center cover, remove it by using include the jack and wheel (A) wrench (B).
Removing wheel clovers and Wheel Nut Caps : ." The tools you'll be using the flat end of the wheel wrench to access the wheel nuts. 5-24 If your vehicle has an aluminum wheel with a center cover, remove it by using include the jack and wheel (A) wrench (B).

Owner's Manual
Page 218
Use the wire wheel key wrench to the left. If your vehicle has wire wheel covers, remove them as follows: Using the flat end of the wire wheel key wrench over the nut and turning it to remove the wheel cover. Remove the theft-deterrent nut, by placing the key end of the key wrench handle, between the wire wheel cover and the center cap, pry off the wire wheel cover. Note: When replacing the wheel cover, carefully line up the tire valve stem and the notch in the wheel cover. Pull off the center cap.
Use the wire wheel key wrench to the left. If your vehicle has wire wheel covers, remove them as follows: Using the flat end of the wire wheel key wrench over the nut and turning it to remove the wheel cover. Remove the theft-deterrent nut, by placing the key end of the key wrench handle, between the wire wheel cover and the center cap, pry off the wire wheel cover. Note: When replacing the wheel cover, carefully line up the tire valve stem and the notch in the wheel cover. Pull off the center cap.
Owner's Manual
Page 219
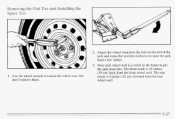
Attach thewheel wrench to the bolt on the end of the jack and rotate thewrench clockwise to loosen thewheel nuts, but don't remove them. 3. Use the wheel wrench to raise the jack head a few inches. 1. The front notch is 10 inches (25 cm) back from the rear wheel well. 5-27 Removing the Flat Tire and Installing the Spare Tire 2. The rear notch is a notch in the frame to put the jackhead into. Near each wheel well is 8 inches (25 cm) forward from the front wheel well.
Attach thewheel wrench to the bolt on the end of the jack and rotate thewrench clockwise to loosen thewheel nuts, but don't remove them. 3. Use the wheel wrench to raise the jack head a few inches. 1. The front notch is 10 inches (25 cm) back from the rear wheel well. 5-27 Removing the Flat Tire and Installing the Spare Tire 2. The rear notch is a notch in the frame to put the jackhead into. Near each wheel well is 8 inches (25 cm) forward from the front wheel well.

Owner's Manual
Page 222
...; I Make sure each wheel hole while tightening the nuts. Never use oil grease on the wheel mounting,surface and replace thewheel nuts with the rounded end of the nuts toward the wheel. . In an towel emergency, you can make the wheel nuts become loose after a time. or If you wheel, remove...
...; I Make sure each wheel hole while tightening the nuts. Never use oil grease on the wheel mounting,surface and replace thewheel nuts with the rounded end of the nuts toward the wheel. . In an towel emergency, you can make the wheel nuts become loose after a time. or If you wheel, remove...
Owner's Manual
Page 269
...6-41 , Some are of these to clean your tires. a When you can . Use only SAE Class "S" type chains that arethe proper size for your Buick, be sure tofollow the manufacturer's warnings They can alldamage your vehicle, stop and retighten them as tightly as possible with the... ends securely fastened. Drive slowly and follow the chain f manufacturer's instructions. I you use any of dangerous if you breathe their fumes in closed space. ...
...6-41 , Some are of these to clean your tires. a When you can . Use only SAE Class "S" type chains that arethe proper size for your Buick, be sure tofollow the manufacturer's warnings They can alldamage your vehicle, stop and retighten them as tightly as possible with the... ends securely fastened. Drive slowly and follow the chain f manufacturer's instructions. I you use any of dangerous if you breathe their fumes in closed space. ...