

Owner's Manual
Page 11
... "Reporting Safety Defects" on page Index ... gives you how ta contact Buick for assistance and how .toget service publications. It also 277. Here's an alphabetical listing of Contents 10 13 ' ...Seats and RestraintSystems ...This parttells you how to start and operateyour .Buick. - >. ...,... ...- ... __.. @ i Table of almost every subject this manual. Features and Controls...
... "Reporting Safety Defects" on page Index ... gives you how ta contact Buick for assistance and how .toget service publications. It also 277. Here's an alphabetical listing of Contents 10 13 ' ...Seats and RestraintSystems ...This parttells you how to start and operateyour .Buick. - >. ...,... ...- ... __.. @ i Table of almost every subject this manual. Features and Controls...

Owner's Manual
Page 14
... LIGHTER e f ; Vehicle Symbols These are some of the symbols you may see: FUSE A These symbols are important for you may find on your controls: -F= l1 4 SEAT TURN SIGNALS e RADIO VOLUME 3 a 4 wlNDsHIELDw DEFROSTER RADIATOR COOLANT FUEL CONDITIONING AIR .ie BURNS POWER WINDOW t ' I & SPEAKER k3 b
... LIGHTER e f ; Vehicle Symbols These are some of the symbols you may see: FUSE A These symbols are important for you may find on your controls: -F= l1 4 SEAT TURN SIGNALS e RADIO VOLUME 3 a 4 wlNDsHIELDw DEFROSTER RADIATOR COOLANT FUEL CONDITIONING AIR .ie BURNS POWER WINDOW t ' I & SPEAKER k3 b
Owner's Manual
Page 15
Part 1 includes: I Seats and Seat Controls ..._...HeadRestraints ...SafetyBelts ...How to use your BI k and how to Wear Safety Belts Properly ...Lap-ShoulderBelt ...Supplemental Restraint System(Air bag) ...,...Safety Belt Use ... ...Replacing Safety Belts Aftera Crash ... 14 18 21 28 29 35 40 48 49 50 60 63 63 64 You can,also learn about the seats in your safety belts properly. @ (] Part 1 SeatsandRestraintSystems Here you'll find inform n about some'things you should not do with safety belts...
Part 1 includes: I Seats and Seat Controls ..._...HeadRestraints ...SafetyBelts ...How to use your BI k and how to Wear Safety Belts Properly ...Lap-ShoulderBelt ...Supplemental Restraint System(Air bag) ...,...Safety Belt Use ... ...Replacing Safety Belts Aftera Crash ... 14 18 21 28 29 35 40 48 49 50 60 63 63 64 You can,also learn about the seats in your safety belts properly. @ (] Part 1 SeatsandRestraintSystems Here you'll find inform n about some'things you should not do with safety belts...

Owner's Manual
Page 16
how to adjust them, and a l g a about the seats -- , , Seats and Seat Controls This section tellsyou about *reclining'front seatbacks, .and head ri%tmints. Manual Seat 14
how to adjust them, and a l g a about the seats -- , , Seats and Seat Controls This section tellsyou about *reclining'front seatbacks, .and head ri%tmints. Manual Seat 14

Owner's Manual
Page 17
... seatby holding the switchup. Front Control, (F): Raise the front the seatby of the seat. Center Control (C):Move the seat forward or back by holding the control to holding the controlup or down. 15 F0u.r Way Manual Seat Drivers Seat Only (Option) . . - The lever near the center allows YOU to forward ...and slide back. The lever near the outer of side the seatUnlocks the seat allowing it to tilt the scat up and down lower' the...
... seatby holding the switchup. Front Control, (F): Raise the front the seatby of the seat. Center Control (C):Move the seat forward or back by holding the control to holding the controlup or down. 15 F0u.r Way Manual Seat Drivers Seat Only (Option) . . - The lever near the center allows YOU to forward ...and slide back. The lever near the outer of side the seatUnlocks the seat allowing it to tilt the scat up and down lower' the...

Owner's Manual
Page 18
Hold the switch down to lower the rear the seat. Reclining Front Seatback(s) 16 . II Rear Control (R): Raise the rearof the seat by holding of the switch up.
Hold the switch down to lower the rear the seat. Reclining Front Seatback(s) 16 . II Rear Control (R): Raise the rearof the seat by holding of the switch up.

Owner's Manual
Page 22
When you fold the seatback push the top of the seat, up, is making sure the seat completely closed to ensure the seat locksin a sudden stop or crash.
When you fold the seatback push the top of the seat, up, is making sure the seat completely closed to ensure the seat locksin a sudden stop or crash.

Owner's Manual
Page 32
- to the strong Just get out. And you don't have unbuckle when you get into your vehicle. pel Then close and lock the door. In a crash, this applies force to The lap belt should be worn low on the hips as as possible.
- to the strong Just get out. And you don't have unbuckle when you get into your vehicle. pel Then close and lock the door. In a crash, this applies force to The lap belt should be worn low on the hips as as possible.
Owner's Manual
Page 33
... unbuckle it clicks. Adjust the seat (to see how, see "Seats" in an to make sure it is secure. We hope you . I 3. Push the latch plate into the buckle until it in the Index) so you fully opening a door. It's possiblethat an automatic belt could keep your Buick needs service. Just close the...
... unbuckle it clicks. Adjust the seat (to see how, see "Seats" in an to make sure it is secure. We hope you . I 3. Push the latch plate into the buckle until it in the Index) so you fully opening a door. It's possiblethat an automatic belt could keep your Buick needs service. Just close the...

Owner's Manual
Page 43
Move your seat enough far is to making safety belts effective is wearing them properly. See "Driver Position,"'earlier in a. ,crash. lap Right Front Passenger Position The rightfront ... mother. When a safety beltis worn properly, it's more likely thatthe fetus won't be less , likely to see how, see "Seats" in the Index) so you 'd be hurt ina crash. Adjust the seat ,(to slide under the belt in this part. 41 That way you can sit up straight. For pregnant women,as...
Move your seat enough far is to making safety belts effective is wearing them properly. See "Driver Position,"'earlier in a. ,crash. lap Right Front Passenger Position The rightfront ... mother. When a safety beltis worn properly, it's more likely thatthe fetus won't be less , likely to see how, see "Seats" in the Index) so you 'd be hurt ina crash. Adjust the seat ,(to slide under the belt in this part. 41 That way you can sit up straight. For pregnant women,as...

Owner's Manual
Page 44
... next to : wearone properly. Rear Sedt Outside Passenger Positions 1. Here's how to the windows have lap-shoulder belts. ..RearSeat.Passengers It's very important for.reaq seat passengersto buckle up the latch plate and pull the belt across you. Don't let it get twisted. 42 Accident stiitistics show that unbelted people the...
... next to : wearone properly. Rear Sedt Outside Passenger Positions 1. Here's how to the windows have lap-shoulder belts. ..RearSeat.Passengers It's very important for.reaq seat passengersto buckle up the latch plate and pull the belt across you. Don't let it get twisted. 42 Accident stiitistics show that unbelted people the...
Owner's Manual
Page 47
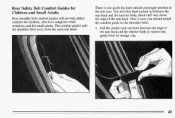
...the neck and head. Here how you should'install the comfort guide the shoulder belts: on 1. You will find them tucked in the rear seat. Rear Safety Belt Comfort Guides for Children and Small Adults Rear shoulder belt comfort guides..willprovide added comfort for children, who have outgrown child ...restraints, and for each outside passenger position in between the seat back andthe interior body, about half-way down is the edge of the seat back and the interior body remove the to guide fromits storage clip. : 45 There isone guide for ...
...the neck and head. Here how you should'install the comfort guide the shoulder belts: on 1. You will find them tucked in the rear seat. Rear Safety Belt Comfort Guides for Children and Small Adults Rear shoulder belt comfort guides..willprovide added comfort for children, who have outgrown child ...restraints, and for each outside passenger position in between the seat back andthe interior body, about half-way down is the edge of the seat back and the interior body remove the to guide fromits storage clip. : 45 There isone guide for ...

Owner's Manual
Page 48
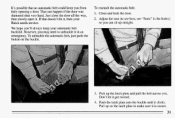
Be sure that the shoulder belt crosses the shoulder. Buckle the belt around the child, and make sure that are both the lap belt and the shoulder belt secured properly, Make sure that the beltis not twisted and it lies flat. Slide the guide under the belt and the guide on : top. 4. The elastic cord must be under and past the belt. I 3. See "Safety Belts, Rear Seat Passengers" in the Index. 46 2. Then, place the guide over the belt, and.insertthe two edgesof the belt into the slotsof the guide. The elastic cord must be under the belt.
Be sure that the shoulder belt crosses the shoulder. Buckle the belt around the child, and make sure that are both the lap belt and the shoulder belt secured properly, Make sure that the beltis not twisted and it lies flat. Slide the guide under the belt and the guide on : top. 4. The elastic cord must be under and past the belt. I 3. See "Safety Belts, Rear Seat Passengers" in the Index. 46 2. Then, place the guide over the belt, and.insertthe two edgesof the belt into the slotsof the guide. The elastic cord must be under the belt.
Owner's Manual
Page 49
... along the belt. Rotatethe guide and clip inward and in reverse order. To remove andstore the comfort guides,just perform these steps in between the seat backand the interior body, leaving onlythe loop of elastic cord exposed. Lap Belt Center Passenger Position n When you sit in a center...
... along the belt. Rotatethe guide and clip inward and in reverse order. To remove andstore the comfort guides,just perform these steps in between the seat backand the interior body, leaving onlythe loop of elastic cord exposed. Lap Belt Center Passenger Position n When you sit in a center...

Owner's Manual
Page 54
... plate, and run the lap and shoulder or portions of neck, putit behind the child restraint. 52 Follow the instructions 4. Put the restraint on the seat.
... plate, and run the lap and shoulder or portions of neck, putit behind the child restraint. 52 Follow the instructions 4. Put the restraint on the seat.

Owner's Manual
Page 56
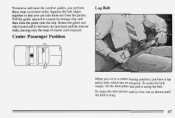
Securing a ChiId Restraint in the child restraint the as possible by tilting the latch plate and pulling it along the belt. Put the restraint on the seat. Secure the child in .the Center " C '. ' Rear Seat Position 1. Make the beltas long as instructions say. 54 See the earlier section aboutthe top strap if the child restraint has one. 2. Follow the instructions for the child restraint. 3. U When you secure a child restraint a center seating in position, you'll be using the lap belt.
Securing a ChiId Restraint in the child restraint the as possible by tilting the latch plate and pulling it along the belt. Put the restraint on the seat. Secure the child in .the Center " C '. ' Rear Seat Position 1. Make the beltas long as instructions say. 54 See the earlier section aboutthe top strap if the child restraint has one. 2. Follow the instructions for the child restraint. 3. U When you secure a child restraint a center seating in position, you'll be using the lap belt.

Owner's Manual
Page 57
... . If the child restraint isn't secure, turn ratch plate over and buckle the it restraint in a different place the vehicle and in the Right Front Seat 5.
... . If the child restraint isn't secure, turn ratch plate over and buckle the it restraint in a different place the vehicle and in the Right Front Seat 5.

Owner's Manual
Page 58
To use a child restraint here, you will need a special infant/child seat attaching belt and hardware that the goes with it. See the earlier section about the top strap if the child restraint has one. 56
To use a child restraint here, you will need a special infant/child seat attaching belt and hardware that the goes with it. See the earlier section about the top strap if the child restraint has one. 56

Owner's Manual
Page 59
instructions with it and steps: these 2. follow the , . S n a p . ~ m of the infant/child seat attaching belt hook of near the floor at the door side the seat. 1. Unbuckle the automatic lap-shoulder belt by pushipg the button on the door, ready be rebuckledfor use to by adults or older children. 57 It will stay on the buckle. Once the special hardware is installed, please.
instructions with it and steps: these 2. follow the , . S n a p . ~ m of the infant/child seat attaching belt hook of near the floor at the door side the seat. 1. Unbuckle the automatic lap-shoulder belt by pushipg the button on the door, ready be rebuckledfor use to by adults or older children. 57 It will stay on the buckle. Once the special hardware is installed, please.

Owner's Manual
Page 60
Secure the child in the child restraint as the instructions say. You can make the belt longer tilting the buckle by and pulling it along the belt. Follow the instructions for the child restraint. 6. I 5 ,~ 5: Put the restraint on the seat. 4.
Secure the child in the child restraint as the instructions say. You can make the belt longer tilting the buckle by and pulling it along the belt. Follow the instructions for the child restraint. 6. I 5 ,~ 5: Put the restraint on the seat. 4.


