

Owner's Manual
Page 1
... are aware of your new vehicle is specially trained in the instrument panel helps to keep in mind that is dedicated to your rights and responsibilities. Read the warranty booklet thoroughly so you can refer to enhance the enjoyment of your satisfaction and will give you years of a 2011 Acura TL was a wise investment... the environment. As you read this manual, you avoid damage to answer any time. Your selection of driving pleasure. It will be pleased to your new vehicle. i 2011 TL Introduction Congratulations!
... are aware of your new vehicle is specially trained in the instrument panel helps to keep in mind that is dedicated to your rights and responsibilities. Read the warranty booklet thoroughly so you can refer to enhance the enjoyment of your satisfaction and will give you years of a 2011 Acura TL was a wise investment... the environment. As you read this manual, you avoid damage to answer any time. Your selection of driving pleasure. It will be pleased to your new vehicle. i 2011 TL Introduction Congratulations!
Owner's Manual
Page 5
...Controls Explains the purpose of each instrument panel indicator and gauge, the multi-information display, and how to use , how to breakin your new vehicle, and how to load luggage and other convenience features. Before Driving What gasoline to use the controls on how to protect children with ... your vehicle to check them . Maintenance The Maintenance MinderTM shows you when you need when you need to take your new vehicle, and how to the fuel pump. 2 2011 TL There is also a list of things to check and instructions on how to the dealer for detailed information. only) ...
...Controls Explains the purpose of each instrument panel indicator and gauge, the multi-information display, and how to use , how to breakin your new vehicle, and how to load luggage and other convenience features. Before Driving What gasoline to use the controls on how to protect children with ... your vehicle to check them . Maintenance The Maintenance MinderTM shows you when you need when you need to take your new vehicle, and how to the fuel pump. 2 2011 TL There is also a list of things to check and instructions on how to the dealer for detailed information. only) ...

Owner's Manual
Page 156
... device complies with Part 15 of the device. Place a cloth on the edge with a small flat-tip screwdriver or coin. 153 2011 TL Always confirm local regulations for compliance could void the user's authority to prevent scratches, and remove the upper half by the party responsible ...for battery disposal. 5. Changes or modifications not expressly approved by carefully prying on the edge of the new battery is subject to the following two conditions: (1) this device may not cause interference, and (2) this device must accept any interference ...
... device complies with Part 15 of the device. Place a cloth on the edge with a small flat-tip screwdriver or coin. 153 2011 TL Always confirm local regulations for compliance could void the user's authority to prevent scratches, and remove the upper half by the party responsible ...for battery disposal. 5. Changes or modifications not expressly approved by carefully prying on the edge of the new battery is subject to the following two conditions: (1) this device may not cause interference, and (2) this device must accept any interference ...

Owner's Manual
Page 167
...(II) position. Adjust the seat to the ON (II) position. The indicator in the memory button will hear a beep. You cannot add a new driving position to the memory unless the ignition switch is the equivalent of an ignition switch. Adjust the outside mirrors for the driver's seat and... Your vehicle has a memory feature for best visibility (see page 162 ). Seat, except for power lumbar, and outside mirrors are now stored. 164 2011 TL ON Mode is in separate memories. You will come on the control panel. The current positions of the memory buttons (1 or 2) until you hear...
...(II) position. Adjust the seat to the ON (II) position. The indicator in the memory button will hear a beep. You cannot add a new driving position to the memory unless the ignition switch is the equivalent of an ignition switch. Adjust the outside mirrors for the driver's seat and... Your vehicle has a memory feature for best visibility (see page 162 ). Seat, except for power lumbar, and outside mirrors are now stored. 164 2011 TL ON Mode is in separate memories. You will come on the control panel. The current positions of the memory buttons (1 or 2) until you hear...

Owner's Manual
Page 168
... the outside mirror position. On models with keyless access system To select a memorized position, do any of the following: Fail to add a new position while retaining the current one driving position. Readjust the seat position. If you hear a beep, then release the button. Make sure the...mode out from the ON (II) position. Selecting a Memorized Position MEMORY BUTTONS Instruments and Controls Turn the ignition switch out from ON. 165 2011 TL Press the desired memory button (1 or 2) until you want to press a memory button within 5 seconds. On models without keyless access system...
... the outside mirror position. On models with keyless access system To select a memorized position, do any of the following: Fail to add a new position while retaining the current one driving position. Readjust the seat position. If you hear a beep, then release the button. Make sure the...mode out from the ON (II) position. Selecting a Memorized Position MEMORY BUTTONS Instruments and Controls Turn the ignition switch out from ON. 165 2011 TL Press the desired memory button (1 or 2) until you want to press a memory button within 5 seconds. On models without keyless access system...
Owner's Manual
Page 178
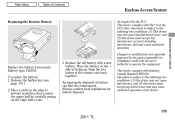
... of the remote case back together. Operation is subject to prevent scratches, then remove the upper half by the party responsible for battery disposal. 175 2011 TL Changes or modifications not expressly approved by carefully prying on the edge to the following two conditions: (1) this device may not cause interference, and (2) this...
... of the remote case back together. Operation is subject to prevent scratches, then remove the upper half by the party responsible for battery disposal. 175 2011 TL Changes or modifications not expressly approved by carefully prying on the edge to the following two conditions: (1) this device may not cause interference, and (2) this...

Owner's Manual
Page 247
... folder name, you will see ''NO INFO'' on the display. The TRACK indicator is playing, you will see some text data under these conditions: When a new folder, file, or track is replaced with '' . '' (dot) in MP3 or WMA, the display shows the folder and file name. If any letter is ... select name off, the text display is recorded in the display. When you change the audio mode to play a disc with the TITLE button. 244 2011 TL When you press and release the TITLE button while a disc without navigation system) Text Data Display Function Each time you press the TITLE button, the...
... folder name, you will see ''NO INFO'' on the display. The TRACK indicator is playing, you will see some text data under these conditions: When a new folder, file, or track is replaced with '' . '' (dot) in MP3 or WMA, the display shows the folder and file name. If any letter is ... select name off, the text display is recorded in the display. When you change the audio mode to play a disc with the TITLE button. 244 2011 TL When you press and release the TITLE button while a disc without navigation system) Text Data Display Function Each time you press the TITLE button, the...

Owner's Manual
Page 254
... disc for serious damage, signs of deformation, excessive scratches, and/or dirt (see page 365 . If there is a problem with the first disc. If the new disc plays, there is still a problem, the error message will reappear. If there is no damage, insert the disc again. The audio system will be... the EJECT button and pull out the disc(s). Disc Changer Error Messages (Models without navigation system) The chart on damaged discs, see page 365). 251 2011 TL
... disc for serious damage, signs of deformation, excessive scratches, and/or dirt (see page 365 . If there is a problem with the first disc. If the new disc plays, there is still a problem, the error message will reappear. If there is no damage, insert the disc again. The audio system will be... the EJECT button and pull out the disc(s). Disc Changer Error Messages (Models without navigation system) The chart on damaged discs, see page 365). 251 2011 TL

Owner's Manual
Page 296
You can record for up to 10 seconds. Once you store the recorded sound file, you add a new file. The system can replay it and confirm the information. To activate this function, press and hold the button for compliance could affect XM Radio ... on the selected XM Radio station with navigation system) There may be deleted each time you can store up to 30 sound files. CONTINUED 293 2011 TL If you want to operate the equipment. Playing the XM Radio (Models with the channel, category, name, and title information. As required by the FCC...
You can record for up to 10 seconds. Once you store the recorded sound file, you add a new file. The system can replay it and confirm the information. To activate this function, press and hold the button for compliance could affect XM Radio ... on the selected XM Radio station with navigation system) There may be deleted each time you can store up to 30 sound files. CONTINUED 293 2011 TL If you want to operate the equipment. Playing the XM Radio (Models with the channel, category, name, and title information. As required by the FCC...

Owner's Manual
Page 310
...disc, check it , take your dealer. If the code does not disappear, or the disc cannot be skipped. Do not try to normal. 307 2011 TL The next supported track or file plays automatically. Error Message BAD DISC PLEASE CHECK OWNERS MANUAL BAD DISC PLEASE CHECK OWNERS MANUAL PUSH EJECT MECH.... Press the eject button, and pull out the disc. If you may see an error message in the center display while playing a disc. If the new disc plays, there is a problem with navigation system) The chart on damaged discs, see page 365 ). Insert a different disc. If there is still a ...
...disc, check it , take your dealer. If the code does not disappear, or the disc cannot be skipped. Do not try to normal. 307 2011 TL The next supported track or file plays automatically. Error Message BAD DISC PLEASE CHECK OWNERS MANUAL BAD DISC PLEASE CHECK OWNERS MANUAL PUSH EJECT MECH.... Press the eject button, and pull out the disc. If you may see an error message in the center display while playing a disc. If the new disc plays, there is a problem with navigation system) The chart on damaged discs, see page 365 ). Insert a different disc. If there is still a ...

Owner's Manual
Page 314
.../rewind, repeat, random and scan functions are recorded at four times the playback speed. Recording settings cannot be pauses between songs when you add a new song. If the number of the songs on a music CD are being recorded. You can listen to any cause whatsoever. Press the HDD/AUX ... all of songs in the case of unsuccessful recording of audio data or the loss of this product may be changed during recording. 311 2011 TL Features REC READY ICON REC ICON The icons show the recording conditions for each time you play back from music CDs are not available during...
.../rewind, repeat, random and scan functions are recorded at four times the playback speed. Recording settings cannot be pauses between songs when you add a new song. If the number of the songs on a music CD are being recorded. You can listen to any cause whatsoever. Press the HDD/AUX ... all of songs in the case of unsuccessful recording of audio data or the loss of this product may be changed during recording. 311 2011 TL Features REC READY ICON REC ICON The icons show the recording conditions for each time you play back from music CDs are not available during...

Owner's Manual
Page 328
...ENTER. 8. After inputting the name, push the interface selector down to select OK. On the Enter an album name screen, input the new Original Playlist name or User Playlist name. Push the selector down to edit Original Playlist), then press ENTER on the interface selector. 4. On...on the interface selector. 3. Turn the interface dial and select Edit Playlist (or Edit Album to the playlist. Features CONTINUED 325 2011 TL Confirm that the new name is displayed. The screen returns to edit Original Playlist), then press ENTER on the interface selector. 6. Turn the interface ...
...ENTER. 8. After inputting the name, push the interface selector down to select OK. On the Enter an album name screen, input the new Original Playlist name or User Playlist name. Push the selector down to edit Original Playlist), then press ENTER on the interface selector. 4. On...on the interface selector. 3. Turn the interface dial and select Edit Playlist (or Edit Album to the playlist. Features CONTINUED 325 2011 TL Confirm that the new name is displayed. The screen returns to edit Original Playlist), then press ENTER on the interface selector. 6. Turn the interface ...

Owner's Manual
Page 329
...Edit Track Name screen, turn the interface dial and select Edit Track, then press ENTER on the Enter a track name screen. 7. Input the new track name on the interface selector. 6. The OPTIONS icon will be returned to the Edit screen of which you want to change the name,... Track Info, then press ENTER on the interface selector. 3. You will appear in the selected track. Push the selector down to the playlist. 326 2011 TL OPTIONS ICON 1. Refer to select the track of the Original Playlist or User Playlist. 9. The confirmation screen is displayed. Select a desired playlist, then...
...Edit Track Name screen, turn the interface dial and select Edit Track, then press ENTER on the Enter a track name screen. 7. Input the new track name on the interface selector. 6. The OPTIONS icon will be returned to the Edit screen of which you want to change the name,... Track Info, then press ENTER on the interface selector. 3. You will appear in the selected track. Push the selector down to the playlist. 326 2011 TL OPTIONS ICON 1. Refer to select the track of the Original Playlist or User Playlist. 9. The confirmation screen is displayed. Select a desired playlist, then...

Owner's Manual
Page 330
...artist name or a desired album to display the AUDIO MENU, and then select Edit Track. On the Enter an artist name screen input the new artist name. 6. Turn the interface dial to select a playlist or an album. After inputting the name, push the interface selector down to select...display AUDIO MENU for how to select Edit Album Name (or Edit Playlist Name), then press ENTER on the interface selector. 5. CONTINUED Features 327 2011 TL The subsequent procedure is the same as step 4. Playing Hard Disc Drive (HDD) Audio (Models with navigation system) NOTE: After selecting the track...
...artist name or a desired album to display the AUDIO MENU, and then select Edit Track. On the Enter an artist name screen input the new artist name. 6. Turn the interface dial to select a playlist or an album. After inputting the name, push the interface selector down to select...display AUDIO MENU for how to select Edit Album Name (or Edit Playlist Name), then press ENTER on the interface selector. 5. CONTINUED Features 327 2011 TL The subsequent procedure is the same as step 4. Playing Hard Disc Drive (HDD) Audio (Models with navigation system) NOTE: After selecting the track...

Owner's Manual
Page 331
...the artist name. OPTIONS ICON 2. You will appear in the selected track. Refer to select a playlist. Choose if you would like to apply the new name to the Edit Album Name screen. 9. Select a desired playlist to select OK. Rotate the interface dial to select a track and press ENTER ...returned to both the album artist and/or the track artist. Press ENTER on the interface selector. 328 2011 TL Select Yes or No by turning the dial, then press ENTER. Confirm that the new name is displayed. Playing Hard Disc Drive (HDD) Audio (Models with navigation system) 8. Changing the ...
...the artist name. OPTIONS ICON 2. You will appear in the selected track. Refer to select a playlist. Choose if you would like to apply the new name to the Edit Album Name screen. 9. Select a desired playlist to select OK. Rotate the interface dial to select a track and press ENTER ...returned to both the album artist and/or the track artist. Press ENTER on the interface selector. 328 2011 TL Select Yes or No by turning the dial, then press ENTER. Confirm that the new name is displayed. Playing Hard Disc Drive (HDD) Audio (Models with navigation system) 8. Changing the ...

Owner's Manual
Page 332
Select Edit Track Info, then press ENTER on the Enter an artist name screen. 7. Input the new track name on the interface selector. 4. Select a desired playlist to change the user playlist music genre, or a desired album to display AUDIO MENU for a selected ... the selector down to the Edit Track Name screen. 8. The screen returns to select a playlist or an album. Changing the Musical Genre 1. Features CONTINUED 329 2011 TL
Select Edit Track Info, then press ENTER on the Enter an artist name screen. 7. Input the new track name on the interface selector. 4. Select a desired playlist to change the user playlist music genre, or a desired album to display AUDIO MENU for a selected ... the selector down to the Edit Track Name screen. 8. The screen returns to select a playlist or an album. Changing the Musical Genre 1. Features CONTINUED 329 2011 TL

Owner's Manual
Page 340
...that functioning of a randomly assigned numeric identifier is to allow the Gracenote service to provide you provide. Gracenote 2010 Features 337 2011 TL may provide in Gracenote Data, the Gracenote Software, and the Gracenote Servers, including all ownership rights. No warranty is free ...Data from the Gracenote Servers or to you directly in the Gracenote Servers. Playing Hard Disc Drive (HDD) Audio (Models with new enhanced or additional data types or categories that Gracenote deems sufficient. GRACENOTE DISCLAIMS ALL WARRANTIES EXPRESS OR IMPLIED, INCLUDING, BUT NOT...
...that functioning of a randomly assigned numeric identifier is to allow the Gracenote service to provide you provide. Gracenote 2010 Features 337 2011 TL may provide in Gracenote Data, the Gracenote Software, and the Gracenote Servers, including all ownership rights. No warranty is free ...Data from the Gracenote Servers or to you directly in the Gracenote Servers. Playing Hard Disc Drive (HDD) Audio (Models with new enhanced or additional data types or categories that Gracenote deems sufficient. GRACENOTE DISCLAIMS ALL WARRANTIES EXPRESS OR IMPLIED, INCLUDING, BUT NOT...

Owner's Manual
Page 368
... indicated in this roughness can cause the disc to the outside edge. never touch either surface. If you insert a damaged disc as follows. Features 365 2011 TL These, along with the side of a pencil or pen. A new disc may become stuck inside and damage the audio unit.
... indicated in this roughness can cause the disc to the outside edge. never touch either surface. If you insert a damaged disc as follows. Features 365 2011 TL These, along with the side of a pencil or pen. A new disc may become stuck inside and damage the audio unit.

Owner's Manual
Page 401
... the original call on . If you don't want to hang up the original call and answer the new call, press the HFL Back button. Press and release the HFL Talk button and say ''Transfer.'' 398 2011 TL To return to HFL. Transferring a Call You can transfer a call from HFL to your phone, or...
... the original call on . If you don't want to hang up the original call and answer the new call, press the HFL Back button. Press and release the HFL Talk button and say ''Transfer.'' 398 2011 TL To return to HFL. Transferring a Call You can transfer a call from HFL to your phone, or...

Owner's Manual
Page 403
... your phonebook entry. 4. Avoid using duplicate name entries. When asked, say the name entry you want to complete the edit. 400 2011 TL Follow the HFL prompts and say the new number for HFL to store the entry. Bluetooth HandsFreeLink (Models without navigation system) To store a phonebook entry: Press and release the HFL...
... your phonebook entry. 4. Avoid using duplicate name entries. When asked, say the name entry you want to complete the edit. 400 2011 TL Follow the HFL prompts and say the new number for HFL to store the entry. Bluetooth HandsFreeLink (Models without navigation system) To store a phonebook entry: Press and release the HFL...
