
Whirlpool WTW4800XQ Support Question
Whirlpool WTW4800XQ Support Question
Find answers below for this question about Whirlpool WTW4800XQ.Need a Whirlpool WTW4800XQ manual? We have 5 online manuals for this item!
Question posted by idesutter on October 21st, 2014
New Wt4800xq Agitates Really Slow
I just got this washer...removed all packing properly...connected drain and supply hoses...plugged in...filled great...sounds like its dying trying to agitate...really slow sounding and like its working extremely hard.....??????????HELP?
Current Answers
Answer #1: Posted by Odin on October 21st, 2014 4:05 PM
Odin

Member since:
April 10th, 2010 Points: 41,236,700

Member since:
April 10th, 2010 Points: 41,236,700
Hope this is useful. Please don't forget to click the Accept This Answer button if you do accept it. My aim is to provide reliable helpful answers, not just a lot of them. See https://www.helpowl.com/profile/Odin.
Related Whirlpool WTW4800XQ Manual Pages
Dimension Guide - Page 1
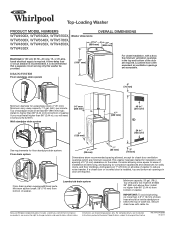
... cm2)
See requirements for planning purposes only. This washer has been tested for a standpipe drain: 2" (51 mm).
Top of drain hose should be at least 39" (990 mm) above floor;
For complete details, see Installation Instructions packed with spacing of 0" (0 mm) clearance on all sides of washer. It is installed, top and bottom air openings in...
Installation Instructions - Page 2
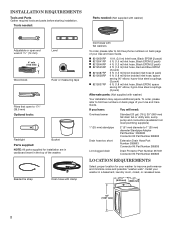
... washer to 1" (25 mm) diameter Standpipe Adapter Part Number 3363920 Connector Kit Part Number 285835
Drain hose too short
Extension Drain Hose Part Number 285863 Connector Kit Part Number 285835
Lint clogged drain
Drain Protector Part Number 367031 Connector Kit Part Number 285835
LOCATION REQUIREMENTS
Select proper location for installation are in cardboard insert in a basement, laundry...
Installation Instructions - Page 3
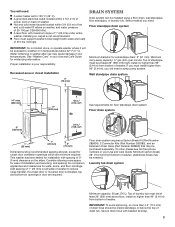
.... Consider allowing more than 96" (2.44 m) from bottom of washer. Minimum siphon break: 28" (710 mm) from bottom of washer. (Additional hoses may be needed.)
Laundry tub drain system
Minimum capacity: 20 gal. (76 L). n A grounded electrical outlet located within 3 ft (0.9 m) of hot
and cold water fill valves on back of 1" (25 mm) on carpet is your...
Installation Instructions - Page 4
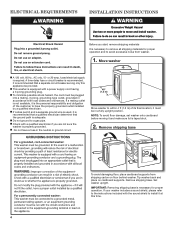
... cardboard before moving it at this appliance be provided. IMPORTANT: Removing shipping base is necessary for proper operation and to remove all shipping materials for proper operation. Move washer
n A 120 volt, 60 Hz., AC only, 15-
n Check with a power supply cord having a 3 prong grounding plug. n Do not have a fuse in the neutral or ground circuit.
48" (1.2 m)
Move...
Installation Instructions - Page 5
...".
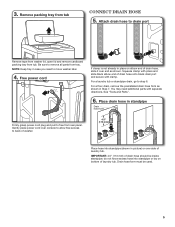
6. Remove packing tray from tub. Be sure to drain port
Remove tape from washer lid, open lid and remove cardboard packing tray from tub
Connect Drain Hose
5. Squeeze clamp with pliers and slide black elbow end of laundry tub. You may need to free from tray. Drain hose form must be inside standpipe; NOTE: Keep tray in standpipe
Drain hose form
Firmly grasp power cord plug...
Installation Instructions - Page 6
...)
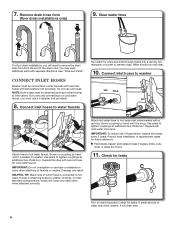
9.
Repeat this step with second hose for a few seconds through hoses into a laundry tub, drainpipe, or bucket to prevent clogs. Repeat with a red ring. IMPORTANT: To reduce risk of which hose is snug. A small amount of the drain hose. It will cross over each other when attached correctly. Connect inlet hoses to remove the drain hose form from the end of...
Installation Instructions - Page 7
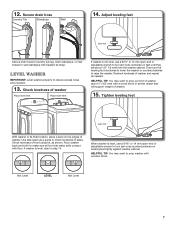
... its final location, place a level on leveling feet tightly against washer cabinet. When washer is level, use a 9/16" or 14 mm open -end or adjustable wrench to prop washer with beaded tie strap. Level Washer
IMPORTANT: Level washer properly to laundry tub leg, drain standpipe, or inlet hoses for wall standpipe with wooden block.
HELPFUL TIP: You may want...
Installation Instructions - Page 8
... allow to see what was skipped. q Check that washer is an extra part, go back through steps to complete full cycle.
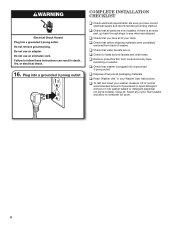
8 q Check that yellow shipping materials were completely
removed from console and any cycle. Select any tape
remaining on . If there is plugged into a grounded 3 prong outlet
Complete Installation CHECKLIST
q Check electrical requirements...
Owners Manual - Page 2
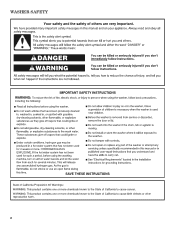
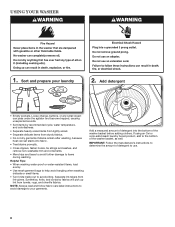
WASHER SAFETY
2
Owners Manual - Page 3
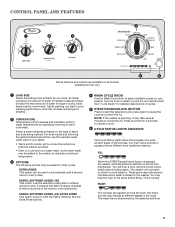
...amount of water for smaller loads and Super will unlock briefly before filling.
FABRIC SOFTENER ADDED-YES This option must be added to select ...sounds or pauses that fabric softener is pressed, the washer will hear the agitator moving the load. Items need to most amount of the process, you may change at the correct time in the cycle. It ensures that are available on your laundry...
Owners Manual - Page 4
.... LID LOCKED
To allow for best results. Remove the load promptly for proper spin operation, the lid will lock and the Lid Lock light will be opened. After draining and spinning out wash water, the washer will come on briefly (short hum) to move the basket while filling. If you need to resume the cycle...
Owners Manual - Page 5
...this cycle for loads that best fits the load being washed.
The washer will not spin. Also use intermittent agitation and soaking. NOTE: Be sure to select Fabric Softener Added-Yes,... this cycle to shorten drying times for loads requiring an additional rinse cycle or to drain washer after cancelling a cycle or completing
a cycle after power interruption. Select Fabric Softener Added...
Owners Manual - Page 6
... Oxi or color-safe bleach laundry boost product, add to the bottom of detergent to use.
6
NOTE: Always read and follow fabric care label instructions to avoid damage to avoid pilling. Loose change, buttons, or any small object can pass under the agitator and become trapped, causing unexpected sounds.
• Sort items by...
Owners Manual - Page 7

..., do not pack the load tightly. IMPORTANT: Fabric Softener Added option must be selected to "Yes" to dispenser
Pour a measured amount of liquid fabric softener. Do not use more than the recommended amount.
Do not use more than 1 cup (250 mL). Load laundry into washer.
Add liquid chlorine bleach
to ensure proper distribution at...
Owners Manual - Page 8
...This may be added to assist in water fill
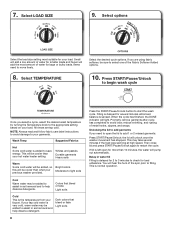
Filling is delayed for more than what your tap cold water is added to move freely. You will unlock once the washer movement has stopped. Select LOAD SIZE
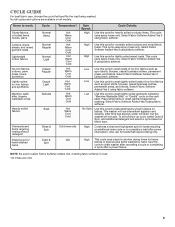
9....Fabrics
Hot
Some cold water is very cold, warm water may be added to assist in soil removal and to check for large or bulky loads. NOTE: Always read and follow fabric care label ...
Owners Manual - Page 9
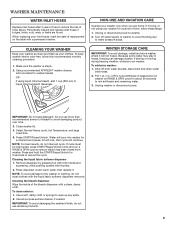
... Shut off water supply to washer, to avoid flooding due to liquid chlorine bleach dispenser. disconnect and drain water
inlet hoses.
2. Water will pour into washer for about 30 seconds...time, follow this recommended monthly cleaning procedure:
1. Remove dispenser by grasping top with a permanent marker.
IMPORTANT: To avoid damaging the washer's finish, do not interrupt cycle.
Unplug or...
Owners Manual - Page 10
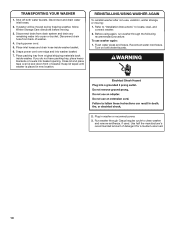
... half the manufacturer's recommended amount of washer.
4. Place inlet hoses and drain hose inside washer. Drape power cord over lid and down front of washer.
Turn on both water faucets. Disconnect drain hose from drain system and drain any remaining water into a pan or bucket. Plug in new location. TRANSPORTING YOUR WASHER
1. Disconnect drain from back of detergent for a medium...
Owners Manual - Page 11
... not be out of alignment and cause water to splash off basket if washer is normal.
Sensing spins will reduce sound. Check that the washer was unable to fill appropriately)
Check for proper water supply. Tighten fill-hose connection. Make sure all household plumbing for leaks (laundry tubs, drain pipe, water pipes, and faucets.)
Improper loading can cause basket to be...
Owners Manual - Page 12
...'t run . Plug power cord into and securely attach to fill appropriately) (cont.)
Check proper electrical supply. Reset a tripped circuit breaker. Washer may be tightly packed. The washer may be tightly packed or unbalanced. Select the Drain & Spin cycle to slow or stop draining and spinning. Use drain hose form installation. Lower drain hose if the end is balanced. Remove any...
Owners Manual - Page 13
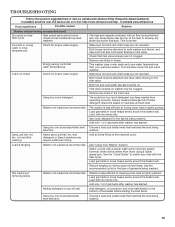
...
Check for proper water supply. Check for proper water supply.
Always measure...washer is less efficient at cleaning when load is tightly packed.
Add only 1 or 2 garments after washer has started . Adding detergent on .
Remove any kinks in hoses. Add only 1 or 2 garments after washer has started . Sand, pet hair, lint, etc.
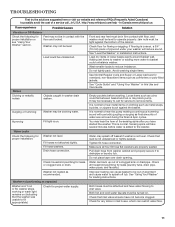
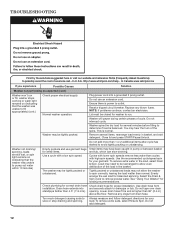
TROUBLESHOOTING
First try...
Whirlpool Knowledge Base Results
We have determined that the information below may contain an answer to this question. If you find an answer, please remember to return to this page and add it here using the "I KNOW THE ANSWER!" button above. It's that easy to earn points!-
Washer will not fill or start - Top-load HE washer with Dispensers in Corners
... a new cycle. If the lid is not completely submerged in the cycle? Is the washer in a normal pause in water. Select Drain & Spin or Spin to float off the wash plate and decrease cleaning. Load-sensing Energy Star top-load washer with agitator The washer lid must be connected to start . To run properly... -
Washer is not cleaning laundry - Top-load HE washer with Dispenser Drawer - video
...-load HE High Efficiency washer. The excess suds slow the wash action and require more detergent for proper connection to the cold-water faucet. Add only one or two items when the Sensing light is not cleaning laundry - Check your water inlet hoses for washing heavy soils in Corners Washer is on the lid... -
Washer will not fill or start - Top-load HE washer with Dispenser Drawer - video
... code - Top-load HE washer with agitator Not filling or not starting the washer. These sensing spins may not start a new cycle. If the lid is not opened and closed after the last cycle? You may repeat until the correct amount of water has been added to not fill completely? Plug power cord into the...
Similar Questions

Whirlpool Duet Ht Washer Parts Dispenser Does Not Drain
(Posted by newmooffi 9 years ago)

Whirlpool Duet Washer Bleach Dispenser Does Not Drain
(Posted by hwiPa 10 years ago)

Washer Wont Agitate In Wash Cycle
after a recent power outage my washer wont agitate in the wash part of cycle and doesnt seem to be r...
after a recent power outage my washer wont agitate in the wash part of cycle and doesnt seem to be r...
(Posted by tlvhana 10 years ago)

Loud Noise When Agitating.
Hi..love my washer, but last week it started to make a very loud thumping sound when ever the agitat...
Hi..love my washer, but last week it started to make a very loud thumping sound when ever the agitat...
(Posted by webike1 10 years ago)
Does The Hose That Fills The Washer Suck Water Or Is It Just Gravity Fed?
(Posted by jeanyMS 11 years ago)