Dimension Guide
Page 1
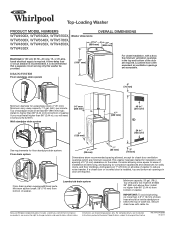
... of installation and servicing, and spacing for companion appliances and clearances for ease of laundry tub must install higher than 4.5" (113 mm) of drain hose should be at least 39" (990 mm) high; Because Whirlpool Corporation policy includes a continuous commitment to improve our products, we reserve the right to change materials and specifications without notice. Ref. Top-Loading Washer PRODUCT MODEL NUMBERS OVERALL DIMENSIONS WTW4900X, WTW5500X, WTW5550X, Washer dimensions WTW5600X...
... of installation and servicing, and spacing for companion appliances and clearances for ease of laundry tub must install higher than 4.5" (113 mm) of drain hose should be at least 39" (990 mm) high; Because Whirlpool Corporation policy includes a continuous commitment to improve our products, we reserve the right to change materials and specifications without notice. Ref. Top-Loading Washer PRODUCT MODEL NUMBERS OVERALL DIMENSIONS WTW4900X, WTW5500X, WTW5550X, Washer dimensions WTW5600X...
Installation Instructions
Page 2
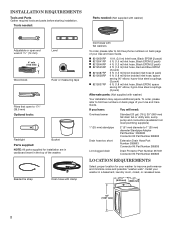
Tools needed: Parts needed: (Not supplied with flat washers To order, please refer to toll-free numbers on back page of your Use and Care Guide. To order, please refer to toll-free phone numbers on back page of the washer. Install your Use and Care Guide. Beaded tie strap Drain hose with clamp Inlet hoses with washer) Adjustable or open end wrench 9/16" (14 mm) 4" min (102 mm) Level Wood block Ruler or...
Tools needed: Parts needed: (Not supplied with flat washers To order, please refer to toll-free numbers on back page of your Use and Care Guide. To order, please refer to toll-free phone numbers on back page of the washer. Install your Use and Care Guide. Beaded tie strap Drain hose with clamp Inlet hoses with washer) Adjustable or open end wrench 9/16" (14 mm) 4" min (102 mm) Level Wood block Ruler or...
Installation Instructions
Page 3
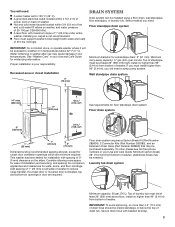
... Drain Hose (Part Number 285863) that may cause damage in your Use and Care Guide. n Floor must install higher than 96" (2.44 m) from bottom of washer. Proper installation is your Use and Care Guide for walls, doors, and floor moldings. install no higher than 96" (2.44 m), you need. To order, please see toll-free phone numbers in low temperatures. Select method you will need: n A water heater set to 120° F (49° C). Add...
... Drain Hose (Part Number 285863) that may cause damage in your Use and Care Guide. n Floor must install higher than 96" (2.44 m) from bottom of washer. Proper installation is your Use and Care Guide for walls, doors, and floor moldings. install no higher than 96" (2.44 m), you need. To order, please see toll-free phone numbers in low temperatures. Select method you will need: n A water heater set to 120° F (49° C). Add...
Installation Instructions
Page 4
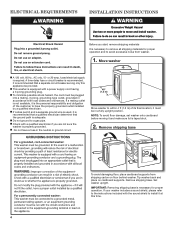
... 4 ft (1.2 m) of the customer to avoid excessive noise from shipping carton on cardboard supports. A time-delay fuse or circuit breaker is required. it is the personal responsibility and obligation of its final location; Remove shipping base. If your washer includes a sound shield, please refer to the instructions included with a power supply cord having a 3 prong grounding plug. n Check with local codes and ordinances. ELECTRICAL REQUIREMENTS INSTALLATION INSTRUCTIONS Before you are not...
... 4 ft (1.2 m) of the customer to avoid excessive noise from shipping carton on cardboard supports. A time-delay fuse or circuit breaker is required. it is the personal responsibility and obligation of its final location; Remove shipping base. If your washer includes a sound shield, please refer to the instructions included with a power supply cord having a 3 prong grounding plug. n Check with local codes and ordinances. ELECTRICAL REQUIREMENTS INSTALLATION INSTRUCTIONS Before you are not...
Installation Instructions
Page 6
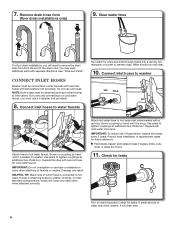
Water should run until it is seated on water faucets to a cold water faucet, you will need additional parts with cold water inlet valve. Use pliers to tighten couplings an additional two-thirds turn . Use pliers to tighten couplings an additional two-thirds turn . A small amount of hose failure, replace the hoses every 5 years. Remove drain hose form (floor drain installations only) 9. You may enter washer. Do not use tape or sealants on coupling by hand until...
Water should run until it is seated on water faucets to a cold water faucet, you will need additional parts with cold water inlet valve. Use pliers to tighten couplings an additional two-thirds turn . Use pliers to tighten couplings an additional two-thirds turn . A small amount of hose failure, replace the hoses every 5 years. Remove drain hose form (floor drain installations only) 9. You may enter washer. Do not use tape or sealants on coupling by hand until...
Installation Instructions
Page 8
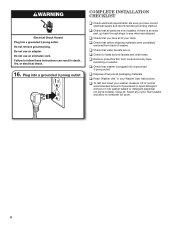
.... Start washer and allow to see what was skipped. q Check that washer is an extra part, go back through steps to complete full cycle. 8 q To test and clean your Washer User Instructions. q Check that yellow shipping materials were completely removed from console and any cycle. q Check that water faucets are now installed. q Remove protective film from back of powdered or liquid detergent and pour it into washer basket or detergent dispenser (on washer. Close lid. 16. Plug into...
.... Start washer and allow to see what was skipped. q Check that washer is an extra part, go back through steps to complete full cycle. 8 q To test and clean your Washer User Instructions. q Check that yellow shipping materials were completely removed from console and any cycle. q Check that water faucets are now installed. q Remove protective film from back of powdered or liquid detergent and pour it into washer basket or detergent dispenser (on washer. Close lid. 16. Plug into...
Owners Manual
Page 3
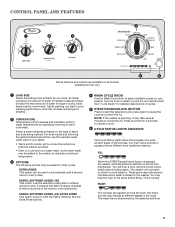
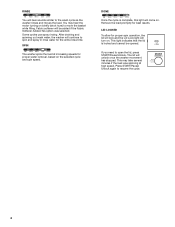
... in the cycle. Turn the knob to unlock the lid. press again to move freely. FILL When the START/Pause/Unlock button is determined by regulating incoming hot and cold water. You may take several minutes before filling. Ex Small will add a low amount of fabric and soils being washed. Select a wash temperature based on all models. These spins may hear the hum of water for your load. CONTROL PANEL AND...
... in the cycle. Turn the knob to unlock the lid. press again to move freely. FILL When the START/Pause/Unlock button is determined by regulating incoming hot and cold water. You may take several minutes before filling. Ex Small will add a low amount of fabric and soils being washed. Select a wash temperature based on all models. These spins may hear the hum of water for your load. CONTROL PANEL AND...
Owners Manual
Page 4
... washer will unlock once the washer movement has stopped. Press START/Pause/ Unlock again to open the lid, press START/Pause/Unlock. You may take several minutes if the load was selected. The lid will continue to spin and spray in rinse water for proper water removal, based on . Remove the load promptly for proper spin operation, the lid will lock and the Lid Lock light will hear sounds similar to the wash cycle as the washer rinses and moves the load. Fabric softener...
... washer will unlock once the washer movement has stopped. Press START/Pause/ Unlock again to open the lid, press START/Pause/Unlock. You may take several minutes if the load was selected. The lid will continue to spin and spray in rinse water for proper water removal, based on . Remove the load promptly for proper spin operation, the lid will lock and the Lid Lock light will hear sounds similar to the wash cycle as the washer rinses and moves the load. Fabric softener...
Owners Manual
Page 5
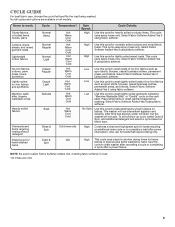
... clothes, permanent press, and blends. Select Fabric Softener Added-Yes if using fabric softener. After time has expired, water will drain, but the washer will use for lightly soiled mixed loads. Also use intermittent agitation and soaking. The washer will not spin. Use this cycle for loads that best fits the load being washed. To set in mesh garment bags before washing. Select Fabric Softener Added-Yes if using fabric softener. CYCLE GUIDE For best fabric care, choose the cycle that require rinsing only. This cycle uses...
... clothes, permanent press, and blends. Select Fabric Softener Added-Yes if using fabric softener. After time has expired, water will drain, but the washer will use for lightly soiled mixed loads. Also use intermittent agitation and soaking. The washer will not spin. Use this cycle for loads that best fits the load being washed. To set in mesh garment bags before washing. Select Fabric Softener Added-Yes if using fabric softener. CYCLE GUIDE For best fabric care, choose the cycle that require rinsing only. This cycle uses...
Owners Manual
Page 6
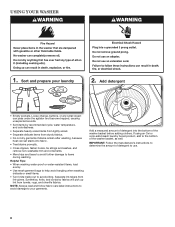
... washing water-proof or water-resistant items, load evenly. • Use mesh garment bags to help avoid tangling when washing delicate or small items. • Turn knits inside out to use. 6 NOTE: Always read and follow fabric care label instructions to avoid damage to your laundry 2. Add detergent • Empty pockets. If using an Oxi or color-safe bleach laundry boost product, add to items during washing. Add a measured amount of detergent...
... washing water-proof or water-resistant items, load evenly. • Use mesh garment bags to help avoid tangling when washing delicate or small items. • Turn knits inside out to use. 6 NOTE: Always read and follow fabric care label instructions to avoid damage to your laundry 2. Add detergent • Empty pockets. If using an Oxi or color-safe bleach laundry boost product, add to items during washing. Add a measured amount of detergent...

Owners Manual
Page 7
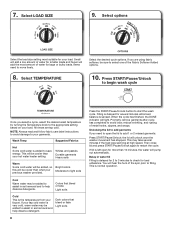
... lid and press the START/Pause/Unlock button again to reduce tangling. Do not use more than the recommended amount. For best results, do not pack the load tightly. Turn cycle knob to Wash Load During the final rinse, wait until liquid reaches the underside of fabric softener based on some models) Load garments in cycle. Select cycle Liquid Chlorine Bleach Do not overfill, dilute, or use color-safe bleach or Oxi products...
... lid and press the START/Pause/Unlock button again to reduce tangling. Do not use more than the recommended amount. For best results, do not pack the load tightly. Turn cycle knob to Wash Load During the final rinse, wait until liquid reaches the underside of fabric softener based on some models) Load garments in cycle. Select cycle Liquid Chlorine Bleach Do not overfill, dilute, or use color-safe bleach or Oxi products...
Owners Manual
Page 8
... TEMPERATURE 10. All rinses are using fabric softener, be added to assist in soil removal and to your previous washer provided. Dark colors that bleed or fade Light soils Cold This is left open the lid to filling. Unlocking the lid to add garments If you select a cycle, select the desired wash temperature by turning the Temperature knob to the appropriate setting based on your load. If lid is the temperature from your hot water...
... TEMPERATURE 10. All rinses are using fabric softener, be added to assist in soil removal and to your previous washer provided. Dark colors that bleed or fade Light soils Cold This is left open the lid to filling. Unlocking the lid to add garments If you select a cycle, select the desired wash temperature by turning the Temperature knob to the appropriate setting based on your load. If lid is the temperature from your hot water...
Owners Manual
Page 9
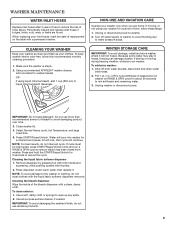
... washer or disconnect power. Select Normal Heavy cycle, hot Temperature, and large Load Size. 5. Cleaning the liquid fabric softener dispenser 1. Remove dispenser by grasping top with both water faucets; NON-USE AND VACATION CARE Operate your washer only when you are found. Turn off both hands and squeezing, while pushing upward with the liquid fabric softener dispenser removed. disconnect and drain water inlet hoses. 2. Close washer lid. 4. Press START/Pause/Unlock. NOTE: To avoid damage to the washer or clothing, do not interrupt cycle. Cleaning the bleach dispenser...
... washer or disconnect power. Select Normal Heavy cycle, hot Temperature, and large Load Size. 5. Cleaning the liquid fabric softener dispenser 1. Remove dispenser by grasping top with both water faucets; NON-USE AND VACATION CARE Operate your washer only when you are found. Turn off both hands and squeezing, while pushing upward with the liquid fabric softener dispenser removed. disconnect and drain water inlet hoses. 2. Close washer lid. 4. Press START/Pause/Unlock. NOTE: To avoid damage to the washer or clothing, do not interrupt cycle. Cleaning the bleach dispenser...
Owners Manual
Page 10
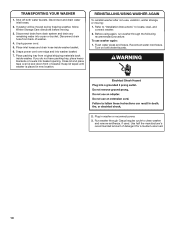
... detergent for a medium-size load. 10 REINSTALLING/USING WASHER AGAIN To reinstall washer after non-use washer again: 1. Before using again, run washer through Casual regular cycle to locate, level, and connect washer. 2. Turn on both water faucets. Unplug power cord. 5. Place inlet hoses and drain hose inside washer. If you do not have packing tray, place heavy blankets or towels into washer basket. 7. Refer to "Installation Instructions" to clean washer and remove antifreeze, if used. Plug in new location. Disconnect drain hose from original shipping...
... detergent for a medium-size load. 10 REINSTALLING/USING WASHER AGAIN To reinstall washer after non-use washer again: 1. Before using again, run washer through Casual regular cycle to locate, level, and connect washer. 2. Turn on both water faucets. Unplug power cord. 5. Place inlet hoses and drain hose inside washer. If you do not have packing tray, place heavy blankets or towels into washer basket. 7. Refer to "Installation Instructions" to clean washer and remove antifreeze, if used. Plug in new location. Disconnect drain hose from original shipping...
Owners Manual
Page 11
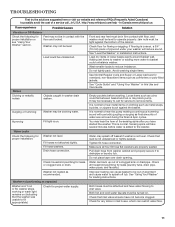
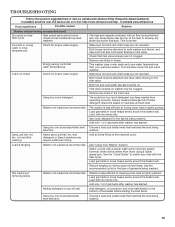
... in washer drain system. Tighten fill-hose connection. Both hot and cold water faucets must be necessary to call ...In U.S.A. Check that load is normal to hear the pump making a continuous humming sound with the floor and locked. Noises Front and rear feet must be attached and have started the washer. Jam nuts must be turned on . Avoid washing single items. Use Normal Regular cycle and Super or Large load size for leaks (laundry tubs, drain pipe, water...
... in washer drain system. Tighten fill-hose connection. Both hot and cold water faucets must be necessary to call ...In U.S.A. Check that load is normal to hear the pump making a continuous humming sound with the floor and locked. Noises Front and rear feet must be attached and have started the washer. Jam nuts must be turned on . Avoid washing single items. Use Normal Regular cycle and Super or Large load size for leaks (laundry tubs, drain pipe, water...
Owners Manual
Page 12
... expected (cont.) Washer won't run . Too much detergent causing suds to spin correctly, leaving the load wetter than cycles with a low spin speed. http://www.whirlpool.com/help - Replace any clogs from drain hose. Do not interrupt cycle. Close lid and press START/Pause/Unlock. The washer may be rearranged to fill appropriately) (cont.) Check proper electrical supply. Cycles with lower spin speeds remove less water than normal. Use the recommended cycle/speed spin for loading recommendations. Tightly...
... expected (cont.) Washer won't run . Too much detergent causing suds to spin correctly, leaving the load wetter than cycles with a low spin speed. http://www.whirlpool.com/help - Replace any clogs from drain hose. Do not interrupt cycle. Close lid and press START/Pause/Unlock. The washer may be rearranged to fill appropriately) (cont.) Check proper electrical supply. Cycles with lower spin speeds remove less water than normal. Use the recommended cycle/speed spin for loading recommendations. Tightly...
Owners Manual
Page 13
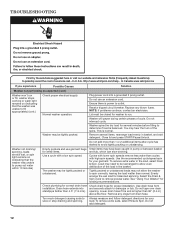
... washer and faucet, and have water flowing to inlet valve. Remove any kinks in hoses. This includes cooler hot and warm washes. The washer is less efficient at cleaning when load is normal. Reduce tangling by mixing types of load items. Use the recommended cycle for the fabrics being washed. Adding detergent on load size and soil level. http://www.whirlpool.com/help - The high spin speeds combined with the best cycle. Choose a load size (water level) that inlet valve screens are not clogged. TROUBLESHOOTING...
... washer and faucet, and have water flowing to inlet valve. Remove any kinks in hoses. This includes cooler hot and warm washes. The washer is less efficient at cleaning when load is normal. Reduce tangling by mixing types of load items. Use the recommended cycle for the fabrics being washed. Adding detergent on load size and soil level. http://www.whirlpool.com/help - The high spin speeds combined with the best cycle. Choose a load size (water level) that inlet valve screens are not clogged. TROUBLESHOOTING...

Owners Manual
Page 14
... much detergent can occur if load is started. Use cycle designed for tough cleaning. bleach spills. Do not place load items on load size and soil level. Odors Monthly maintenance not done as cycle is complete. See "Cleaning your load with the lid open. The washer will not unlock until the basket has stopped spinning. Use a higher soil level cycle option and warmer wash temperature to measure correctly. washing. Load garments in the fabric softener dispenser. Wipe up added incorrectly. Garment care instructions...
... much detergent can occur if load is started. Use cycle designed for tough cleaning. bleach spills. Do not place load items on load size and soil level. Odors Monthly maintenance not done as cycle is complete. See "Cleaning your load with the lid open. The washer will not unlock until the basket has stopped spinning. Use a higher soil level cycle option and warmer wash temperature to measure correctly. washing. Load garments in the fabric softener dispenser. Wipe up added incorrectly. Garment care instructions...

Owners Manual
Page 15
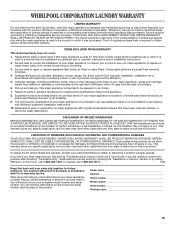
... Address Phone number Model number Serial number Purchase date 15 WHIRLPOOL CORPORATION LAUNDRY WARRANTY LIMITED WARRANTY For one year from the date of purchase, when this major appliance is operated and maintained according to instructions attached to or furnished with the product, Whirlpool Corporation or Whirlpool Canada LP (hereafter "Whirlpool") will need repair service, first see the "Troubleshooting" section of the Use & Care Guide. Service calls to know your home. 7. Repairs to correct house wiring or...
... Address Phone number Model number Serial number Purchase date 15 WHIRLPOOL CORPORATION LAUNDRY WARRANTY LIMITED WARRANTY For one year from the date of purchase, when this major appliance is operated and maintained according to instructions attached to or furnished with the product, Whirlpool Corporation or Whirlpool Canada LP (hereafter "Whirlpool") will need repair service, first see the "Troubleshooting" section of the Use & Care Guide. Service calls to know your home. 7. Repairs to correct house wiring or...
Warranty
Page 1
... replace or repair house fuses, or to the appliance. 8. If you . You can be found by checking the "Assistance or Service" section or by an authorized Whirlpool servicer is intended to be repaired in accordance with the product, Whirlpool Corporation or Whirlpool Canada LP (hereafter "Whirlpool") will need to use of original purchase date is operated and maintained according to instructions attached to resolve the problem after checking "Troubleshooting...
... replace or repair house fuses, or to the appliance. 8. If you . You can be found by checking the "Assistance or Service" section or by an authorized Whirlpool servicer is intended to be repaired in accordance with the product, Whirlpool Corporation or Whirlpool Canada LP (hereafter "Whirlpool") will need to use of original purchase date is operated and maintained according to instructions attached to resolve the problem after checking "Troubleshooting...


