Whirlpool WMH32519HZ Support Question
Whirlpool WMH32519HZ Support Question
Find answers below for this question about Whirlpool WMH32519HZ.Need a Whirlpool WMH32519HZ manual? We have 3 online manuals for this item!
Question posted by iyms1991 on November 18th, 2021
Whirlpool Wmh32519hz Series Filter Measurement
Hi, whats the measurement of Whirlpool microwave WMH32519HZ, i need the replacement and dont know how to choose, and what is the measurement of ,WMH32519HZ-0,WMH32519HZ-3 , i need to replace also. thanks
Current Answers
Related Whirlpool WMH32519HZ Manual Pages
Quick Reference Manual - Page 1
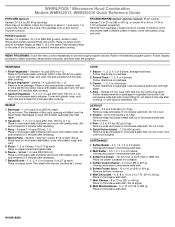
..., 4 oz (113 g) each potato several times with plastic wrap. WHIRLPOOL® Microwave Hood Combination Models WMH32517, WMH32519 Quick Reference Guide
POPCORN (sensor)
Senses ...(250, 500, 750 mL or 1 L): Place in microwave-safe container, place on paper towel.
Senses 0.5-2.0 cups (125-500 mL) dry, white long grain: Follow measurements on 3 sides. Let stand 5 minutes after cooking....
Quick Reference Manual - Page 2
...■ Boneless Chicken - Pasta: Add liquid to the microwave oven. Clear the display using the Cancel control, then reprogram...microwave oven stops, remove container, remove the lid, and add the pasta. All rights reserved. Use 2 tbs (30 mL) water for smaller quantities, or 4 tbs (60 mL) water for more doneness, or when steaming larger quantities.
® /™ © 2013 Whirlpool...
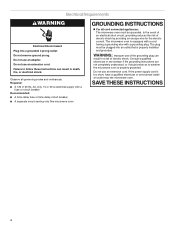
Installation Instructions - Page 2

... to back of microwave oven)
E. 1/4" x...filters
H. Materials Needed
Standard fittings for wood studs. See the "Venting Design Specifications" section.
2 Read and follow the instructions provided with any tools listed here.
■■ Measuring...Replacement Parts" section. MICROWAVE HOOD COMBINATION SAFETY
INSTALLATION REQUIREMENTS
Tools and Parts
Tools Needed Gather the required tools...
Installation Instructions - Page 3

... along the perforation to withstand the heat produced by the microwave oven for weight of any obstructions so that the door can open fully.
■■ Some models have a pocket handle. But use the wall template for use the bump out mounting kit replacing the I bar mounting plate
Bump out mounting bracket
Product...
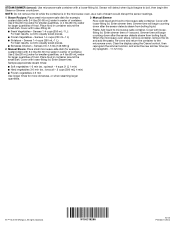
Installation Instructions - Page 4
...A time-delay fuse or time-delay circuit breaker ■■ A separate circuit serving only this microwave oven
GROUNDING INSTRUCTIONS
For all governing codes and ordinances. Required: ■■ A 120 V, 60 Hz..., AC only, 15 or 20 A electrical supply with a grounding plug. The microwave oven is properly grounded. WARNING: Improper use an adapter. SAVE THESE INSTRUCTIONS
4 Do not ...
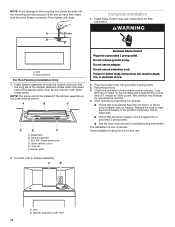
Installation Instructions - Page 5

...Remove screws attaching damper plate to the venting system. Exhaust Port
6.
A B
A. Rotate Blower Motor
The microwave oven is being handled.
Blower motor 5. Remove any remaining contents from the microwave oven
cavity. 2. Lift blower motor out of the microwave oven.
B
A. Blower motor wire B. NOTE: Skip this section if you are using recirculation installation. Insert the...
Installation Instructions - Page 6
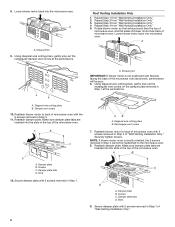
... Installation Only." 4. Repeat Step 3 from "Wall Venting Installation Only." 2. Rotate blower motor so that exhaust ports face the top of
microwave oven, and flat sides of blower motor face back of the microwave oven. Damper vent covers
10. Make sure damper plate tabs are
inserted into the slots in Step 3 cannot be poor. 6.
Damper...
Installation Instructions - Page 7
... at End Holes Figure 2
B
C
C
C
B
D
D
A
A
A
A
E
E
F
E
E
F
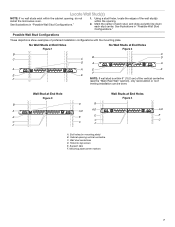
NOTE: If wall stud is within 6" (15.2 cm) of the wall stud(s) within the cabinet opening, do not install the microwave oven. Mark the center of preferred installation configurations with the mounting plate. Support tabs F.
Mounting plate center markers
7 See illustrations in "Possible Wall Stud Configurations...
Installation Instructions - Page 8
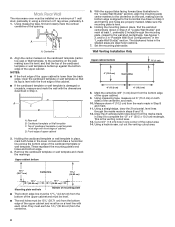
... draw a horizontal line across the bottom edge of the cardboard template or wall template. Using measuring tape, measure out 6" (15.2 cm) on the wall, making sure its bottom edge is aligned to...to complete the 12" x 4" (30.5 x 10.2 cm) rectangle. This is level.
6. Mark Rear Wall
The microwave oven must be installed on a level line with each be 141⁄8" (35.96 cm) from the bottom edge of ...
Installation Instructions - Page 10
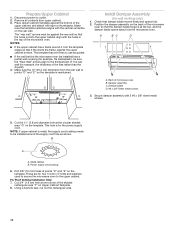
...is metal, the supply cord bushing needs to the thickest part of t he rear wall (for two 1/4-20 x 3" bolts and washers used to secure the microwave oven to outlet. 2. Using a keyhole ... 11⁄2" (3.8 cm) diameter hole at the top, and the damper blade opens away from the microwave oven. Prepare Upper Cabinet
1. Disconnect power to the upper cabinet. Remove all contents from the rear wall to...
Installation Instructions - Page 11

... person holding it may warp the top of the upper cabinet. Push microwave oven against mounting plate and hold in the bottom of the microwave oven. NOTE: If microwave oven does not need to be the same thickness as the space between upper cabinet and microwave oven. If adjustment is no gap between the upper cabinet bottom and the...
Installation Instructions - Page 12
...filters. Then secure with tools. A
B
C
D
E
F
A.
Failure to follow these instructions can result in properly. Save Installation Instructions for future use an extension cord. Then tighten with #6 x 3/8" sheet metal screw. WARNING
A. Upper cabinet cutout E. Long tab F.
Replace... at 100% power. Bolt B.
Plug microwave oven into a grounded 3 prong outlet. NOTE...
Installation Instructions - Page 13
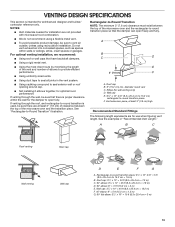
...; Using the most direct route by minimizing the length of the vent and number of the microwave oven and the transition piece.
If venting through the roof, and rectangular-to-round transition is used... cm) of clearance between the top of the microwave oven and the rectangular-to open freely and fully. NOTES:
■■ Vent materials needed for installation are for the damper to -round ...
Installation Instructions - Page 14

... caps must be installed to round transition piece must not exceed the equivalent of the installation hardware needs to be replaced, call , you need your dealer to round transition piece must be used . When you need the microwave oven model number and serial number. Two 90° elbows = 20 ft (6.1 m) B. 1 wall cap = 40 ft (12.2 m) C. 1 rectangular...
Specification Sheet - Page 1
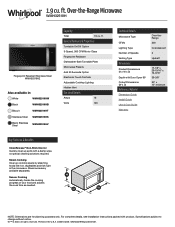
... Cooktop Lighting
Hidden Vent
Electrical Details
Amps
16
Volts
120
Technical Details
Microwave Type
CFMs Lighting Type Number of your food and adjusts the cook time as needed.
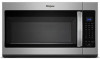
All rights reserved. Over-the-Range Microwave
WMH32519H
Fingerprint Resistant Stainless Steel WMH32519HZ
Also available in the U.S.A. Steam accessory available separately. NOTE: Dimensions are for...
Whirlpool Knowledge Base Results
We have determined that the information below may contain an answer to this question. If you find an answer, please remember to return to this page and add it here using the "I KNOW THE ANSWER!" button above. It's that easy to earn points!-
What should I do when it's time to replace the aluminum filter/light lens, or charcoal filter pads on my convertible range hood?
... to receive a 10% discount on my microwave oven? making your appliances look and run like replacement water filters for your aluminum filter/light lens, or charcoal filter pads: We recommend that will fit right and work right, because they are genuine replacements and will continue I need replacement parts for replacement parts. Maintaining your order for my convertible... -
Operating the dispenser controls (Measured Fill dispensing system control with a display screen) - Side by side refrigerator
...choose...know when to lock the dispenser. Dim: Press the Light button a second time to "Replace." After changing the filter, reset the filter... status light by side refrigerator in the container, you that the container can continuously dispense water or dispense only a specified amount of water (Measured... may need to ... -
Operating the fast fill dispensing system controls - Side by side refrigerator
...replace the filter when the status light changes to red ("Replace") or water flow to change your water filter...can continuously dispense water using the Measured Fill feature, you also can ...filter. The display will help you know when to "Ounces," "Cups," or "Liters." Side by pressing the Filter... controls on continuously, you may choose either On or Night Light. In ...
Similar Questions

Top Vent Piece For Microwave
I think im missing a piece that goes on the top of the microwave. Im wondering if you have pic
I think im missing a piece that goes on the top of the microwave. Im wondering if you have pic
(Posted by Lsav 2 years ago)

How To Replace A Charcoal Filter On Microwave Wmh1164xws
(Posted by Anonymous-166579 3 years ago)

I Have F7 Service Code On The Microwave I Need The Manual And Diagrams For It .
the model Number is GMH5205XVS-0
the model Number is GMH5205XVS-0
(Posted by dcoffee173 7 years ago)

What If I Don't Have Charcoal Filter In Microwave
(Posted by chrlbreau 10 years ago)
Why Did My Microwave Come With A Charcoal Filter, But No Instructions?
my new microwave came with a charcoal filter, but no instructions on how to install it. Do I need it...
my new microwave came with a charcoal filter, but no instructions on how to install it. Do I need it...
(Posted by csienko14 12 years ago)