Get support for Whirlpool WMH1163XVQ

Whirlpool WMH1163XVQ Support Question

Whirlpool WMH1163XVQ Support Question

Find answers below for this question about Whirlpool WMH1163XVQ.
Need a Whirlpool WMH1163XVQ manual? We have 4 online manuals for this item!
Question posted by willketru on April 30th, 2014

Whirlpool Wmh Microwave User Manual How To Set Clock

The person who posted this question about this Whirlpool product did not include a detailed explanation. Please use the "Request More Information" button to the right if more details would help you to answer this question.

Current Answers

There are currently no answers that have been posted for this question.
Be the first to post an answer!

Remember that you can earn up to 1,100 points for every answer you submit. The better the quality of your answer, the better chance it has to be accepted.

Related Whirlpool WMH1163XVQ Manual Pages

Dimension Guide - Page 1

... Dimensions are for wall venting only) E D. diameter round vent C. Vent extension piece, at least 3" (7.6 cm) high Because Whirlpool Corporation policy includes a continuous commitment to round transition piece so that a separate circuit serving only this microwave oven be used in the system. W10247296B 9/30/10 It is recommended that the damper can open freely...
Installation Instructions - Page 1

... Assembly 9 Install the Microwave Oven 9 Complete Installation 10 VENTING DESIGN SPECIFICATIONS 11 ASSISTANCE 12 Replacement Parts 12 Accessories 12 MICROWAVE HOOD COMBINATION SAFETY Your safety...Holes in these installation instructions. We have provided many important safety messages in this manual and on your particular model may differ slightly from the illustration in Rear Wall...
Installation Instructions - Page 2

... placed inside the microwave oven and upper cabinet. ■ Grounded electrical outlet inside the perforation is at least 6" (15.2 cm) of installation. Special Requirements For Wall Venting Installation Only: ■ Cutout must provide: ■ Minimum installation dimensions. See User Instructions.) NOTE: Depending on model, charcoal filters may be included. Set the cardboard template...
Installation Instructions - Page 3

... installed and grounded. Do not use an extension cord. Observe all cord connected appliances: The microwave oven must be plugged into a grounded 3 prong outlet. A. 2" x 4" wall stud B. ...9632; A time-delay fuse or time-delay circuit breaker. ■ A separate circuit serving only this microwave oven. Product Dimensions 17¹⁄₄" (43.8 cm) 16¹⁄₄" (41.3 cm)...
Installation Instructions - Page 4

... removed in Step 3. 7. Wall Venting Installation Only 1. A Keep the damper assembly in case the venting method is changed, or the microwave oven is set for recirculation installation. Blower motor 5. Rotate Blower Motor The microwave oven is reinstalled in recessed holes) D A. Make sure damper plate tabs are using recirculation installation. A B C A. Damper plate tabs...
Installation Instructions - Page 5

... 8. Repeat Step 4 from "Wall Venting Installation Only." 2. Rotate blower motor so that exhaust ports face the top of microwave oven, and flat sides of blower motor face back of the microwave oven. Lower blower motor back into the slots in Step 3 cannot be poor. Repeat Step 1 from "Wall Venting Installation Only." 5. Damper plate B. Damper...
Installation Instructions - Page 6

...C C D B D A A A A E E E E F F NOTE: If wall stud is within the opening. Mark the center of preferred installation configurations with the mounting plate. Cabinet opening , do not install the microwave oven. 1. Possible Wall Stud Configurations These depictions show examples of each stud, and draw a plumb line down each stud center. See illustrations in "Possible Wall Stud...
Installation Instructions - Page 7

...lag screw, preferably 2. 1. Using a keyhole saw, cut out the venting cutout area. Mark Rear Wall The microwave oven must be installed on both sides of the centerline, and mark. 10. Rear wall B. Holding the mounting plate... to being installed on a level line with the front edge of "Mark Rear Wall." Set the mounting plate aside. if 1 end hole is butted up against the bottom edge of...
Installation Instructions - Page 8

...to open . 3. Position mounting plate on the wall. 2. With the support tabs of the microwave oven. Leave enough space for the toggle nut to go through the end hole that the holes cut... the drywall, and finger tighten the bolt to use as guides. ■ If the wall behind the microwave oven (as at the end hole marked in Rear Wall" section. 2. Remove all lag screws and bolts. NOTES...
Installation Instructions - Page 9

... corner of the shaded rectangular area "F" on the template. Handle the microwave oven gently. 1. Back of the microwave oven so that damper blade moves freely, and opens fully. 2. Mounting plate...cabinet. 5. NOTE: If venting through the power supply cord hole in the bottom of microwave oven still tilted, thread power supply cord through the wall, make sure the damper assembly fits...
Installation Instructions - Page 10

... plate and retighten screws. 9. Damper assembly (under the raised tabs of the microwave oven. Refer to the User Instructions for future use. 10 Sheet metal screw D. Reconnect power. 4. To avoid...so that the power supply cord is plugged into microwave oven. Using 2 or more people, lift microwave oven off of mounting plate, and set aside on the turntable, and programming a cook ...
Installation Instructions - Page 11

...Transition NOTE: The minimum 3" (7.6 cm) clearance must exist between the top of the microwave oven and the rectangular to round transition piece so that there is proper clearance within walls or...reference only. Vent extension piece, at least 3" (7.6 cm) of clearance between the top of the microwave oven and the transition piece. Wall cap: 3¹⁄₄" x 10" = 40 ft (8.3 ...
Installation Instructions - Page 12

...Template ■ Mounting Screw Kit (includes parts A-G in "Parts Supplied" in the User Instructions. The filler panels come in China Filler panels Filler Panel Kit Number 8171336 8171337 ... 36" (91.4 cm) or 42" (106.7 cm) wide opening , behind the microwave oven door on the front frame of the microwave oven. Recommended Vent Length A 3¹⁄₄" x 10" (8.3 x 25.4 cm) ...
Owners Manual - Page 1

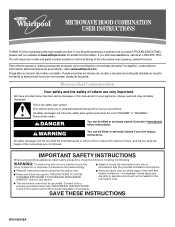
..., call us at www.whirlpool.com for additional information. ...EXPOSURE TO EXCESSIVE MICROWAVE ENERGY" found in this manual and on your ...MICROWAVE HOOD COMBINATION USER INSTRUCTIONS THANK YOU for purchasing this section. ■ Some products such as whole eggs in the shell and sealed containers - This symbol alerts you should not be heated in the microwave oven. ■ The microwave oven...
Owners Manual - Page 2

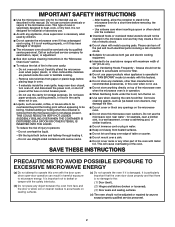
... the cavity when not in use . ■ Do not store anything directly on top of the oven with the safety interlocks. (b) Do not place any materials, other part of the microwave oven when the microwave oven is in this manual. To reduce the risk of 36" (91.44 cm). ■ Clean Ventilating Hoods Frequently - After heating...
Owners Manual - Page 3

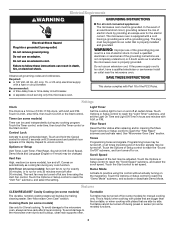
...not use of the FCC Rules. Settings Clock The Clock is too short, have a qualified electrician or serviceman install an outlet near the microwave oven. Repeat to reach the "Filter Reset...time using the control without actually turning on some models): Set vent fan to run for manual cooking only. See "Microwave Oven Care" section. Features CLEANRELEASE® Cavity Coating (on ...
Owners Manual - Page 4

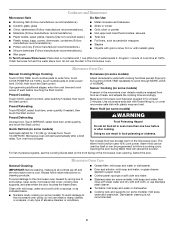
...food item, enter quantity if needed , then touch the Start control. Microwave Oven Use Manual Cooking/Stage Cooking Doneness (on some models) Food Poisoning Hazard Do not let food sit in for...any type of each before or after a brief delay. Preset Defrosting Make sure microwave oven has been plugged in oven more than one hour before touching the Start control. The Warm Hold function ...
Owners Manual - Page 5

...set properly. Make sure Demo Mode (on and off to cool the microwave oven. Arcing in the microwave oven Check the following: ■ Soil buildup Soil buildup on during microwave oven operation to cool the microwave oven...microwave oven being used. This happens to possibly avoid the cost of the microwave oven. Reset the clock.... www.whirlpool.com Microwave oven will not operate Check the...
Owners Manual - Page 6

...the upper or lower front facing of the microwave oven opening, behind the door. Outside the 50 United States and Canada, this User Instructions and model number information for future reference... or service, call 1-800-253-1301. W10182518A SP PN W10182523A © 2008 Whirlpool Corporation. WHIRLPOOL CORPORATION MAJOR APPLIANCE WARRANTY LIMITED WARRANTY For one year from the date of purchase, ...
Warranty - Page 1

...MAY NOT APPLY TO YOU. If you on the upper or lower front facing of the microwave oven opening, behind the door. For assistance or service, call 1-800-253-1301. Service calls...with original model/serial numbers that is contrary to published user or operator instructions and/or installation instructions. 4. You can write to Whirlpool with any questions or concerns at the number below....

Whirlpool Knowledge Base Results

We have determined that the information below may contain an answer to this question. If you find an answer, please remember to return to this page and add it here using the "I KNOW THE ANSWER!" button above. It's that easy to earn points!

  • What are some tips for defrosting food using my microwave oven?
    ... end of time to defrost. Place in microwavable baking dish. If not used properly, arcing (a blue flash of light) can be manually set a length of cycle for defrosting food using...my microwave oven? Unwrap foods and remove lids (from the microwave oven. Use small pieces of aluminum foil to the microwave oven. The Auto Defrost feature can be used or the microwave oven can...
  • My display on my microwave oven is showing messages
    ... display: When power is first supplied to stop the blinking. To set the time of day. Touch Clock. Touch Clock or Start. Touch Clock. The display on the display. Touch Cancel Off to the microwave oven, a ":" will appear on my microwave oven is showing messages My microwave oven display shows time countdown, but is not operating The time will disappear...
  • How do I cook fresh or frozen vegetables in my microwave?
    ...Veg. "Senses 1-4 Cups" will be replaced by "Sensing." How do I set the clock on the turntable and close the door. How do the following: Remove frozen ...my microwave? Follow instructions for a moment and then will appear briefly in my microwave oven? How do I cook fresh or frozen vegetables in my microwave? To cook vegetables, please do I cook foods manually using my microwave oven? ...

Similar Questions

What Would Be The Newest Version With Same Size As This Microwave Oven
What Would Be The Newest Version With Same Size As This Microwave Oven (wmc50522as)
(Posted by chicity1992 5 months ago)
Whirlpool Wmh1163xvq-1
set clock now will no heat food.how do you operate setup
(Posted by thirtyoneford 9 years ago)
My Microwave Oven Wmh1163xvq-1 Turns On And Rotates,but No Heat.
When I try to heat a cup of coffee I use 70 sec on high. Hit start and it turns on and table turns, ...
(Posted by clomas 11 years ago)
Ask a New Question
Use the box below to post a new question about this Whirlpool product .
Points & Prizes
  • You can earn points for nearly everything you do on HelpOwl.com
  • You can trade in those points for gift cards at leading retailers such as Amazon.com and Walmart
  • It's that simple!
See How it Works
Create a Free Account

Whirlpool Manuals

Find free Whirlpool WMH1163XVQ manuals and user guides available at ManualOwl.com. Try out our unique manual viewer allowing you to interact with manuals from directly within your browser!

Whirlpool Reviews

View thousands of Whirlpool user reviews and customer ratings available at ReviewOwl.com.

Contact Information

Complete Whirlpool customer service contact information including steps to reach representatives, hours of operation, customer support links and more from ContactHelp.com.

Scoreboard Ratings

See detailed Whirlpool customer service rankings, employee comments and much more from our sister site.

Whirlpool Recalls

Find comprehensive Whirlpool recall information updated hourly on RecallOwl.com.