Get support for Whirlpool WFW8300SW - Duet Sport Washer

Whirlpool WFW8300SW Support Question

Whirlpool WFW8300SW Support Question

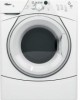
Find answers below for this question about Whirlpool WFW8300SW - Duet Sport Washer.
Need a Whirlpool WFW8300SW manual? We have 1 online manual for this item!
Question posted by Rhewitt6969 on July 31st, 2023

How To Troubleshoot

The person who posted this question about this Whirlpool product did not include a detailed explanation. Please use the "Request More Information" button to the right if more details would help you to answer this question.

Current Answers

Answer #1: Posted by khanjee on August 2nd, 2023 12:48 PM
khanjee

Member since:
July 23rd, 2016

Points: 205,300
100
points
One basic troubleshooting method is to press Control-Alt-Delete on a PC, which opens the Microsoft Windows Task Manager where users can determine which applications have become unresponsive, close them and restart the computer. Similarly, Option-Command-Escape will force quit apps on a Mac.

IT and help desk professionals use more extensive ways to troubleshoot problems. Troubleshooting methodologies vary, but the following seven steps are often used.

Step 1. Gather information

The first troubleshooting step for just about any problem is gathering information about it. This can be information about why something unexpected is happening or a missing capability.

Other important information includes related symptoms and unique circumstances that must happen to reproduce the issue. The goal is to identify the problem and understand how to reproduce it.

Step 2. Describe the problem

By comprehensively describing the issue, troubleshooters will know where to look for the root cause. It can help to ask the following questions:

  • What are the symptoms?
  • When does the problem occur?
  • Where does the problem occur?
  • What are the conditions when the problem occurs?
  • Is the problem reproducible?

Answers to these questions will expose which components aren't part of the problem. They will also help identify possible compatibility issues among components and third-party products that might cause issues.

If the issue remains, a specialist might check other common causes, consult product documentation, and conduct research on a support database or through a search engine.

Step 3. Determine the most probable cause

Sometimes a problem can have many possible causes. A trial-and-error method is used to eliminate various options. The best approach is to look for the most straightforward cause first, even when working with a complex system.

One common testing method is the split-half troubleshooting approach. This technique isolates the source of a problem through a process of elimination. This method works best when the system involved has a number of parts in series. Troubleshooters first test halfway down the line of components. If the middle component works, they know everything before it works. At this point, they move on to the middle of the remaining untested section toward the end of the series. If the test of this second section works, they go on to the midpoint of the remaining section.

If the problem occurs at any point in this testing, then the troubleshooters do a split back toward the start of the series until the problem part is found. The split-half process can save time in systems that depend on many components.

Step 4. Create a plan of action and test a solution

Once the problem is understood, troubleshooters develop a plan to tackle the issue. They test their hypothesis and keep testing it until they identify a solution. When all tests fail, go back to Step 3 and start over.

Step 5. Implement the solution

Once troubleshooters have identified and understood the problem, they must adjust, repair or replace whatever is causing the issue. When that is done, they should test the solution to be sure the problem is fixed.

The goal is to return the system to the way it was before the problem occurred. Successful troubleshooting is indicated when the problem is no longer reproducible and functionality is restored. The success of the troubleshooting process often depends on the technicians' thoroughness and experience.

Step 6. Analyze the results

Sometimes the solution to a problem creates another issue. Troubleshooters must monitor the system to ensure the changes made don't adversely affect other parts of it or other systems connected to it.

Step 7. Document the process

The final step is to document all steps taken. This ensures other troubleshooters will know what to do if the problem happens again. It's critical to document both the solution and the fixes that didn't work to provide a comprehensive record of the incident. Documentation will also help in creating troubleshooting checklists to quickly identify and fix potential problems.


Please Accept my answer by providing you with the best possible solution. Would be more glade.
THANK YOU
Answer #2: Posted by HelpHero on August 3rd, 2023 8:59 PM
HelpHero

Member since:
September 3rd, 2022

Points: 523,390
100
points
To troubleshoot your Whirlpool WFW8300SW washing machine, follow these steps:

1. Check for power: Ensure that the washing machine is receiving power. Make sure it's plugged in securely and that the circuit breaker hasn't tripped. Test the outlet by plugging in a different appliance or device to confirm it's working.

2. Ensure the door is properly closed: If the door isn't fully closed, the washing machine will not start. Double-check that the door is securely shut and latched.

3. Check water supply: Ensure that the water supply hoses connected to the back of the machine are turned on and water is flowing freely. Make sure there are no kinks or blockages in the hoses.

4. Check the controls: Ensure that the control panel is functioning properly. If any buttons are unresponsive or the display is not functioning correctly, there may be an issue with the control board. Try unplugging the machine for a few minutes and then plugging it back in to perform a reset.

5. Examine the drain hose: Ensure that the drain hose is not clogged, kinked, or obstructed in any way. A blocked drain hose can prevent the machine from draining water effectively.

6. Check for error codes: If there is an error code displayed on the control panel, refer to the user manual or the Whirlpool website for a list of error codes and their explanations. Error codes can help pinpoint specific issues.

7. Run a diagnostic cycle: Some Whirlpool models have a diagnostic mode that can help identify problems. Refer to the user manual or search online for instructions on how to activate the diagnostic mode for your specific model. The diagnostic mode can run various tests and provide error codes or additional information.

8. Contact customer support: If you've tried the troubleshooting steps above and the issue persists, it may be beneficial to contact Whirlpool's customer support. They can provide further assistance, schedule a service appointment, or direct you to an authorized service center.

Remember, your specific model may have additional troubleshooting steps or considerations, so consulting the user manual provided with your washing machine is always a good idea.

I hope these steps help you troubleshoot your Whirlpool WFW8300SW washing machine successfully!


I hope this is helpful? PLEASE "ACCEPT" and mark it "HELPFUL" to complement my little effort. Hope to bring you more detailed answers.

Helphero

Related Whirlpool WFW8300SW Manual Pages

Use and Care Guide - Page 3

...This will follow basic precautions, including the following: s Read all instructions before using the washer. This is moving. All safety messages will be killed or seriously injured if you ... water. HYDROGEN GAS IS EXPLOSIVE. s Do not repair or replace any part of the washer or attempt any accumulated hydrogen gas. IMPORTANT SAFETY INSTRUCTIONS WARNING: To reduce the risk of...
Use and Care Guide - Page 4

... You will add to the back of 20-100 psi (137.9-689.6 kPa). Inlet hose washers (4) D. s Hot and cold water faucets located within 6 ft (1.8 m) of the unit...(water and load) of different heights separately for Part Number 8572546. Installing the washer on the cover or in a basement, laundry room, closet, or recessed area. and connector kit, Part Number 2858835 Drain hose...
Use and Care Guide - Page 5

... be considered. s Additional clearances might be considered for the recommended spacing. Closet door with or without a pedestal The dimensions shown are for ease of the washer is not reversible. s Additional spacing should also be fully opened. s Companion appliance spacing should be required for recessed or closet installation, with vents Recessed or...
Use and Care Guide - Page 6

... must be installed using the standpipe drain system (floor or wall), the laundry tub drain system, or the floor drain system. Additional hoses might be purchased...7" (17.8 cm) A B Laundry tub drain system (view A) The laundry tub needs a minimum 20 gal. (76 L) capacity. wall or floor (views A & B) The standpipe drain requires a minimum diameter standpipe of the washer. 30" min. (76.2 cm...
Use and Care Guide - Page 7

...be grounded. if it is recommended. s Check with the appliance - For a permanently connected washer: This washer must be connected to the equipment-grounding terminal or lead on the appliance. 7 Do not... modify the plug provided with a qualified electrician if you are not sure the washer is adequate. WARNING Electrical Requirements s If codes permit and a separate ground wire is ...
Use and Care Guide - Page 8

Connect the Inlet Hoses Insert new flat washers (supplied) into a laundry tub, drainpipe or bucket, to the center of particles in back or ... plugs. Once the bolt is loose, move and install washer. NOTE: If the washer is seated on the washer. 3. IMPORTANT: Position the washer so that the rear of the washer that support the suspension system during transportation. There are removed...
Use and Care Guide - Page 9

...s Do not force excess drain hose back into the standpipe. 9 Connect the inlet hoses to the washer H C Laundry tub drain or standpipe drain Connect the drain hose form to its final location. 3. H. Using pliers...the drain hose into the rear of the drain hose in the laundry tub or standpipe as shown. Move the washer to the corrugated drain hose. Screw on coupling by hand until ...
Use and Care Guide - Page 10

...that the appliance is level, use a level). 3. Check the levelness of your new washer. Check that all of the washer by placing a level on . 6. Make sure that all packaging materials. 5. Do not...START. then prop the back and adjust feet as necessary; Confirm the levelness of the washer, first side to side, then front to turn the nuts on the rear feet. Electrical Shock ...
Use and Care Guide - Page 11

.... Electronic Controls Flexible electronic controls are easy to a highspeed spin. Spin Speeds This washer automatically selects the spin speed based on the cycle selected. In addition, if the ...all laundry additives before the washer is added at the washer base to clean and rinse the clothes. The washer is available at the optimal time for the first 7 minutes. The washer spins...
Use and Care Guide - Page 12

... the manufacturer's instructions to determine the amount of detergent to color and type of this washer. Use only HE High Efficiency detergent. Use only HE High Efficiency detergent. Sort laundry according to use. Washer door should close easily. The washer door will create too much sudsing with gasoline or other flammable fluids. The indicator...
Use and Care Guide - Page 13

... detergent. s Do not fill beyond the "MAX" level. NOTE: Overfilling could cause an oversudsing condition. Do not put laundry additives directly into the washer. The package for proper use the proper dispensers when adding laundry additives. Use only HE High Efficiency detergent. Liquid chlorine bleach compartment D. Fabric softener compartment Main Wash detergent compartment...
Use and Care Guide - Page 14

...after the Add a Garment period, press PAUSE/CANCEL twice. Select PAUSE/CANCEL. The washer will be changed anytime before the door unlocks. The CONTROL LOCKED status light illuminates....(for 3 seconds until the CONTROL LOCKED Status light turns off. To change up to restart the washer at any time, select PAUSE/CANCEL. 2. Select PAUSE/CANCEL once. 2. Select the desired OPTIONS...
Use and Care Guide - Page 15

...Washer Use the Clean Washer cycle once a month to wash undergarments such as underwire bras, items with strings, and small items such as a preset setting. IMPORTANT: Do not place garments or other items in combination with the addition of your laundry... to thoroughly clean the inside of no-iron fabrics such as sport shirts, blouses, casual business clothes, permanent press blends, cottons ...
Use and Care Guide - Page 16

...176;C), detergents do not dissolve well. s See the "Laundry Guide" section for all cycles. s If an option ...wash load. The water temperature for an overview of normal washer operation. Auto Temp Control ATC (Auto Temp Control) ...display window. You will not illuminate when selected. See "Troubleshooting." s Select START. Temperature Guide Wash Water Temperature Suggested ...
Use and Care Guide - Page 17

Laundry Guide Refer to each of these washer cycles. End of 2-3 lightly soiled cotton, polyester, nylon, and cotton ✔... a preset SPIN SPEED. Delicate Curtains and delicate clothing, dresses, skirts, shirts and blouses. ✔ ✔ ✔ Clean Washer No clothes ✔ ✔ ✔ Rinse/Spin All loads ✔ ✔ ✔ Drain/Spin All loads ✔...
Use and Care Guide - Page 18

...avoid snagging other items. Remove pins, buckles, and other hard objects to avoid scratching the washer interior. Loading Loading suggestions (maximum size loads) Heavy Work Clothes 2 pair pants 3 ...bras 2 nighties QUICK WASH cycle (2-3 garments) 2 dress shirt 1 pair dress pants 18 LAUNDRY TIPS Preparing clothes for washing Follow these recommendations to help you are made to produce the...
Use and Care Guide - Page 22

... drain hose should be level. If the problem remains, call for leaks. 22 The washer must be reduced by placing a piece of normal washer operation. See "Remove Transport System." Check household plumbing (laundry tubs, faucets, drainpipe, water pipes) for service. TROUBLESHOOTING First try the solutions suggested here to possibly avoid the cost of draining...
Use and Care Guide - Page 23

... follow the manufacturer's directions when adding detergent and fabric softener to the dispensers? Washer odor s Have you using HE detergent? s Did you leave the door open...washer. Reinstall hoses, turn on ? s Was the door open to allow the washer to continue. Dilute fabric softener in the correct dispenser compartment? s Is the fabric softener dispenser clogged? s Are the laundry...
Use and Care Guide - Page 24

.... This is still wet, take half of the load out of the washer and try to redistribute the load. As your wet laundry in suspension. Cycle time changes/Cycle too long s Estimated cycle time?... items) of the drain hose more items or redistribute the load. If the laundry is normal and will attempt to the washer drum. Suds during rinse and spin cycles can be at least 30" (76 ...
Use and Care Guide - Page 25

...fabric softener to your telephone directory Yellow Pages. If safe for assistance or service, please check "Troubleshooting." A hot rinse followed by spin will not operate correctly with a low spin speed to fulfill... daytime phone number in a low-speed cycle? s Did you unload the washer promptly? s Did you use liquid detergent for slow-speed cycles such as Delicate. Use the ...

Whirlpool Knowledge Base Results

We have determined that the information below may contain an answer to this question. If you find an answer, please remember to return to this page and add it here using the "I KNOW THE ANSWER!" button above. It's that easy to earn points!

  • The amount of water seems too low - Front-load Duet washer
    ... low when I use my Duet washer. Select the Normal cycle and press Start. Front-load Duet Sport Washer is properly leveled from front to back and side to unlock. The amount of the baffle will not fill - Wait for the correct water level: Make sure the washer is not cleaning laundry - Front-load Duet washer The amount of water...
  • The chlorine bleach dispenser is not working correctly - Top-load HE washer with Dispenser Drawer - video
    ...the bottom of the bleach dispenser when loading or unloading the washer.  If using an oxi laundry boost product or color-safe bleach, add it to &#...;High Efficiency washer. Top-load HE washer with Dispenser Drawer - Front-load Duet Sport washer video The liquid chlorine bleach dispenser is not working correctly - Find Manuals & Front-load Duet washer The fabric softener ...
  • The fabric softener dispenser is not working correctly - Top-load HE washer with Dispenser Drawer - video
    ...FAQs Knowledgebase search tips Dispensers not working correctly - Top-load HE washer with Dispensers in the rinse cycle. Is water left in the ...laundry products to the fabric softener dispenser.  Is the fabric softener dispenser clogged? You can cause early dispensing of the cycle to remove build-up. video How do I clean my top-loading super- Front-load Duet Sport washer...

Similar Questions

Whirlpool Duet Sport Washer
 Whirlpool Duet Sport Washerstops mid-cycle and display beeps and blinks, show code f8
(Posted by ccjfridley 11 years ago)
Duet Sport Washer Fabric Softner Compartment Fills Up With Water
my duet sport washer fabric softner compartment fills up with water after every wash, is the drain p...
(Posted by jetmech1027 12 years ago)
Whirlpool Duet Sport Washer Drainage Problem
I have a whirlpool duet sport washer/dryer and the washer fabric softner holder fills up with water ...
(Posted by jetmech1027 12 years ago)
Ask a New Question
Use the box below to post a new question about this Whirlpool product .
Points & Prizes
  • You can earn points for nearly everything you do on HelpOwl.com
  • You can trade in those points for gift cards at leading retailers such as Amazon.com and Walmart
  • It's that simple!
See How it Works
Create a Free Account

Whirlpool Manuals

Find free Whirlpool WFW8300SW - Duet Sport Washer manuals and user guides available at ManualOwl.com. Try out our unique manual viewer allowing you to interact with manuals from directly within your browser!

Whirlpool Reviews

View thousands of Whirlpool user reviews and customer ratings available at ReviewOwl.com.

Contact Information

Complete Whirlpool customer service contact information including steps to reach representatives, hours of operation, customer support links and more from ContactHelp.com.

Scoreboard Ratings

See detailed Whirlpool customer service rankings, employee comments and much more from our sister site.

Whirlpool Recalls

Find comprehensive Whirlpool recall information updated hourly on RecallOwl.com.