
Whirlpool WFW70HEBW Support Question
Whirlpool WFW70HEBW Support Question
Find answers below for this question about Whirlpool WFW70HEBW.Need a Whirlpool WFW70HEBW manual? We have 5 online manuals for this item!
Question posted by lisagibson79 on January 3rd, 2019
How Do I Get To The Drain Filter?
I have the WFW70HEBW1 it is not like the HW0. I have found videos on how to remove the lower panel on the WFW70HEBW0 but the HW1 is one solid panel in front. I have not seen any diagrams or videos on my washer. It's been having slow draining and gives me the error. I just need to figure out how to access the drains filter.
Current Answers


Related Whirlpool WFW70HEBW Manual Pages
Installation Guide - Page 2
...)
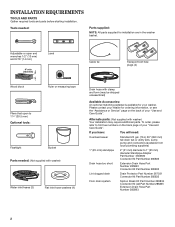
Optional tools:
Flashlight
Bucket
Parts needed :
Parts supplied:
NOTE: All parts supplied for your "Use and Care Guide". Tools needed : (Not supplied with washer)
Water inlet hoses (2)
Flat inlet hose washers (4)
Drain hose with washer) Your installation may be shipped unassembled)
Available Accessories: An optional matching pedestal is available for installation are in the...
Installation Guide - Page 4
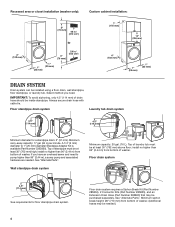
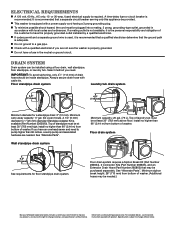
... drain hose should be installed using a floor drain, wall standpipe, floor standpipe, or laundry tub. Floor drain system
4.5" (114 mm)
See requirements for a standpipe drain: 2" (51 mm). Always secure drain hose... (25 mm) diameter Standpipe Adapter Kit is available (Part Number 3363920). Top of washer. Wall standpipe drain system
4.5" (114 mm)
min.
30" (762 mm)
Minimum capacity: 20 gal....
Installation Guide - Page 6
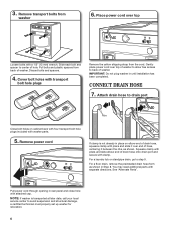
... has been completed. For a laundry tub or standpipe drain, go to back of hole. CONNECT DRAIN HOSE
7. Squeeze clamp with pliers and slide elbow end of washer.
Gently place power cord over top
Loosen bolts with a 1/2" (13 mm) wrench. IMPORTANT: Do not plug washer in Step 8. For a floor drain, remove the preinstalled drain hose form as shown.
See...
Installation Guide - Page 7
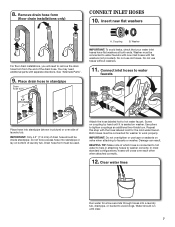
... be inside standpipe; Insert new flat washers
For floor drain installations, you will cross over side of laundry tub. HELPFUL TIP: Make note of the drain hose. 8. Use pliers to remove the drain hose form from the end of which hose is seated on bottom of laundry tub. Remove drain hose form
(floor drain installations only)
CONNECT INLET HOSES 10...
Installation Guide - Page 8

... hose to Step 19. Record hose installation or replacement dates for leaks
Remove cardboard from side to washer
LEVEL WASHER
Leveling your washer properly reduces excess noise and vibration.
16.
Secure drain hose
Laundry Tub
Standpipe
Wall
4.54".5" (114 mm)
4.5" (114 mm)
4.5" (1143 mm)
Grip washer from top and rock back and forth, making sure all four...
Dimension Guide - Page 2
... least 30" (762 mm) high;
n Do not have an overhead sewer and need . IMPORTANT: To avoid siphoning, only 41⁄2" (113 mm) of washer. (Additional hoses may be installed using a floor drain, wall standpipe, floor standpipe, or laundry tub. install no higher than 96" (2.44 m) from bottom of standpipe must be provided. n This...
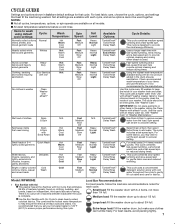
Use & Care Guide - Page 5

...Estimated Time Remaining display. Touch the desired option along the bottom of the cycle for your laundry load. See "Cycle Guide" for 3 seconds. Wash Temp The recommended wash temperature is... or decrease in the cycle. Lower soil level settings will be displayed (for 3 seconds to lock the controls to avoid unwanted changes or operation. the washer remembers the last on/off Delay...
Use & Care Guide - Page 6

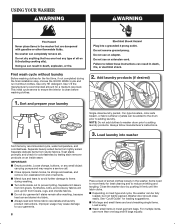
... Remove the load promptly for best results. Eco Monitor
The Eco Monitor allows you to the high position.
The sensing process will drain...adjust the settings and options to indicate that cycle. Add laundry products as when the washer is set, the Delay Wash indicator will light and ...not overfill; CONTROL PANEL AND FEATURES
Choosing the Right Detergent
Use only High Efficiency detergents. After...
Use & Care Guide - Page 7
... 30 washes to keep the inside of clothes
Drain
N/A
Fast
N/A
TumbleFresh™
& Spin
Medium
Delay Wash
Slow
Off
Use Drain & Spin to thoroughly clean the inside of ...fast-speed final spin help ensure the removal of bacteria between loads after the cycle is designed to ensure proper performance during the Clean
Washer with 3-4 items, not more than ...
Use & Care Guide - Page 8
... initial cycle serves to reduce wrinkling and tangling. Always follow fabric care labels and laundry product instructions. Treat stains promptly and check for colorfastness by testing stain remover products on load type and cycle, the washer can be added to the drum prior to items during the final installation step, choose the QUICK...
Use & Care Guide - Page 9
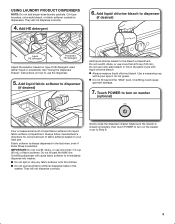
...for correct amount of fabric softener based on how to use liquid fabric softener dispenser balls in this washer. n Do not use the dispenser.
5. Add liquid fabric softener to dispenser
(if desired)...softener onto the clothes.
Make sure the drawer is selected. USING LAUNDRY PRODUCT DISPENSERS
NOTE: Do not add single-dose laundry packets, Oxi-type boosters, color-safe bleach, or fabric softener...
Use & Care Guide - Page 13
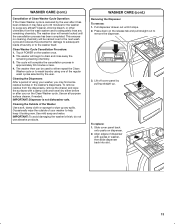
... remove: 1. To replace: 1.
IMPORTANT: Dispenser is canceled by pulling straight up to 30 minutes for damage to subsequent loads of laundry or to the washer itself.
Press down on the washer once. 2. The washer will begin to drain and rinse away the
remaining cleaning chemistry. 3. The cycle will remain locked until it looking new. Slide cover panel...
Use & Care Guide - Page 14
... disconnect power. Plug in hoses, freezing can damage washer. Disconnect and drain water inlet hoses.
2. Washer must be moved during freezing weather, winterize your washer only when you are home. Turn off both water faucets. Shut off water supply to washer to avoid flooding due
to clean washer
and remove antifreeze, if used. Place inlet hoses and...
Use & Care Guide - Page 15
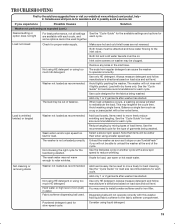
... cycle.
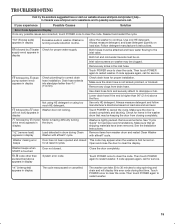
Lower drain hose if the end is running a suds reduction routine. Remove some items. See "Cycle Guide" for proper installation.
for correct drain
hose installation.
System error code. Close the door completely. Reselect and restart the cycle. F8 followed by E1 (drain
pump system error) appears in display
F7 followed by E2 (door Washer door...
Use & Care Guide - Page 16
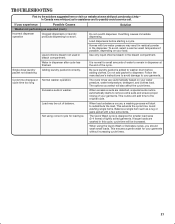
... regular detergents can cause leaking from door or rear of a clogged sink or drainpipe. Washer not performing as coins could be necessary to drainpipe or laundry tub. This is normal to remove items.
It is normal for leaks (laundry tubs, drain pipe, water pipes, and faucets.)
Only use HE detergent.
Check floor for service to...
Use & Care Guide - Page 18

...washer stops working much HE detergent. (cont.)
Washer not draining/ spinning, loads are completed, the door must be opened between the washer drum and the outer tub.
Do not seal the drain hose with a slower spin speed. To remove extra suds, select DRAIN... following manufacturer's directions based on .
Lower drain hose if the end is on your load.
Make sure hot and cold inlet...
Use & Care Guide - Page 19
...size and soil level. If you will start to install a water softener and/or iron filter. Remove any kinks in water.
Load not rinsed
Check for
are not reversed. Always measure detergent and... follow manufacturer's directions based on load size and soil level. Avoid tightly packing the washer. The load may need to redistribute the load. Add load loosely.
See the "Cycle ...
Use & Care Guide - Page 21
..., you select will add time to remove extra suds and ensure proper rinsing of your load. This extends the cycle time.
Do not overfill dispenser. Overfilling causes immediate dispensing. Water in the bleach compartment. Be sure laundry packet is normal for small amounts of water to washer drum before starting a cycle. Load may...
Use & Care Guide - Page 22
...may have other than the limited warranty that have been removed, altered, or cannot be provided by
calling Whirlpool....number Model number Serial number Purchase date
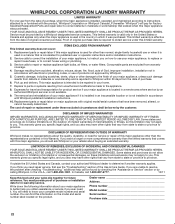
22 WHIRLPOOL CORPORATION LAUNDRY WARRANTY
LIMITED WARRANTY
For one year from the date ... dealer to repair or replace appliance light bulbs, air filters, or water filters. Damage resulting from the date of the Use &...
Warranty Information - Page 1
... accordance with Whirlpool published installation instructions.
10.
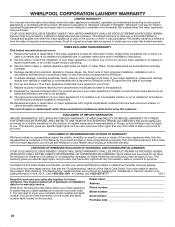
The removal and reinstallation of your major appliance is located in .... In Canada, call 1-800-253-1301. WHIRLPOOL CORPORATION LAUNDRY WARRANTY
LIMITED WARRANTY
For one year from the date of... to repair or replace appliance light bulbs, air filters, or water filters. WHIRLPOOL SHALL NOT BE LIABLE FOR INCIDENTAL OR ...
Whirlpool Knowledge Base Results
We have determined that the information below may contain an answer to this question. If you find an answer, please remember to return to this page and add it here using the "I KNOW THE ANSWER!" button above. It's that easy to earn points!-
Vibration - Front-load washer
... need to be removed from the washer before you operate the washer. Each unit is normal. If you probably have not heard compared to the pedestal by entering your hands; Vibration that are with your product model number in noise, vibration, error codes, and possible machine damage. Normal sounds in the floor from the... -
Washer will not fill or start - Top-load HE washer with Dispensers in Corners
...and cold water faucets are completed. Check to give you the best fabric care for each load...Washer will not fill or start - Are both faucets for one inch. Remove any clothes in your desired cycle and press Start. Allow the cycle to drain... washer Not filling or not starting the washer. Display shows an error code - Cabrio® Do not add more items to the washer ... -
Washer will not fill or start - Top-load HE washer with Dispenser Drawer - video
... fabric care. Remove any accumulated film or particles from the washer. Has a cycle...washer with the lid open. Close the washer lid before locking again. Plug power cord into the load during operation. Do not use short slow spins to drain...washer with dry items only. video My Cabrio TM High Efficiency washer will use an extension cord. Next, the washer...
Similar Questions

Removing Front Panel On Wfw94hexw2 Washer.
How do you take off the whole front panel of the washer to get to the filter
How do you take off the whole front panel of the washer to get to the filter
(Posted by Greenfieldtaylor92 3 years ago)

How To Unlock A Locked Door On Wfw70hebw Washer
How do I unlock a locked door on WFW70HEBW washer?
How do I unlock a locked door on WFW70HEBW washer?
(Posted by Judywinglee 7 years ago)

Washer Lint Filter
Whirlpool Duet WFW70HEBW washer has bad odor. Read how to clean washer but also said to clean lint f...
Whirlpool Duet WFW70HEBW washer has bad odor. Read how to clean washer but also said to clean lint f...
(Posted by hill1714 8 years ago)
How To Reset The Washing Machine. It Is Locked And I Cannot Open The Door
(Posted by maguimond 9 years ago)

My Whirlpool Wfw9050xw Front-load Washer Fills With Water Until An Error Occurs
(Posted by huge40817 10 years ago)