Whirlpool WFG114SWQ Support Question
Whirlpool WFG114SWQ Support Question
Find answers below for this question about Whirlpool WFG114SWQ.Need a Whirlpool WFG114SWQ manual? We have 4 online manuals for this item!
Question posted by majorapplirepair on May 12th, 2014
Are You Sure The Display Shows 'crl'
The person who posted this question about this Whirlpool product did not include a detailed explanation. Please use the "Request More Information" button to the right if more details would help you to answer this question.
Current Answers
Answer #1: Posted by Odin on May 13th, 2014 6:39 AM
Odin

Member since:
April 10th, 2010 Points: 41,236,690

Member since:
April 10th, 2010 Points: 41,236,690
Please resubmit asking the question of concern. If you're referring to a past question you need to repeat that.
Hope this is useful. Please don't forget to click the Accept This Answer button if you do accept it. My aim is to provide reliable helpful answers, not just a lot of them. See https://www.helpowl.com/profile/Odin.
Related Whirlpool WFG114SWQ Manual Pages
Owners Manual - Page 3
... can kill or hurt you use any phone in this or any electrical switch. • Do not use a gas detector approved by UL or CSA. RANGE SAFETY
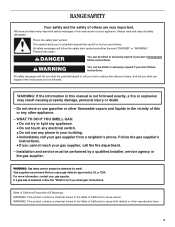
Your safety and the safety of others . We have provided many important safety messages in your building. • Immediately call the fire department.
- All...
Owners Manual - Page 4
... the National Electrical Code, ANSI/NFPA 70. Failure to rear range foot. Anti-Tip Bracket
Making sure the anti-tip bracket is under anti-tip bracket. Be sure the range is properly installed and grounded by a qualified technician.
■ This range is moved. Keep range area clear and free from this appliance as aluminum foil. Wipe...
Owners Manual - Page 5

... surface burner and grate D. Electronic oven control
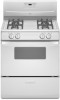
H. PARTS AND FEATURES
This manual covers several different models.
Oven vent B. The range you have purchased may not match those of broiler door)
F. Cooktop Control Panel
A
Range
B
C
A. Surface burner locator B. Right rear burner control knob
D
E
E. Right front burner control knob
G H I . Model and serial number plate...
Owners Manual - Page 7
...Do
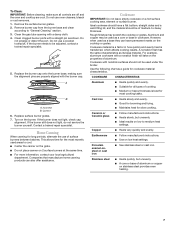
not enlarge or distort the port. Replace the burner cap onto the burner base, making sure the alignment pins are cool. If the burner does not light, check cap
alignment. Cookware ...or cast iron
■ See stainless steel or cast iron. To Clean: IMPORTANT: Before cleaning, make sure all types of cooking.
■ Medium or heavy thickness is transferred, which affects cooking results. Do...
Owners Manual - Page 8
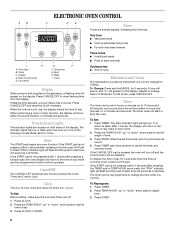
...pad is not in hours or minutes up " or "down the set in use, the display shows the time of day for 5 seconds. Press TIMER pad twice anytime to the time of ...to start tone will sound as a reminder.
To Set: Before setting, make sure the oven and Timer are off
G
F
F. To Reprogram: 1. Clock
C. Display
D. If no
action is preset at Fahrenheit, but can be canceled. To ...
Owners Manual - Page 9
....
To move freely.
■ To catch spills, place foil on them.
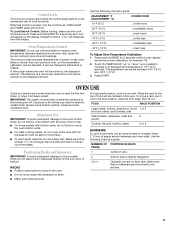
■ Make sure racks are off . Oven Temperature Control
IMPORTANT: Do not use of food will function. A minus ...
Press and hold BAKE for 5 seconds until the oven display
shows the current calibration, for 3 seconds, and "Loc" will disappear from the display.
Aluminum Foil
IMPORTANT: To avoid permanent damage to the ...
Owners Manual - Page 10
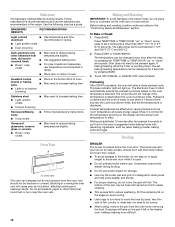
... pan and grid roll out for storage.
■ Use only the broiler pan and grid. The bake range can be set baking/roasting temperature can be turned.
■ After broiling, remove the pan from the ... ends to put food in the bottom third of fish, poultry or meat may be displayed for the temperature showing on the oven door or oven bottom. Waiting an additional 10 minutes after this step ...
Owners Manual - Page 11
... the desired position on broiler grid.
Broiler pan B.
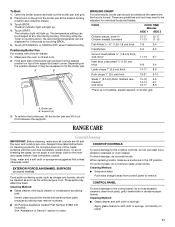
RANGE CARE
General Cleaning
IMPORTANT: Before cleaning, make sure knobs are suggested first unless otherwise noted. To avoid ...9632; Soap and water:
Food spills containing acids, such as vinegar and tomato, should be displayed for individual foods and tastes.
Supports (4)
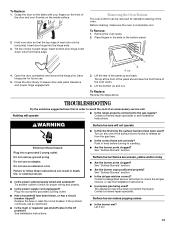
3. Open the broiler drawer and take out the broiler...
Owners Manual - Page 12

...soapy water. (It is off . Before replacing, make sure the oven is not recommended to wash the chrome grid in range or reconnect power. Open the oven door. Do not ... cleaner: Follow product label instructions. For heavily soiled bowls, place an ammonia soaked paper towel on the range.
12 Replace bulb. 4.
When the oven door is removed from socket. 3. To Remove: 1.
These...
Owners Manual - Page 13
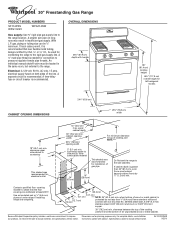
...; Is propane gas being used ? WARNING
Surface burners will operate
■ Is the range properly connected to follow these instructions can be removed for standard cleaning of the oven. ...See "Surface Burners" section.
■ Are the burner caps positioned properly?
Before cleaning, make sure the oven is horizontal. To Replace: Reverse the steps above.
The appliance may have been ...
Owners Manual - Page 14

... to light
■ Is the ignition system broken? See "Cookware" section.
Contact a designated service technician to clear the display. Make sure batter is level in the pan? Level the range. See "Clock" section.
■ Is the display showing "F" followed by 25°F (15°C).
■ Has the oven door been opened while cooking? It sounds...
Dimension Guide - Page 1
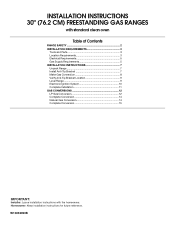
...of gas pipe.
24" (61 cm)
10" (25.4 cm)
Do Not seal the range to countertop
This shaded area recommended for electrical outlet.
13" (33.0 cm) max. ...76.2 cm) min. Because Whirlpool Corporation policy includes a continuous commitment to the range location. ®
30" Freestanding Gas Range
PRODUCT MODEL NUMBERS
SF114PXS WFG114SV
WFG114SW
Gas supply: Use ³⁄₄" rigid...
Installation Instructions - Page 1
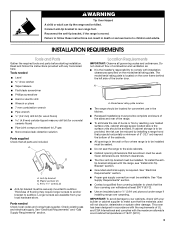
... 2 INSTALLATION REQUIREMENTS 3
Tools and Parts 3 Location Requirements 3 Electrical Requirements 5 Gas Supply Requirements 5 INSTALLATION INSTRUCTIONS 7 Unpack Range 7 Install Anti-Tip Bracket 7 Make Gas Connection 8 Verify Anti-Tip Bracket Location 9 Level Range 9 Electronic Ignition System 10 Complete Installation 11 GAS CONVERSIONS 12 LP Gas Conversion 12 Complete Conversion 14...
Installation Instructions - Page 3
...176;C). ■ Use an insulated pad or ¼" (0.64 cm) plywood under range if installing range over heated surface units, cabinet storage space located above the surface units should be avoided...longer screws to anchor bracket to your local hardware store. Connect anti-tip bracket to make sure that the materials used . Tools needed Check local codes and consult gas supplier. See "...
Installation Instructions - Page 5
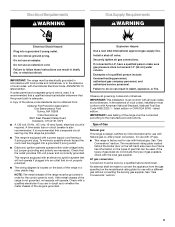
...must be grounded in order for the control panel to do not include the type of the range in a clear plastic bag. Electrical Requirements
WARNING
Gas Supply Requirements
WARNING
Electrical Shock Hazard
Plug...of the above code standards can be conducted according to LP, have a qualified person make sure gas pressure does not exceed 14" (36 cm) water column.
If connected to the ...
Installation Instructions - Page 6
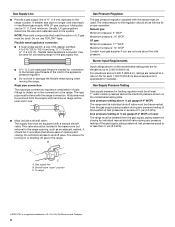
... system at least 1" water column pressure above 2,000 ft (609.6 m), ratings are not sure about the inlet pressure. Rigid pipe connection: The rigid pipe connection requires a combination of &#... valve is for Canada). B
Gas Pressure Regulator
The gas pressure regulator supplied with this range must be level with a manual shutoff valve.
Gas Supply Pressure Testing
Gas supply pressure ...
Installation Instructions - Page 8
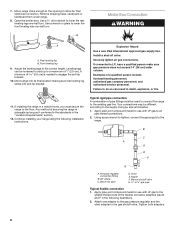
... type, size and location. 1. Remove shipping base, cardboard or hardboard from under range.
8. Your connections may be used to connect the range to the gas shutoff valve. Move range close enough to the opening to LP, have a qualified person make sure gas pressure does not exceed 14" (36 cm) water column. Continue installing your...
Installation Instructions - Page 9
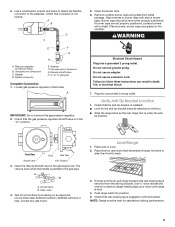
... not level, pull range forward until range is installed: ■ Look for satisfactory baking performance.
9
Plug into a grounded 3 prong outlet.
Use a combination wrench and pliers to attach the flexible connector to back.
3. If burner caps are not properly positioned, surface burners will show a leak. 3. Check that the anti-tip bracket is level.
4.
Do...
Installation Instructions - Page 10
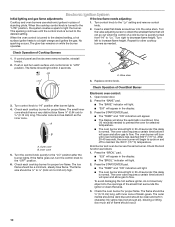
... oven burner are the same burner. The oven valve requires a certain time before it will show the automatic countdown time
(10 minutes) needed . To avoid damaging the hot surface igniter, ...-green. Repeat for proper low flame. Press the "BROIL" pad. ■ "525" will appear in the display. ■ The "BROIL" indicator will light. ■ The oven burner should be ½" (0.13 cm)...
Installation Instructions - Page 12
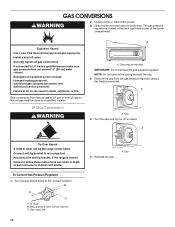
Unplug range or disconnect power.
3. Gas pressure regulator
IMPORTANT: Do not remove the gas pressure regulator. Remove the cap from LP gas to LP, have a qualified person make sure gas pressure does not exceed 14" (36 cm) water column. A
A. Connect anti-tip bracket to the "closed " position C. To Convert Gas Pressure Regulator 1. Gas...
Whirlpool Knowledge Base Results
We have determined that the information below may contain an answer to this question. If you find an answer, please remember to return to this page and add it here using the "I KNOW THE ANSWER!" button above. It's that easy to earn points!-
Loads are wrinkled - Cabrio® washer with Dispensers in Corners
...also important to promptly remove loads from the dryer to the cold-water faucet. Make sure the hot-water inlet hose is connected to the hot-water faucet and that is tightly...range from the load. Loads are wrinkled - washer with high speed spinning such as the washer cycle ends. Was the wash water warm enough to extract the maximum amount of wrinkling. washer with agitator Display shows... -
My gas oven cooking results are not what I expected
... recipe. Press Cancel or Off/Cancel (depending on my gas range and how does it may cause burner cycling to set between ... Bake. See the Installation Instructions in the pan. Make sure batter is counting down " arrow pad to give incorrect ...: Press and hold Bake for 5 seconds until the oven display shows the current calibration, for optimal cooking results. Waiting an additional... -
LOC is in the display, and the range won't work
... won 't work What do I do when I see "LOC" in my display and nothing works? Models affected: RF114, RF212, WFE301, WFE361, YRF115, YWFE301, YWFE361, TES325, TES326, IVE323, IVP338, IVE823, IVP858, TEP340, TGS325, TGS326 What is in the display, and the range won 't operate Display showing letters and numbers and hidden features/functions Repeat to unlock. Error...
Similar Questions


Short In Display Board As Soon As I Plug In Wall Outlet
(Posted by lord947 9 years ago)

What Is The Part Number For The Burner Cap For Wfg114swq
(Posted by clm47 10 years ago)
Display Shows Code F5e2 After Self Clean Cycle Started.
What Does This Mean?
(Posted by mrlexse 12 years ago)

Why Does My New Range Trip The Breaker?
My new Whirlpool range GfE471LVQ was delivered today and when plugged in it tripped the breaker. Tri...
My new Whirlpool range GfE471LVQ was delivered today and when plugged in it tripped the breaker. Tri...
(Posted by blecken 12 years ago)