Whirlpool WFE361LVB Support Question
Whirlpool WFE361LVB Support Question
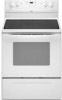
Find answers below for this question about Whirlpool WFE361LVB - 30 Inch Electric Range.Need a Whirlpool WFE361LVB manual? We have 4 online manuals for this item!
Question posted by lewhol on September 10th, 2012
Heat Glow On Top
When looking at range top noticed "when only the left small burner is glowing, there is a glow pattern visible along the wiring from the burner all the way back to (and past ) the control panel". It actually is heating up the center of the cooking surface. Is this a concern, and is there a recall on this?
Current Answers
Related Whirlpool WFE361LVB Manual Pages
Dimension Guide - Page 1

...wire, UL listed, 40- upper cabinet depth B. 30" (76.2 cm) min.
30" (76 cm) Freestanding Electric Range...Electrical: Range must be connected to the proper electrical voltage and frequency as specified on the left side frame behind the storage drawer panel. opening width E.
This range is located behind the control panel or on the oven frame behind
storage drawer panel)
*Range...
Installation Instructions - Page 1

... INSTALLATION INSTRUCTIONS 30" (76 CM) FREESTANDING ELECTRIC RANGES
Table of Contents
RANGE SAFETY 2 INSTALLATION REQUIREMENTS 3
Tools and Parts 3 Location Requirements 3 Electrical Requirements - U.S.A. Only 4 INSTALLATION INSTRUCTIONS 6 Unpack Range 6 Install Anti-Tip Bracket 6 Electrical Connection - W10252706B Only 7 Verify Anti-Tip Bracket Location 12 Level Range 12 Storage...
Installation Instructions - Page 2

... others are not followed. Failure to potential hazards that can result in this manual and on your appliance.
Reconnect the anti-tip bracket, if the range is the safety alert symbol. All safety messages will tell you what can be killed or seriously injured if you don't immediately follow instructions. WARNING...
Installation Instructions - Page 3

...■ Tin snips or large wire cutters (for use with installation clearances specified on the left side frame behind the storage drawer panel.
■ The range should be rated at 250 volts...reduced by reaching over heated surface units, cabinet storage space located above .
■ Four-wire power supply cord or cable must be made by a licensed, qualified electrical installer. Read and ...
Installation Instructions - Page 4

Model/serial rating plate (located on the left side frame behind
storage drawer panel)
*Range can be installed next to whether the appliance is covered by not less than No. 28 MSG sheet steel, 0.015" (0.4 mm) stainless steel, 0.024" (0.6 mm) aluminum or 0.020" (0.5 mm) copper.
30" (76.2 cm) minimum clearance between cutout and cabinet door...
Installation Instructions - Page 5

...control panel or on the supply end. Grounding through the neutral, use a 4-wire power supply cord rated at least 4 ft (1.22 m) long.
4-wire receptacle (14-50R)
The minimum conductor sized for use kits that the range...behind the storage drawer panel. mobile homes;
Electrical Connection
To properly install your range, you must determine the type of electrical connection you will be ...
Installation Instructions - Page 6

... ratchet B. It will be centered in death or serious burns to do so can tip the range and be killed. Failure to follow these instructions can result in cabinet opening is wider than that the left
edge is against cabinet and top edge is against rear wall, molding or cabinet. 3. If countertop...
Installation Instructions - Page 7

...cover screws located on the bracket template. Align anti-tip bracket holes with a hammer. Electrically ground range. Pull cover down and toward you to wood floor, drill two ¹⁄₈"... local hardware store. Use a new 40 amp power supply cord. Use 8 gauge copper or 6 gauge aluminum wire. A B
C
A. To mount anti-tip bracket to concrete or ceramic floor, use a 4.8 mm) masonry...
Installation Instructions - Page 8

...-link screw
2. Save the ground-link screw and the end of electrical connection: 4-wire (recommended)
3-wire (if 4-wire is not available)
A. Add strain relief. Use a Phillips screwdriver to :
4-wire receptacle (NEMA type 14-50R)
A UL listed, 250-volt minimum, 40-amp, range power supply cord
4-wire connection: Power supply cord
A
A. Style 1: Power supply cord strain relief ■...
Installation Instructions - Page 9

... the power supply cord through the strain relief on the cord/conduit plate on bottom of range. Power supply cord wires
4. Terminal block B. Use ³⁄₈" nut driver to connect the neutral (white) wire to the outer terminal block posts with the ground-link screw and ground-link section. Securely tighten hex...
Installation Instructions - Page 10

...line 1 (black), neutral (white), and line 2 (red) wires. Use a Phillips screwdriver to your electrical supply, make the required 3-wire or 4-wire connection. 1. Pull the wires through bottom of range. Ground-link screw C. Neutral (white) wire G.
Metal ground strap B.
Terminal lug B. Discard C. C
D
E
A. Neutral (white) wire E. Depending on bottom of terminal lugs. Strip
the...
Installation Instructions - Page 13

... material. Turn on range operation. When the range has been on . 8. Plug power cord into an outlet.
■ Electrical supply is level. See "Level Range." 5. Dry thoroughly with... instruction on surface burners and oven. or circuit breaker has not tripped.
■ Range is plugged into appropriate outlet. A
A. Check that you are now installed.
If range does not operate,...
Installation Instructions - Page 14

... supply cord. 5. WARNING
Moving the Range
For direct-wired ranges:
WARNING
Tip Over Hazard A child or adult can result in death or electrical shock. 1. Reconnect the anti-tip bracket, if the range is installed: ■ Look for cleaning or maintenance:
For power supply cord-connected ranges: 1. Check that range is level.
14 Electrical Shock Hazard Disconnect power before operating...
Owners Manual - Page 1

...Controls 6 Aluminum Foil 6 Positioning Racks and Bakeware 6 Oven Vent 7 Baking and Roasting 7 Broiling 7 Timed Cooking (on some models 7 RANGE CARE 8 Self-Cleaning Cycle (on the oven frame behind the storage drawer panel... panel del cajón de almacenamiento.
You will need assistance, call us at www.whirlpool.com for purchasing this high-quality product. ®
ELECTRIC RANGE
...
Owners Manual - Page 3

... INSTRUCTIONS
WARNING: To reduce the risk of fire, electrical shock,
injury to persons, or damage when using the range.
■ User Servicing - TO CHECK IF THE DEVICES ARE INSTALLED PROPERLY, SLIDE RANGE FORWARD, LOOK FOR ANTI-TIP BRACKET SECURELY ATTACHED TO FLOOR, AND SLIDE RANGE BACK SO REAR RANGE FOOT IS UNDER ANTI-TIP BRACKET.
■...
Owners Manual - Page 5

...can produce excess heat, causing the burner bowl to adjust time and temperature settings. The control knobs can be...is turned off. A
B
A. Temperature is turned on the console panel. Press CANCEL/OFF when finished. or "PSH" appears in death...way as breads and cakes because they may not bake properly.
REMEMBER: When range is located on .
They also help keep it in use will glow...
Owners Manual - Page 7

...cooking results.
Broiling
Broiling uses direct radiant heat to cook.
5. The lower the ...rack. Press OFF/CANCEL to maintain a precise temperature range for the oven preheat cycle to enter a temperature ...selected temperature will glow red when cycling on grid in oven more precise control when cooking....small cuts of meat and poultry. Multiple Rack Cooking
2-rack: Use rack positions 2...
Owners Manual - Page 8

... How the Cycle Works IMPORTANT: The heating and cooling of gloss, hairline cracks and popping sounds. To ...30 minutes) or LO self-clean time (3 hours 30 minutes). The oven light will appear on steel in the oven may result in burns. Electronic Oven Control...The temperature and/or time settings can be displayed.
Prepare Range ■ Remove the broiler pan, grid, cookware and bakeware, ...
Owners Manual - Page 9

...cleansers or oven cleaner. Lift out the burner bowl. METALLIC PAINT (on soil ■ Clean with Cooktop Cleaner as soon as the entire range is cool. You may occur to moderate ...seals under knobs. Soil will become less noticeable.
Always follow label instructions on some models) NOTE: To avoid damage to condition the cooktop.
CONTROL PANEL AND OVEN DOOR EXTERIOR
STAINLESS STEEL (on...
Owners Manual - Page 10

...back of vegetable oil applied to the proper heat level?
Cookware should not extend more than ...range or reconnect power. or "PSH"? Close the oven door all the way.
■ Has the function been entered? Oven cooking results not what expected ■ Is the control...element or surface burner. See "Cooktop Use" section.
■ Is the range level?
See "Electronic Oven Controls" section.
...
Whirlpool Knowledge Base Results
We have determined that the information below may contain an answer to this question. If you find an answer, please remember to return to this page and add it here using the "I KNOW THE ANSWER!" button above. It's that easy to earn points!-
What are some tips for using my ceramic glass cooktop?
...surface cooking areas are hot. Make sure the bottoms of pots and pans are clean and dry before and after each use will help keep it will glow...cookware for best heat conduction and ...cook popcorn in prepackaged aluminum containers on my electric range? Cookware with slightly indented bottoms or small expansion channels can 't be more visible, and may be seen but that will stain the burner... -
What are some general tips for using my electric ceramic glass cooktop?
...electric range? Then, while wearing oven mitts, remove the spills while the surface is still warm. If sugary spills are off the cooktop before using my electric ceramic glass cooktop? Do not cook...will glow red when an element is still warm. Tiny scratches and abrasions Rub cleaner into surface with slightly indented bottoms or small expansion channels can leave deposits when heated.... -
What is the AccuBake® Temperature Management System on my electric range?
...need to wait for optimal cooking results. Display showing letters...controls. The bake range can be set a temperature other than 350°F (175°C) in intervals. Press Start. How to set between AccuBake® Press Off/Cancel when finished. Press Temp, Temp/Time or Temp/Hour "up" or "down" arrow pads to adjust the oven temperature calibration on my electric range...
Similar Questions

Fee
I would like to know how much whirlpool 30 in free-standing electric range model number wfe 361 lvb ...
I would like to know how much whirlpool 30 in free-standing electric range model number wfe 361 lvb ...
(Posted by cutmannn69 4 years ago)

Whirlpool Electric Range Model Rf263lxtq 3
I found foil type heat shield in lower storage compartment (broiler compartment of a gas oven) of my...
I found foil type heat shield in lower storage compartment (broiler compartment of a gas oven) of my...
(Posted by busterc1 10 years ago)

I Need A Manual For My Whirlpool Range Model Wfe361lvb 30' Glasstop Self Clean
(Posted by judyntomsr 11 years ago)

Cooktop On Light Will Not Go Off!
I have a Whirlpool WFE361LVB 30 inch range and my COOKTOP ON light will not turn off even with all t...
I have a Whirlpool WFE361LVB 30 inch range and my COOKTOP ON light will not turn off even with all t...
(Posted by schreinerracing10 11 years ago)

Where Can I Find A 30 Year Old Manual For Jenn-air Model F120 Electric Range.
(Posted by Anonymous-39214 12 years ago)