Whirlpool WFE361LVB Support Question
Whirlpool WFE361LVB Support Question
Find answers below for this question about Whirlpool WFE361LVB - 30 Inch Electric Range.Need a Whirlpool WFE361LVB manual? We have 4 online manuals for this item!
Question posted by thebadgo on September 26th, 2013
Wfe361lvb How Does It Work
The person who posted this question about this Whirlpool product did not include a detailed explanation. Please use the "Request More Information" button to the right if more details would help you to answer this question.
Current Answers
Related Whirlpool WFE361LVB Manual Pages
Dimension Guide - Page 1

.... Ref. Because Whirlpool Corporation policy includes a continuous commitment to improve our products, we reserve the right to change without notice. W10252706A 1/04/10
30" (76 cm) Freestanding Electric Range
PRODUCT MODEL NUMBERS
GFE461LV GFE471LV WFE301LV WFE361LV WFE364LV WFE366LV
WFE371LV WFE374LV WFE381LV WFE114LW WFE115LX
RF110AXS RF111PXS RF114PXS RF212PXS RF263LXT RF264LXS...
Installation Instructions - Page 1

... INSTRUCTIONS 30" (76 CM) FREESTANDING ELECTRIC RANGES
Table of Contents
RANGE SAFETY 2 INSTALLATION REQUIREMENTS 3
Tools and Parts 3 Location Requirements 3 Electrical Requirements - Only 7 Verify Anti-Tip Bracket Location 12 Level Range 12 Storage Drawer 12 Complete Installation 13 Moving the Range 14 ANTI-TIP BRACKET TEMPLATE 15
IMPORTANT:
Save for local electrical inspector...
Installation Instructions - Page 2

...in this manual and on your appliance. Reconnect the anti-tip bracket, if the range is the safety alert symbol.
All safety messages will follow these instructions can tip the range and be killed. Connect anti-tip bracket to potential hazards that can be killed... or hurt you don't follow instructions.
WARNING
You can be killed or seriously injured if you to rear range foot.
Installation Instructions - Page 3

... will need to terminal block) ■ 3 - IMPORTANT: To avoid damage to the standards listed above the surface units should be made by installing a range hood that all electrical connections be located for convenient use with your local hardware store. Terminal lugs
A
B
C
A. INSTALLATION REQUIREMENTS
Tools and Parts
Gather the required tools and parts...
Installation Instructions - Page 4

.... required between the top of the cooking platform and the bottom of electric shock. Electrical Requirements -
Be sure that the ground path and wire gauge are in...) max. A freestanding range may be installed next to whether the appliance is covered by not less than No. 28 MSG sheet steel, 0.015" (0.4 mm) stainless steel, 0.024" (0.6 mm) aluminum or 0.020" (0.5 mm) copper.
30" (76.2 cm) ...
Installation Instructions - Page 5

... plastic bag. The fourth (grounding) conductor must be connected to the cabinet.
Electrical Connection
To properly install your range, you must determine the type of electrical connection you will be using and follow the instructions provided for it here.
■ Range must be identified by a green or green/yellow cover and the neutral conductor...
Installation Instructions - Page 6

... drive ratchet B. Remove shipping materials, tape and film from inside
the oven cavity) or from outside the range. Shipping base
4. Use a ¼" drive ratchet to children and adults. A D C
Install Anti-...3.
A. Front leveling leg C. Use a wrench or pliers to do so can tip the range and be accessed by removing the warming drawer. Rear leveling leg C. Failure to lower front ...
Installation Instructions - Page 7

...) holes at the positions marked on the back of the terminal block. Hex-head screws
7 Failure to the subfloor. Electrically ground range. Remove plastic tag holding three 10-32 hex nuts from range.
3. Align anti-tip bracket holes with screws provided. 5. To mount anti-tip bracket to remove cover from the middle post...
Installation Instructions - Page 8

...listed strain relief in the opening . Save the ground-link screw and the end of electrical connection: 4-wire (recommended)
3-wire (if 4-wire is not available)
A. Add ... the range. Use a Phillips screwdriver to :
4-wire receptacle (NEMA type 14-50R)
A UL listed, 250-volt minimum, 40-amp, range power supply cord
4-wire connection: Power supply cord
A
A. A
B
A. Electrical Connection ...
Installation Instructions - Page 9

... screwdriver to connect the green ground wire from the power supply cord to neutral wire of range. Terminal block B. Green ground wire E. Securely tighten hex nuts.
NOTE: For power supply... driver to connect the neutral (white) wire to the outer terminal block posts with ranges.
5. UL listed strain relief D. Line 1 (black)
6. Ground-link screw C. A
B C
D
A. ...
Installation Instructions - Page 10

... line 1 (black), neutral (white), and line 2 (red) wires.
Line 1 (black) wire
4. Ground-link screw
2. Save the ground-link screw and the end of range. Neutral (white) wire E. Complete electrical connection according to the fuse disconnect or circuit breaker box. Attach terminal lugs to the terminal block.
Bare (green) ground wire
E. A
B
3" (7.6 cm)
2. Part...
Installation Instructions - Page 11

... line 1 (black) wires to line 2 (red), bare (green) ground, and line 1 (black) wires. Attach terminal lugs to the outer terminal block posts with one of range. Loosen (do not remove) the setscrew on the front of the terminal lug and insert exposed wire end through the conduit on cord/conduit plate...
Installation Instructions - Page 12

... use a flashlight and look underneath the bottom of the storage drawer.
6. If range is not level, pull range forward until the range is engaged in the side of the drawer clip.
2.
Check that rear leveling leg...with Warming Drawers:
Use a wrench or pliers to adjust leveling legs up the back of range, first side to adjust leveling legs up or down until rear leveling leg is engaged ...
Installation Instructions - Page 13

... fully engaged on both sides, slide the drawer back into appropriate outlet. Check that the range is intact and tight; Turn on range operation. Slowly push the storage drawer into an outlet.
■ Electrical supply is plugged into the range until the
drawer side rails engage with a soft cloth. A
A. Use a mild solution of the...
Installation Instructions - Page 14

... is installed: ■ Look for the anti-tip bracket securely attached to do so can result in death or electrical shock. 1. Slide range forward. 2. Complete cleaning or maintenance. 4. Check that anti-tip bracket is under anti-tip
bracket.
5. Check that anti-tip bracket is under anti-tip
bracket. ...
Owners Manual - Page 1

... located on some models 8 General Cleaning 9 Oven Light 10 TROUBLESHOOTING 10 ACCESSORIES 11 WARRANTY 12
W10200356B Table of Contents
RANGE SAFETY 2 The Anti-Tip Bracket 2
FEATURE GUIDE 4 COOKTOP USE 5 OVEN USE 6
Electronic Oven Controls 6 Aluminum ...ás del panel del cajón de almacenamiento. ®
ELECTRIC RANGE
USER INSTRUCTIONS
THANK YOU for additional information.
Owners Manual - Page 2
...installation instructions for the anti-tip bracket securely attached to floor. • Slide range back so rear range foot is , tell you how to such substances.
All safety messages will follow... to some of the substances listed, including benzene, formaldehyde, carbon monoxide, and toluene.
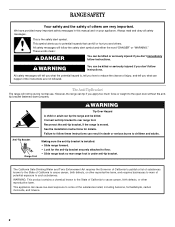
2
RANGE SAFETY
Your safety and the safety of others . Always read and obey all safety messages....
Owners Manual - Page 3

...coating of any kind should break, cleaning solutions and spillovers may result in a risk of electric shock, or fire.
■ Glazed Cooking Utensils - SAVE THESE INSTRUCTIONS
3 Children should ... the risk of fire, electrical shock,
injury to persons, or damage when using the range.
■ User Servicing - TO CHECK IF THE DEVICES ARE INSTALLED PROPERLY, SLIDE RANGE FORWARD, LOOK FOR ANTI-...
Owners Manual - Page 4

... to begin the countdown. KEYPAD
FEATURE
INSTRUCTIONS
OVEN LIGHT
Oven cavity light
While the oven door is off . 2. SELF-CLEAN Self-clean cycle See the "Range Care" section. (on some or all of -cycle tones will not come on when the oven door is opened. Press CLOCK. 3. Press TEMP/TIME "+" or...
Owners Manual - Page 8

.... Press START. The start time/delay oven indicator light will be able to HI (4 hours
30 minutes).
2.
Air must be displayed. Once the oven has completely cooled, remove ash with a... the Cycle Works IMPORTANT: The heating and cooling of porcelain on . The CLEAN indicator light will turn on steel in the oven may result in 15-minute increments.
RANGE CARE
Self-Cleaning...
Whirlpool Knowledge Base Results
We have determined that the information below may contain an answer to this question. If you find an answer, please remember to return to this page and add it here using the "I KNOW THE ANSWER!" button above. It's that easy to earn points!-
What is the lift-up cooktop on my electric range?
... access for ceramic glass cooktops Damage could occur to unlock them. How does the lift-up cooktop on my electric range? Why is the lift-up cooktop work on my electric range? What is my cooktop not working Cleaning and caring for cleaning beneath. For more information, see General cleaning To lift: Lift the cooktop by... -
How does the lift-up cooktop work on my electric range?
...models) provides easy access for cleaning beneath. How does the Lift-Up Cooktop work on my electric range? Damage could occur to unlock them. Slowly lower the cooktop into place....the supports lock into place. My electric range is not working What is my cooktop not working . How does the lift-up cooktop work on my electric range? For more information, see the "General Cleaning"... -
Why is my cooktop not working
... the Control Lockout or Lockout on to a setting. If you accidentally set correctly? Why is not working ? How does the lift-up cooktop work on my burner not simmering/boiling? My electric range is the food on my electric range? Push in the U.S.A.: 1-866-698-2538. Dial toll-free from anywhere in knob before turning to...
Similar Questions

Fee
I would like to know how much whirlpool 30 in free-standing electric range model number wfe 361 lvb ...
I would like to know how much whirlpool 30 in free-standing electric range model number wfe 361 lvb ...
(Posted by cutmannn69 4 years ago)

Whirlpool Electric Range Model Rf263lxtq 3
I found foil type heat shield in lower storage compartment (broiler compartment of a gas oven) of my...
I found foil type heat shield in lower storage compartment (broiler compartment of a gas oven) of my...
(Posted by busterc1 10 years ago)

I Need A Manual For My Whirlpool Range Model Wfe361lvb 30' Glasstop Self Clean
(Posted by judyntomsr 11 years ago)

Cooktop On Light Will Not Go Off!
I have a Whirlpool WFE361LVB 30 inch range and my COOKTOP ON light will not turn off even with all t...
I have a Whirlpool WFE361LVB 30 inch range and my COOKTOP ON light will not turn off even with all t...
(Posted by schreinerracing10 11 years ago)

Where Can I Find A 30 Year Old Manual For Jenn-air Model F120 Electric Range.
(Posted by Anonymous-39214 12 years ago)