
Whirlpool WET3300XQ Support Question
Whirlpool WET3300XQ Support Question
Find answers below for this question about Whirlpool WET3300XQ.Need a Whirlpool WET3300XQ manual? We have 5 online manuals for this item!
Question posted by jlnaboys on January 19th, 2012
Transporting A Whirlpool Stacked Washer And Dryer
"I have a Whirlpool Thin Twin Stackable washer and dryer that I moved from one house to another. I laid that unit on it's back and a little thin grease (about 1 tablespoon) leaked out. What should I do? How do I remove the front panel without scratching it? Can you help me?
Current Answers


Related Whirlpool WET3300XQ Manual Pages
Installation Guide - Page 2
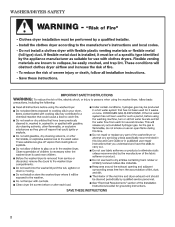
Washer/DRYER Safety
2
Installation Guide - Page 4
...
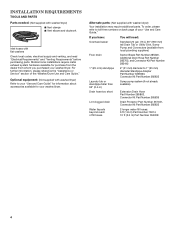
Tools and Parts
Parts needed: (Not supplied with washer/dryer) n Vent clamps n Vent elbows and ductwork
Inlet hoses with washer/dryer)
Your installation may require additional parts.
Optional equipment: (Not supplied with washer/dryer) Refer to 1" (25 mm) diameter Standpipe Adapter Part Number 3363920, Connector Kit Part Number 285835
Laundry tub or standpipe taller than 96" (2.4 m)
Sump...
Installation Guide - Page 5
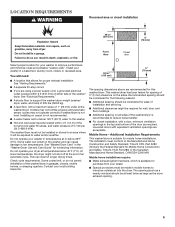
..., and water pressure of 5-100 psi (34.5-689.6 kPa). Installing on all sides of the washer/dryer is recommended to reduce noise transfer. The washer/dryer must conform to water and/or weather. Do not operate your washer in a basement, laundry room, closet, or recessed area.
Check code requirements. Louvered doors with a maximum slope of 1" (25...
Installation Guide - Page 7

... more than 4.5" (113 mm) of drain hose should be inside standpipe or below the top of standpipe must install higher than 96" (2.4 m) from bottom of washer/dryer. Laundry tub drain system
Minimum capacity: 20 gal. (76 L). Select method you must be needed.)
Wall standpipe drain system See requirements for a standpipe drain: 2" (51 mm...
Installation Guide - Page 8
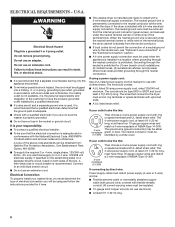
... the appliance is properly grounded.
A copy of the above code standards can be removed from : National Fire Protection Association, One Batterymarch Park, Quincy, MA 02269. n...wire power supply connection must have the properly grounded outlet installed by a qualified electrician. If your washer/dryer, you must determine the type of the terminal block.
n 10-gauge solid copper wire ...
Installation Guide - Page 10
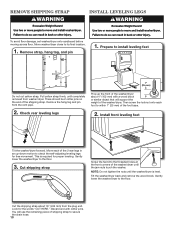
... at the front corners of the shipping strap. Look for proper leveling. Remove Shipping Strap
Install Leveling Legs
To avoid floor damage, set washer/dryer onto cardboard before moving across floor.
There should be 2 cotter pins on the end of the washer/dryer until the washer/dryer is required for the words "CUT HERE." Pull yellow strap firmly...
Installation Guide - Page 14
... strain relief
(127
5" mm)
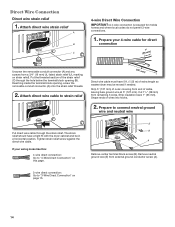
Direct wire cable must have a tight fit with the dryer cabinet and be moved if needed. Strip insulation back 1" (25 mm). Reaching inside the terminal block opening (B).... 3 wires. Strip 5" (127 mm) of extra length so washer/dryer may be in a horizontal position. Remove neutral ground wire (E) from a 3/4" (19 mm) UL listed strain relief (UL marking on...
Installation Guide - Page 15
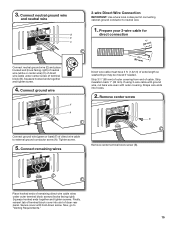
...-down screw. Strip 31/2" (89 mm) of outer covering from end of extra length so washer/dryer may be moved if needed. Connect remaining wires
Remove center terminal block screw (B). Remove center screw
B
Connect ground wire (green or bare) (F) of dryer rear panel.
Now, go to external ground conductor screw (A). Connect neutral ground wire
and neutral...
Installation Guide - Page 18
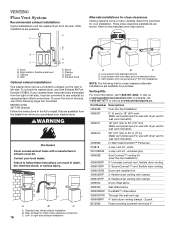
VENTING Plan Vent System
Recommended exhaust installations Typical installations vent the washer/dryer from whom you purchased your washer/dryer. Wall
E. To convert the washer/dryer, use with dryer vent to wall vent mismatch)
4396014
29" (737 mm) to 50" (1.27 m) Metal vent periscope (For use Side Exhaust Kit Part Number 279823. To cover ...
Installation Guide - Page 20
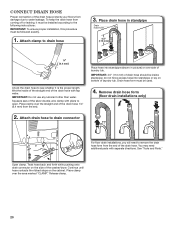
...remove the drain hose form from the end of the drain hose. IMPORTANT: Do not use any lubricant other than water. Place hose into standpipe or lay on the side of the washer/dryer...be followed exactly.
1. Place clamp over side of laundry tub.
Remove drain hose form (floor drain installations only)
2. Squeeze...leaking, it is the proper length. Open clamp. Place clamp over ...
Installation Guide - Page 21
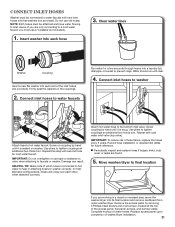
...seat the washers in a closet or recessed area: move the washer/dryer into a laundry tub, ...leaks are found.
5. Move washer/dryer to final location
If you must use a Y-adapter (not included).
1. Connect inlet hoses to a cold water faucet, you are only connecting to water faucets
Run water for a few seconds through hoses into its final location and remove cardboard from under washer/dryer...
Installation Guide - Page 22
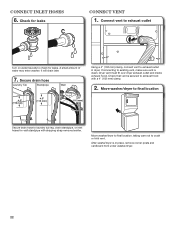
... connecting to check for leaks. Check that vent is secured to laundry tub leg, drain standpipe, or inlet hoses for leaks
Connect vent
1. After washe/dryer is clean. A small amount of water may enter washer. Move washer/dryer to final location
Secure drain hose to exhaust hood with shipping strap removed earlier. Secure drain hose
Laundry Tub
Standpipe
Wall
4.54...
Installation Guide - Page 23
... outlet
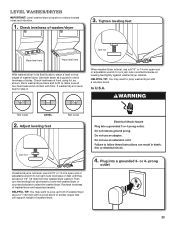
23 HELPFUL TIP: You may want to raise the washer/dryer.
Check levelness of washer/dryer.
4. Plug into a grounded 3- Check levelness of washer/dryer. Adjust leveling feet
Not Level
Jam nut
If washer/dryer is level, skip to reduce excess noise and vibration.
1. Level Washer/DRYER
IMPORTANT: Level washer/dryer properly to step 2. Tighten leveling feet
Jam nut
Place level...
Installation Guide - Page 24
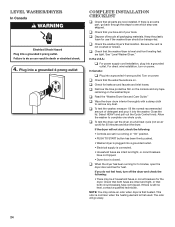
... the washer to remove any tape
remaining on . Check that both fuses are tight. q Check that the washer/dryer is not crushed or kinked. q Dispose of/recycle all parts are intact and tight, or circuit breakers have not tripped.
• Dryer door is still no heat, contact a qualified technician. Keep the plastic
foam for leaks around...
Use & Care Guide - Page 2
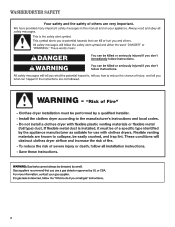
WASHER/DRYER SAFETY
2
Use & Care Guide - Page 14
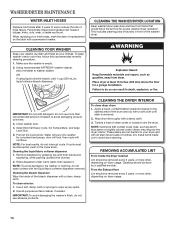
... future loads of hose failure. This includes clearing piles of the washer/ dryer. Close washer door.
4. Cleaning the dryer interior
To clean dryer drum 1. Use all-purpose surface cleaner, if needed. Removing accumulated lint
From Inside the Dryer Cabinet Lint should be interrupted, push in front of laundry in the Cycle knob.
IMPORTANT: Do not add detergent. Use...
Use & Care Guide - Page 16
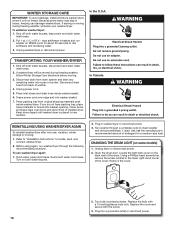
TRANSPORTING YOUR WASHER/DRYER
1. Shut off both water faucets. Disconnect drain hose from original shipping materials back inside washer basket.
6. Drape power cord over doors and down front of the dryer. Keep doors taped until washer/dryer is placed in washer/dryer or reconnect power. 3. Flush water pipes and hoses. Remove the cover.
3. Close doors and place tape ...
Use & Care Guide - Page 17
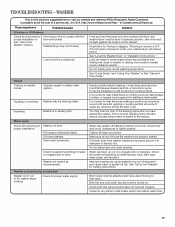
... become clogged. all four fill hose flat washers are removed during the Spin cycle.
Check for leaks (laundry tubs, drain pipe,
water pipes, and faucets.)
Washer not loaded as expected
Washer won't run or fill, washer stops working
Check for proper installation or see "Using Your Washer" section. Gurgling or humming Washer may not be tight against the stainless...
Use & Care Guide - Page 20
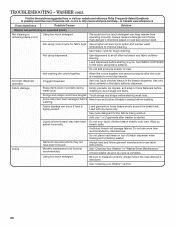
...://www.whirlpool.com/help - Use a higher soil level cycle option and warmer wash temperature to avoid chlorine bleach and fabric softener staining. Not washing like colors together and remove promptly after washer is tightly packed. Incorrect dispenser operation
Clogged dispenser.
Items may not have been damaged before Mend rips and broken threads in "Washer/Dryer...
Dimension Guide - Page 1
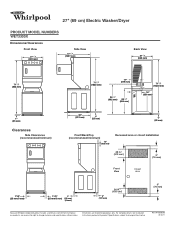
...complete details, see Installation Instructions packed with product.
27" (69 cm) Electric Washer/Dryer
PRODUCT MODEL NUMBERS WET3300X
Dimensions/Clearances
Front View
27.15/4"
(692 mm)
Side... (127 mm)
24 in.2 (155 cm2)
3" (76 mm)
Because Whirlpool Corporation policy includes a continuous commitment to improve our products, we reserve the right to change materials and specifications ...
Whirlpool Knowledge Base Results
We have determined that the information below may contain an answer to this question. If you find an answer, please remember to return to this page and add it here using the "I KNOW THE ANSWER!" button above. It's that easy to earn points!-
Can I change the door-swing direction? - Front-load washer
... the door-swing direction on my front-load washer? No. The washer door is not reversible. However, the dryer door can be reversed. See the Dryer Installation Instructions for details. Front-load washer Vibration - Front-load washer Can I change the door-swing direction? - Dryer Moving your dryer model number in the search tool below to... -
My dryer makes sounds or vibrations
... knotted or balled up . Laundry items with rivets and buckles. You can get caught in the seam where the drum meets the front or rear. My dryer will happen numerous times throughout...Remove any bunching that may have occurred during the first few minutes, the rollers will cause the dryer cabinet to vibrate. Leave space between the washer and dryer to -side. My dryer... -
Vibration - Top-load HE washer with Dispenser Drawer - sound clips
...the floor beneath the washer and dryer. Refer to corner, with your hands; Top-Load HE with Dispenser Drawer - Cabrio® Cabrio® Front-load washer Try to rock the washer diagonally, from across ...in noise and vibration. My Cabrio TM High Efficiency washer vibrates. Is the wash load balanced? Is the washer basket moving during wash? During the final spin, higher spin speeds ...
Similar Questions

Transporting A Whirlpool Stackable Washer/dryer.
I just purchased a used Whirlpool stackable unit. We need to move the unit about 360 miles. Is it ok...
I just purchased a used Whirlpool stackable unit. We need to move the unit about 360 miles. Is it ok...
(Posted by bobcatad 1 year ago)

How To Transport My Washer
I need to move my whirlpool top loader washer. What do I need?
I need to move my whirlpool top loader washer. What do I need?
(Posted by Anonymous-148444 9 years ago)

Why Does Wet3300xq Washer Rinses In Hot Instead Of Cold
(Posted by smoamand 10 years ago)
1995 Thin Twin Stack Washer Timer Replacement?model #lte5243bno
(Posted by danisue 11 years ago)

Whirlpool Duet Ht Electrical IssuesWfw9200sqa12
Had the Duet washer/dryer installed new when my custom home was finished 3 yrs ago. Since day one,it...
Had the Duet washer/dryer installed new when my custom home was finished 3 yrs ago. Since day one,it...
(Posted by retirednak 11 years ago)