Whirlpool WED94HEXW Support Question
Whirlpool WED94HEXW Support Question
Find answers below for this question about Whirlpool WED94HEXW.Need a Whirlpool WED94HEXW manual? We have 4 online manuals for this item!
Question posted by alazarnjbcs on March 4th, 2013
Cannot Vent This Dryer To Outside. 1. Is It O.k. To Use Ventless Duct?
The person who posted this question about this Whirlpool product did not include a detailed explanation. Please use the "Request More Information" button to the right if more details would help you to answer this question.
Current Answers
Related Whirlpool WED94HEXW Manual Pages
Dimension Guide - Page 1
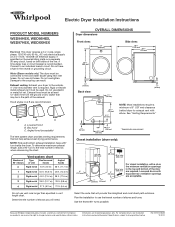
...commitment to improve our products, we reserve the right to the outside. 4" (102 mm) diameter vent is recommended. For complete details, see Installation Instructions packed with equivalent air ventilation...Water (Steam models only): The dryer must be in .2 min. (155 cm2) 3" (76 mm)
For closet installation, with elbow. Do not use vent runs longer than specified in vent length chart. NOTE: Side ...
Installation Instructions - Page 1
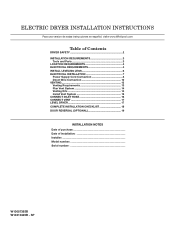
...4 Electrical Requirements 4 INSTALL LEVELING LEGS 6 ELECTRICAL INSTALLATION 7
Power Supply Cord Connection 8 Direct Wire Connection 10 VENTING 13 Venting Requirements 13 Plan Vent System 14 Venting Kits 14 Install Vent System 15 Connect Inlet Hose 16 Connect Vent 17 Level Dryer 17 Complete Installation Checklist 18 Door reversal (OPTIONAL 19
INSTALLATION NOTES Date of purchase Date...
Installation Instructions - Page 3
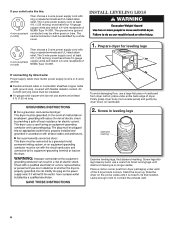
.... ■■A UL listed strain relief.
1/4" and 5/16" nut driver (recommended)
Adjustable wrench that all parts are included. Check existing electrical supply and venting. NOTE: Do not use with dryer) Refer to 1" (25mm) or hex-head socket wrench
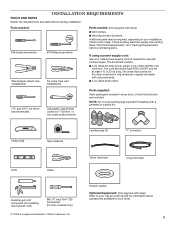
Parts supplied:
Parts package is a registered trademark of Saturn Fasteners, Inc. INSTALLATION REQUIREMENTS
TOOLS AND...
Installation Instructions - Page 4

LOCATION REQUIREMENTS
Check code requirements. Some codes limit, or do not permit, installation of dryer.
You may use the water supply for exhaust vent with maximum slope of dryer.
■■The dryer must not be installed or stored in an area where it will need :
■■A location allowing for walls, doors, and floor moldings...
Installation Instructions - Page 5
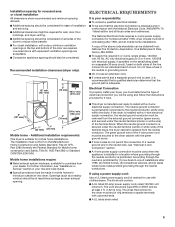
...the electrical connection is adequate and in mobile homes to introduce outside air into dryer.
The cord should be type SRD or SRDT and be ...Use and Care Guide.
■■Special provisions must conform to the Manufactured Home Construction and Safety Standard, Title 24 CFR, Part 3280 (formerly the Federal Standard for it is suitable for wall, door, floor moldings, and dryer venting...
Installation Instructions - Page 6
... corner posts until diamond marking is close to connect the exhaust vent.
6 The 4-wire power supply cord, at least 4 ft. (1.22 m) long, must be insulated.
■■10-gauge solid copper wire (do not use a large flat piece of cardboard from dryer packaging under entire back edge of NEMA Type 10-30R. place...
Installation Instructions - Page 8
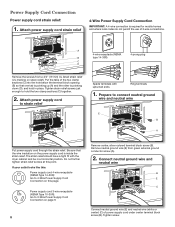
...looks like this: Power supply cord 4-wire receptacle (NEMA Type 14-30R): Go to strain relief
Spade terminals with the dryer cabinet and be in place. Power Supply Cord Connection
Power supply cord strain relief:
1. The strain relief should have a...wire connection is required for mobile homes and where local codes do not permit the use of power supply cord under center terminal block screw (B).
Installation Instructions - Page 9
... Requirements. Tighten screw.
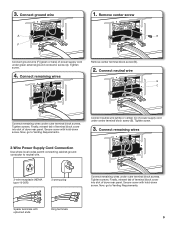
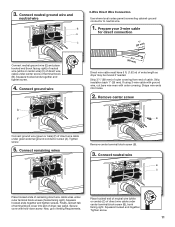
3. Connect remaining wires
3-Wire Power Supply Cord Connection
Use where local codes permit connecting cabinet-ground conductor to Venting Requirements. Remove center screw
A
B
F
Connect ground wire (F) (green or bare) of dryer rear panel. Connect neutral wire
B
C
Connect remaining wires under green external ground conductor screw (A). Finally, reinsert...
Installation Instructions - Page 11
...of neutral wire (white or center) (C) of direct wire cable under center screw of dryer rear panel. Strip insulation back 1" (25 mm). 3. Squeeze hooked ends together and ...ground wire and neutral wire
B E C
3-Wire Direct Wire Connection Use where local codes permit connecting cabinet-ground conductor to Venting Requirements. Prepare your 3-wire cable for direct connection
(251"mm)
...
Installation Instructions - Page 12
... Requirements.
12
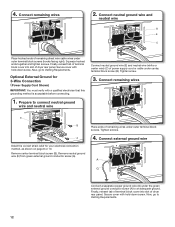
Connect remaining wires
2. Prepare to Venting Requirements. A
G
Connect a separate copper ground wire (G) under center, terminal block screw (B). Tighten screw.
3. Now, go to connect neutral ground wire and neutral wire
Connect neutral ground wire (E) and neutral wire (white or center wire) (C) of dryer rear panel. Finally, reinsert tab of terminal block...
Installation Instructions - Page 13

... be connected or secured with screws or other fastening devices that may be connected into interior of duct and catch lint. Dryer exhaust must not be used.
■■ Do not use plastic or metal foil vent. Only rigid or flexible metal vent shall be used for best drying performance and to avoid crushing and kinking.
Review...
Installation Instructions - Page 14
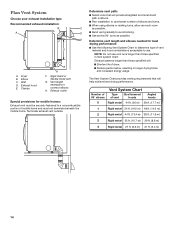
...;■Shorten life of mobile home and must be securely fastened to a noncombustible portion of dryer. ■■Reduce performance, resulting in Vent system chart.
Exhaust hood E. Rigid metal or flexible metal vent
G. Terminate exhaust vent outside.
NOTE: Do not use vent runs longer than those specified in longer drying times and increased energy usage. Exhaust outlet...
Installation Instructions - Page 15
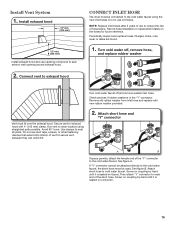
...dryer must be used. Do not use to the cold water faucet using straightest path possible.
Vent must be connected to reduce the risk of hose failure. Run vent to seal exterior wall opening around exhaust hood.
2. Do not use caulking compound to dryer location using... hood and use duct tape, screws, or other fastening devices that extend into interior of vent to the cold...
Installation Instructions - Page 16
...
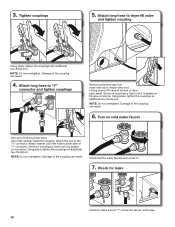
One end of "Y" connector. Tighten couplings
5. Attach long hose to dryer fill valve
and tighten coupling
A
Using pliers, tighten the couplings with additional two-thirds turn . Damage to the...can result.
Screw on coupling by hand until it is seated on fill valve connector. Using pliers, tighten the couplings an additional two-thirds turn. Check for leaks
Check for leaks...
Installation Instructions - Page 17
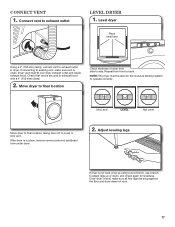
... exhaust outlet in place, remove corner posts and cardboard from side to adjust legs up using a wood block, use wrench to side. Connect vent to back. Move dryer to final location
Check levelness of dryer from under dryer.
2.
Adjust leveling legs
If dryer is not level, prop up or down, and check again for the moisture sensing...
Installation Instructions - Page 18
...vent is an extra part, go away.
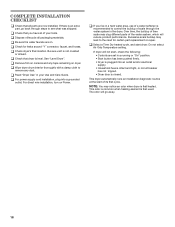
18 q Check that you live in the dryer.
q Select a Time Dry heated cycle, and start , check the following: • Controls are on dryer.
If there is not crushed
or kinked. q Wipe dryer...not select Air Only Temperature setting. If dryer will go back through the water system in a hard water area, use of a water softener is recommended to ...
Owners Manual - Page 5
... may vary depending on clothes.
Proper venting will be customized to efficiently dry laundry.
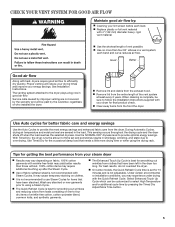
n The Enhanced Touch Up Cycle is not adjustable. CHECK YOUR VENT SYSTEM FOR GOOD AIR FLOW
Maintain good air flow by:
n Cleaning your dryer for final product check. n Use no more drying time or when using a Steam Cycle. n On some models, the...
Owners Manual - Page 13
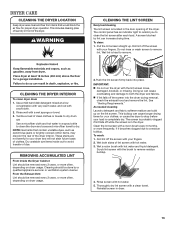
...From the Exhaust Vent Lint should be done by lint can build up . Doing so can cause longer drying times for proper dryer operation. DRYER CARE
CLEANING THE DRYER LOCATION
Keep dryer area clear ... piles of laundry in front of clean clothes or towels to dry drum OR Use a microfiber cloth and hot water in dryer.
13 Tumble a load of the dryer. As needed cleaning Laundry detergent and ...
Owners Manual - Page 15
....
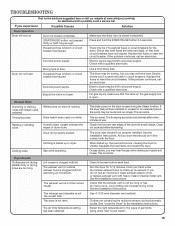
Hold your hand under the outside exhaust hood is used in the Installation Instructions.
Make sure the dryer door is balled up , the load will increase drying times.
For gas dryers, make sure that both circuit breakers have heat.
See the Installation Instructions. Long venting will bounce, causing the dryer to check air movement.
See "Level...
Owners Manual - Page 17
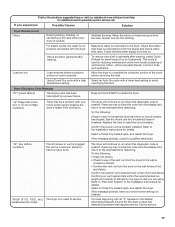
... details. For steam cycles, the water is crushed or kinked.
• Confirm the vent run from the area, rewash and dry the clothing. Using Timed Dry cycle with the dryer.
To remove odors left in the area where your vent system falls within the recommended run when this diagnostic code is located.
Confirm your...
Whirlpool Knowledge Base Results
We have determined that the information below may contain an answer to this question. If you find an answer, please remember to return to this page and add it here using the "I KNOW THE ANSWER!" button above. It's that easy to earn points!-
Display shows AF - Dryer
... outside exhaust hood Is the exhaust vent kinked, smashed or crushed? If the air movement is free of the dryer drum after the cycle has ended. Check for the longest exhaust vent systems. For the best airflow, use it only once. Remove any plastic or metal foil vent with rigid or flexible heavy metal vent. Dryer... -
Damp loads or long drying times - Dryer
... cause longer drying times. Replace any plastic or metal foil vent with rigid or flexible heavy metal vent. A dryer softener sheet may be in a garage, on dryer use it only once. Remove any plastic or metal foil vent with a rigid or flexible heavy metal vent. Is the dryer located in a garage or on a porch may be removed... -
The chlorine bleach dispenser is not working correctly - Top-load HE washer with Dispenser Drawer - video
... oxi products are thicker than the bleach manufacturer recommends. The following video demostrates how the dispensers operate. Wipe up spills. If using an oxi laundry boost product or color-safe bleach, add it to the liquid chlorine bleach dispenser. Do not pour liquid chlorine bleach...
Similar Questions

How Old Is This Dryer?
model #WED94HEXW1. What is the age of this dryer?
model #WED94HEXW1. What is the age of this dryer?
(Posted by kathyharris9213 5 years ago)

Dryer When Off Even With Door Open Heat Is Still On
I have not used my dryer for days when I use to keep door close condensation builds up so I keep doo...
I have not used my dryer for days when I use to keep door close condensation builds up so I keep doo...
(Posted by stoneslpf 6 years ago)

Whirlpool Wed94hexw Dryer
how do I make the steam work on this dryer, do I have to install something?
how do I make the steam work on this dryer, do I have to install something?
(Posted by canceljose 11 years ago)

About A Foot Of Water Got Into My Whirlpool Roper Dryer, Is It Safe To Use?
When our basement flooded the dryer got about 1 foot of water in it the water has been out of it for...
When our basement flooded the dryer got about 1 foot of water in it the water has been out of it for...
(Posted by PorkyKat 12 years ago)