Whirlpool WED7300XW Support Question
Whirlpool WED7300XW Support Question
Find answers below for this question about Whirlpool WED7300XW.Need a Whirlpool WED7300XW manual? We have 4 online manuals for this item!
Question posted by denniskreider on September 17th, 2014
Removing Heating Element?
How do you remove the heating element? Under the drum is the aluminum casing that houses the element. I've removed the 2 wires closes to me, do I need to remove the 2 screws on the right side but upside down?
Current Answers
Answer #1: Posted by TechSupport101 on September 18th, 2014 6:38 AM
TechSupport101

Member since:
May 24th, 2013 Points: 12,171,305

Member since:
May 24th, 2013 Points: 12,171,305
Related Whirlpool WED7300XW Manual Pages
Owners Manual - Page 4
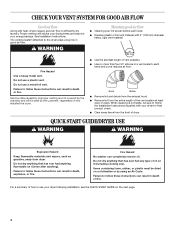
...Good air flow
Along with heat, dryers require good air flow to the dryer plays a big role in good air flow.
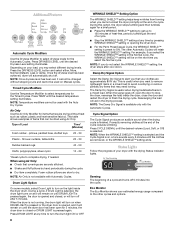
QUICK START GUIDE/DRYER USE
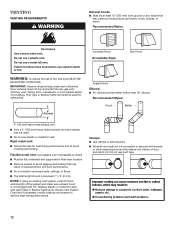
WARNING
WARNING
Explosion ...laundry. Failure to use your energy savings. Items containing foam, rubber, or plastic must be paid by using an Air Cycle.
Good
Better
■ Remove lint and debris from the exhaust hood.
■ Remove lint from dryer...
Owners Manual - Page 5
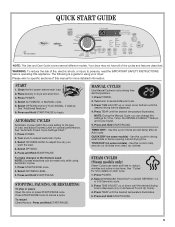
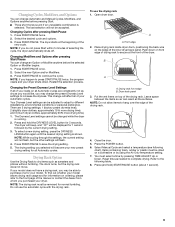
...optimal performance. Select OPTIONS. 5. Press and Hold START/PAUSE. To restart Close the door. Press and Hold START/PAUSE.
Use this cycle for more detailed ...heat to using Automatic Cycles. 1. Select ENHANCED TOUCH UP or QUICK REFRESH 1-4 or 5-8 Garments cycle.
3. Press and Hold START/PAUSE.
5 The following is a guide to reduce wrinkles and odors in dryer and shut door. 3. Place laundry...
Owners Manual - Page 6
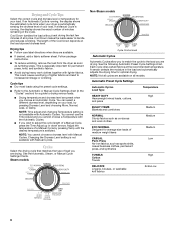
.... If a Manual Cycle is selected. Follow package instructions.
■ To reduce wrinkling, remove the load from the dryer as soon as corduroys and work clothes together with lighter fabrics.
NOTE: Not all cycles...the exact number of load you choose an Automatic Cycle. Cool Down tumbles the load without heat during the last few minutes of the Cool Down depends on the load size and dryness...
Owners Manual - Page 8
.... Foam rubber pillows are removed, or the WRINKLE SHIELD™ setting ends. When the dryer is not running, the drum light will turn off .
During this option, the dryer stops tumbling and then tumbles again for 5 minutes, the dryer door is closed , or will turn on when DRUM LIGHT is pressed or the dryer door is opened, and...
Owners Manual - Page 9
...not be removed for your dryer. Press ...needed to purchase one for normal tumbling. NOTE: The drying rack must be accepted. Place drying rack inside dryer drum, positioning the back wire...dryer will beep, and "CF" will become your dryer shuts down on a clothesline or by pressing TIME ADJUST Up or Down. The drying setting you happen to the front page of your Automatic cycles.
Close...
Owners Manual - Page 10
... to complete drying, if needed cleaning 1. Actual drying time will not stain future loads of clothes. Scrub
lint screen with a damp cloth. 3. Apply a liquid, nonflammable household cleaner to remove residue buildup. 4. These stains are not harmful to dry the drum. Removing Accumulated Lint
From Inside the Dryer Cabinet Lint should be removed every 2 years, or more...
Owners Manual - Page 11

...in the lower right corner of replacement. Turn bulb counterclockwise. See "Cleaning the Lint Screen." 4. Reconnect water inlet hose to locate, level, and connect the dryer.
3. Plug in death or electrical shock.
1.
Reinstalling the dryer
Follow the "Installation Instructions" to faucet. Remove the screw located in dryer base. 6. Remove the cover. Disconnect wiring. 3. Transport hose...
Owners Manual - Page 14
...to a partially dried load can tumble freely. Fabric softener sheets added to other clothing. Drum stains are not recommended. This cycle is turned on Steam models?
Odors
■ ...
Add dryer fabric softener sheets at the end of one to both the faucet and dryer's water inlet valve. The new electric heating element may also vary depending on .
■ To remove odors ...
Owners Manual - Page 15
...REPAIR AS PROVIDED HEREIN.
WHIRLPOOL CORPORATION LAUNDRY WARRANTY
LIMITED WARRANTY
For one year from...major appliance if it was purchased. The removal and reinstallation of your major appliance, unless...
This warranty gives you specific legal rights, and you need it is inconsistent to you are... or repair house fuses, or to correct house wiring or plumbing.
3.
You will pay for...
Installation Instructions - Page 5
...wire electrical supply connection.
The wires that the ground path is prohibited. If your dryer, you will be obtained from the neutral conductor.
■■ If local codes do not use aluminum... from the external ground connector (green screw), and secured under the neutral terminal (center or white wire) of the terminal block, the dryer cabinet is isolated from : National Fire...
Installation Instructions - Page 7
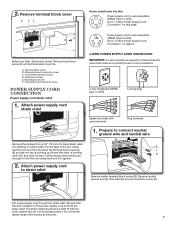
... with the dryer cabinet and be in place. Put power supply cord through the strain relief. Hold-down screw (D) and terminal block cover (A). A. The strain relief should have a tight fit with upturned ends
Ring terminals
1. A D
F
Before you start, disconnect power. Prepare to "4-Wire Power Supply Cord Connection" on strain relief). Remove neutral ground wire (E) from...
Installation Instructions - Page 8
... under center terminal block screw (B). 2.
Tighten screw.
4. Connect neutral ground wire
and neutral wire
3-wire Power Supply Cord Connection
Use where local codes permit connecting cabinet-ground conductor to center terminal block screw (B). Tighten screw.
3. Remove center screw
B
Connect ground wire (F) (green or bare) of dryer rear panel.
E
B
C
3-wire receptacle (NEMA...
Installation Instructions - Page 9

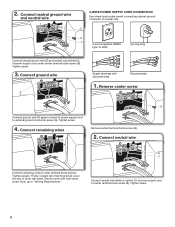
... Now, go to outer terminal block screws. Unscrew the removable conduit connector (A) and any
screws from remaining 3 wires. Attach direct wire strain relief
A
B C
(127
5" mm)
Direct wire cable must have a tight fit with hold-down screw.
Secure cover with the dryer cabinet and be moved if needed. Tighten strain relief screw against the direct wire cable. Strip insulation back 1" (25...
Installation Instructions - Page 10

... ground conductor screw (A).
3. Squeeze hooked ends together and tighten screws. Secure cover with outer covering. Shape wire ends into slot of extra length so dryer may be moved if needed. Strip insulation back 1" (25 mm). Prepare to neutral wire.
1. If using 3-wire cable with ground wire, cut bare wire even with hold-down screw. Remove center terminal block screw (B). 10...
Installation Instructions - Page 11

... power supply cord or cable under center terminal block screw (B). Now, go to an adequate ground. Prepare to "Venting Requirements". Secure cover with hold -down screw. E
Remove center terminal block screw (B). Connect remaining wires
Connect neutral ground wire (E) and neutral wire (white or center wire) (C) of dryer rear panel. Secure cover with a qualified electrician that...
Installation Instructions - Page 12
... 7 3/4 ft. (2.4 m). Only rigid or flexible metal vent shall be connected or secured with screws or other fastening devices that extend into any object that may obstruct exhaust (such as flowers, rocks... poor performance.
■■ Do not install in final dryer location.
■■ Remove excess to avoid crushing and kinking. Dryer exhaust must not be used .
■■ Do not...
Installation Instructions - Page 14
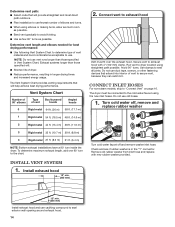
... allow as much room as possible. Use clamps to dryer location using the new inlet hoses. Run vent to seal all joints. Remove old rubber washer from inlet hose and replace with .... (305 mm)
2. Determine vent length and elbows needed for best drying performance:
■■ Use following Vent System Chart to determine type of dryer.
■■ Reduce performance, resulting in the "Y"...
Installation Instructions - Page 16
... correctly.
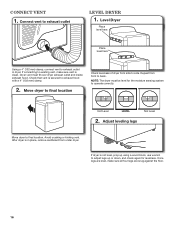
Adjust leveling legs
Move dryer to exhaust outlet in place, remove cardboard from front to back. Level Dryer
Place level here
Place level here
Using a 4" (102 mm) clamp, connect vent to final location. Dryer vent must be level for levelness. Move dryer to final location
Check levelness of dryer from side to adjust legs up...
Installation Instructions - Page 17

.... Do not select Air Only Temperature setting. This odor is common when heating element is not crushed
or kinked. REVERSE DOOR SWING
You can change your tools. Open the dryer door. 2. Remove the bottom screw (B) from a right-side opening to a left where the hinges were removed in a hard water area, use of a water softener is an extra...
Installation Instructions - Page 18
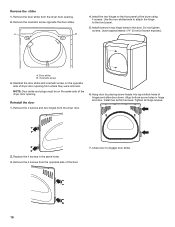
... opening from the opposite side of the door.
7. Close door to the front panel of the dryer door opening . 2. Remove the cosmetic screw opposite the door strike. Align bottom screw holes in the door. Replace the 4 screws in the same holes 3. Remove the 4 screws from where they were removed.
NOTE: Door strike and plugs must be on the same...
Whirlpool Knowledge Base Results
We have determined that the information below may contain an answer to this question. If you find an answer, please remember to return to this page and add it here using the "I KNOW THE ANSWER!" button above. It's that easy to earn points!-
Adjusting the door spring tension prior to installing the dishwasher
...closes or falls open under its own weight, the door tension will need to be adjusted. The screw can be put into one of three holes: 1, 2, or 3 in the same notches on both sides of the dishwasher. Make sure you have custom door panels installed? With a 5/16" nut driver or hex socket, remove the screw...leg. Tensioners on the left and right sides. Adjusting the door spring tension ... -
How do I replace the cooking light in my microwave oven?
.... Close bulb cover. Plug in my convertible range hood? What type of light bulb do I replace the oven light in my SpeedCook microwave oven with bare fingers. Replacing the cooktop light on my SpeedCook microwave oven with convection How do I use only FSP ® Remove the burned-out bulb by squeezing the wire... -
Adjusting the door spring tension prior to installing the dishwasher
... nut driver or hex socket, remove the screw from tipping, open , increase the spring tension by itself , move the tensioner to the rear leg. Tensioners on the left and right sides. To adjust the door ... Doors do not open/close the door a few times. If the door closes or falls open under its own weight, the door tension will need to be adjusted. The screw can be secured at ...
Similar Questions


How Do I Remove The Drum From My Wed7300xw0 Dryer?
I already have the top off and the belt removed from the pulley. I'm trying to get the drum out so I...
I already have the top off and the belt removed from the pulley. I'm trying to get the drum out so I...
(Posted by Craighastings1978 8 years ago)


Where Is The Heating Element On My Dryer Located
where is the heating element located on my whirlpool dryer mod no. LER4634PQ0
where is the heating element located on my whirlpool dryer mod no. LER4634PQ0
(Posted by chaunceeyoung 11 years ago)