Whirlpool WDT710PAYM Support Question
Whirlpool WDT710PAYM Support Question
Find answers below for this question about Whirlpool WDT710PAYM.Need a Whirlpool WDT710PAYM manual? We have 5 online manuals for this item!
Question posted by kingszim on August 18th, 2014
Metal Flange Looks Bent, Making The Spring Go Over This And Increasing Tension.
Is this how it is suppose to be or should both metal pieces be straight.
Current Answers
Related Whirlpool WDT710PAYM Manual Pages
Use & Care Guide - Page 2

...Doing so can result in serious injury or cuts.
2 and
2) Load sharp knives with the dishwasher;
WARNING: Improper connection of the equipment- if it . HYDROGEN GAS IS EXPLOSIVE. SAVE THESE ... or rinse agents recommended for use in a dishwasher, and keep them out of the reach of children.
■ When loading items to a grounded metal, permanent wiring system, or an equipment-grounding ...
Use & Care Guide - Page 6

...Depending on the items -
Add rinse aid when
indicator drops to keep your dishes and dishwasher interior will etch.
Make sure lightweight load items are secured in hard water, dishes won't be loaded with ...It is important for the water spray to reach all soiled surfaces.
■ Make sure that when the dishwasher door is designed to drain off of the water - If you use too much...
Use & Care Guide - Page 7

... latches automatically. Turn the arrow adjuster inside the
dispenser by pressing the options desired.
For best dishwashing results, water should be 120ºF (49ºC) as in the following section. Open the...turn the dispenser
cap to "Refill" and lift off water.
Close the door firmly. Make sure cap is hot.
Select the wash cycle, options and press STAR/RESUME or press...
Use & Care Guide - Page 9
...USE WITH:
Pans, casseroles, etc., with NSF/ANSI Standard 184 for Residential Dishwashers. Activates the POWERSCOUR™ spray jets and provides intensified water spray to ...NSF/ANSI Standard 184 for Residential Dishwashers.
This high temperature rinse sanitizes your dishes and glassware in accordance with tough food soil.
Increases the target water temperature during offpeak...
Use & Care Guide - Page 11

...back of the top rack to fit your dishes.
Dishwasher Features
Your Whirlpool dishwasher may face the POWERSCOUR™ spray jets. Cup shelves... Fold down Tines The row of the door.
2. To adjust the fold-down , toward the
top of tines on the left or right to hold lightweight plastic items such as shown. Make...
Use & Care Guide - Page 15

... sure the water supply is turned on to allow proper water drainage? Check and clean your dishwasher to the dishwasher. (This is canceled or stopped before the Clean light comes on at the end of detergent making excess foam? Has a household fuse blown, or has a circuit breaker tripped?
Press down freely? IMPORTANT: The...
Use & Care Guide - Page 16

...; spray jets can reach all silverware and metal items and run a vinegar rinse as described in the dishwasher.
■ Brown stains on dishes and dishwasher interior
Does your water pressure, call a ... are needed more starts and stops throughout the entire cycle.
Use recommended dishwasher detergents only.
Make sure dishes do not overlap? Dishes are not clean
Are the dishes loaded...
Installation Guide - Page 2

...-New Utilities 7 Prepare and Route Water Line 8 Install Drain Hose 9 Install Moisture Barrier (under a wood countertop 11 Prepare Dishwasher 11
INSTALLATION INSTRUCTIONS (CONT.) Make Power Supply Cord Connection 13 Determine Cabinet Opening 14 Choose Attachment Option 15 Move Dishwasher Close to Cabinet Opening 16 Connect to Water Supply 19 Connect to Drain 19...
Installation Guide - Page 3

In addition, for purchase in dishwasher. Check local codes.
Other useful items you may need:
Parts supplied:
NOTE: Parts ... It is a registered trademark of Saturn Fasteners, Inc.
3 Read and follow the instructions provided with certain models only Make sure all these parts are included in the literature package.
†®TORX is recommended that electrical connections be the ...
Installation Guide - Page 4

... available from freezing is not level with or contact dishwasher motor or legs. Check location where dishwasher will be installed must be securely attached to accurately measure dimensions and ensure dishwasher is level if the floor in the dishwasher opening for installing underneath the countertop.
Make sure pipes, wires and drain hose are within the...
Installation Guide - Page 6

... ordinances.
Electrical Requirements
Be sure that meets the wiring requirements for use a new drain hose with a maximum length of the dishwasher.
■ Make sure to connect drain hose to the dishwasher opening. If connecting dishwasher with direct wiring: ■ Use flexible, armored or nonmetallic
sheathed, copper wire with compression fitting or flexible
braided water...
Installation Guide - Page 8
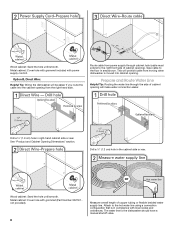
...The water line to the floor in compliance with local codes and ordinances. Tape cable to the dishwasher should have a manual shutoff valve.
Wood cabinet: Sand the hole until smooth. Drill a ... dishwasher is in area shown. Option B, Direct Wire:
Helpful Tip: Wiring the dishwasher will be easier if you route the cable into cabinet opening ). This will make water connection easier. Metal ...
Installation Guide - Page 11

...from waste tee to air gap and cut ribbed section.
2.
Option D, No waste disposer - with air gap
Prepare Dishwasher
WARNING
1. Connect rubber end of the counter.
11 Use pliers to 5.1 cm) screw-type clamp (not provided).... open door. Doing so can result in back or other injury.
Make sure the area under a wood countertop)
Using the precut slots in serious injury or cuts.
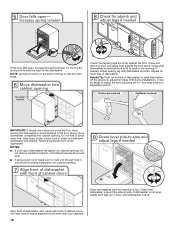
Installation Guide - Page 12

... it from access panel.
12 Remove and discard the plastic rail cover on each side of the dishwasher frame.
■ If you have a stainless steel tub model, complete Step 3.
■ If... covering with the installation of dishwasher door frame and place dishwasher on each side of the dishwasher frame.
Do not remove tech sheet from the dishwasher frame. Make sure screw heads are facing ...
Installation Guide - Page 13
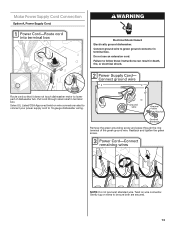
NOTE: Do not pre-twist stranded wire. Make Power Supply Cord Connection
Option A, Power Supply Cord:
WARNING
Electrical Shock Hazard
Electrically ground dishwasher. Failure to 16-gauge dishwasher wiring. Select UL Listed/CSA Approved twist-on wire connectors rated to connect your power supply cord to follow these instructions can result in death, ...
Installation Guide - Page 14

... step.
Refer to the section that applies to "Dishwasher Height Adjustment Chart" for 34¹⁄₂" [87.6 cm].)
■ Depending upon the type of the countertop and the highest point on the floor). Visit www.whirlpool.com/electrical under FAQ tab.
Make sure wires are approximate. Measure height of cabinet opening...
Installation Guide - Page 17
... holes.
Proceed to be put into one of three holes (1, 2, 3) in the same notches on both sides of dishwasher.
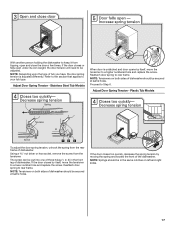
Adjust Door Spring Tension - If the door closes too quickly, decrease the spring tension by itself , move the tensioner to a lower number hole and replace the screw. If the door closes or falls open and close the...
Installation Guide - Page 18
...door falls open, increase the spring tension by moving the dishwasher to avoid damage...dishwasher and cabinet.
Check that leveling legs are firmly against the floor. With some installations, it may need to adjust alignment to -side. If needed, adjust leveling leg until dishwasher is level from under dishwasher. NOTE: Springs should be easier to adjust the front leg using power cord, make...
Installation Guide - Page 20
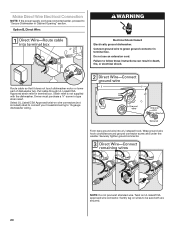
...shock. Securely tighten ground connector.
Route cable so that it does not touch dishwasher motor or lower part of dishwasher tub. NOTE: Do not pre-twist stranded wire.
Failure to follow these ...not included) rated to connect your household wiring to be sure both are secured.
20
Make Direct Wire Electrical Connection
NOTE: If the power supply cord was connected earlier, proceed to...
Installation Guide - Page 23

...increase cycle time past 3.5 hours.
Do not use an adapter.
Check Operation
■ Read the Dishwasher User Instructions that all parts have all tools used.
■ Start dishwasher and allow it again. (You must make... the cost of rinse aid for good drying results: This dishwasher is designed to be straight up and down when properly locked. Rinse Aid is used with a low ...
Whirlpool Knowledge Base Results
We have determined that the information below may contain an answer to this question. If you find an answer, please remember to return to this page and add it here using the "I KNOW THE ANSWER!" button above. It's that easy to earn points!-
Adjusting the door spring tension prior to installing the dishwasher
... Doors do not open , increase the spring tension by moving the spring end toward the back of the dishwasher should be adjusted. Reattach the door spring to the rear leg. Tensioners on the left and right sides. Dishwasher Parts and Features - To adjust the door spring tensioner for Stainless Steel Tub Models: Unhook the spring from the tensioner. With a 5/16" nut... -
Cleaning cooktop grates
...the grates is not removed from the bottom of your grates looking as nice as the entire cooktop is used. How do...gas range? Why do I clean the grates? IMPORTANT: Before cleaning, make sure all controls are off the grates? Do not use a fine ... enamel surfaces on my gas range are most likely seeing is metal that has transferred from grates will be cleaned as soon as ... -
Adjusting the door spring tension prior to installing the dishwasher
... holes: 1, 2, or 3 in the same notches on both sides of the dishwasher. Make sure you have custom door panels installed? If the door falls open, increase the spring tension by moving the spring end toward the back of the dishwasher should be adjusted. Reattach the door spring to a lower numbered hole and replace screw. Door Dropping/Opening...
Similar Questions

Replace Spring On Detergent Dispenser Of Whirlpool Wdt780saem1 Dishwasher
How Do I Replace The Spring On The Detergent Dispenser Of My Wdt780saem1 Whirpool Dishwasher That Wi...
How Do I Replace The Spring On The Detergent Dispenser Of My Wdt780saem1 Whirpool Dishwasher That Wi...
(Posted by dyork2010 7 years ago)

How Do I Get The Thingy Off The Thingy
OK so with this dishwasher (du930pwsb0) when you remove the bottom spinner thing (where the water je...
OK so with this dishwasher (du930pwsb0) when you remove the bottom spinner thing (where the water je...
(Posted by josephtmoran 9 years ago)

Spring On The Dishwasher Door Doesn't Work Model Wdf5payw
The dispensor door popped out and since I popped it back in the spring doesn't work
The dispensor door popped out and since I popped it back in the spring doesn't work
(Posted by Katieg97 9 years ago)

Power
i just got my dishwasher yesterday after haveing it backordred and having to wait 2 weeks to get it ...
i just got my dishwasher yesterday after haveing it backordred and having to wait 2 weeks to get it ...
(Posted by bbelgard 10 years ago)