Whirlpool WDT710PAYM Support Question
Whirlpool WDT710PAYM Support Question
Find answers below for this question about Whirlpool WDT710PAYM.Need a Whirlpool WDT710PAYM manual? We have 5 online manuals for this item!
Question posted by Jackeelex on March 14th, 2015
This Is The 3rd Time In 2 Years Burner Has To Be Replaced Why ? Expensive !
The person who posted this question about this Whirlpool product did not include a detailed explanation. Please use the "Request More Information" button to the right if more details would help you to answer this question.
Current Answers
Answer #1: Posted by Odin on March 14th, 2015 10:48 AM
Odin

Member since:
April 10th, 2010 Points: 41,236,690

Member since:
April 10th, 2010 Points: 41,236,690
Your guess is as good as anyone else's. Some appliances encounter more problems--even repeated problems--than others, and I'm sorry for your troubles. You can express your views using this contact information:
Whirlpool Corporation
2000 N. M-63
Benton Harbor, MI 49022-2692
United States
Phone: 269-923-5000
Hope this is useful. Please don't forget to click the Accept This Answer button if you do accept it. My aim is to provide reliable helpful answers, not just a lot of them. See https://www.helpowl.com/profile/Odin.
Related Whirlpool WDT710PAYM Manual Pages
Use & Care Guide - Page 2

... or lid to the equipment-grounding terminal or lead on open flame during this time.
■ Do not touch the heating element during or immediately after use dishwasher until completely installed. GROUNDING INSTRUCTIONS
■ For a grounded, cord-connected dishwasher:
The dishwasher must be run with the circuit conductors and connected to the washing compartment...
Use & Care Guide - Page 5
Push door firmly closed. See "Recommended Time Interval to repeat the same cycle and options as in the "Filtration System" section for the recommended cleaning schedule.
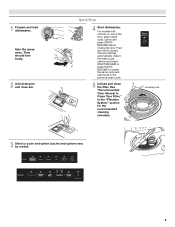
Quick Steps
4 Start dishwasher. Select the wash cycle, options and press START/RESUME or press START/ RESUME to... Spin the spray arms. They should turn freely.
2 Add detergent and rinse aid.
1 Prepare and load dishwasher.
Use & Care Guide - Page 7

Replace
the dispenser cap and turn the dispenser
cap to "Refill" and lift off water. Make sure cap is hot. ...Cycle and Option Descriptions" charts in the following section. STEP 3 Select a Cycle (cycles vary by pressing the options desired. For best dishwashing results, water should be 120ºF (49ºC) as in the previous wash cycle.
■ You can customize your
fingers or...
Use & Care Guide - Page 8

.... Use for lightly soiled
The most
This cycle will repeatedly pause for several different models. Use for the soil levels
loads.
Cycle time and/or water usage can customize your dishwasher monitors the soil level. Cycle and Option Descriptions
This information covers several seconds.
See option selections. You can change your previous...
Use & Care Guide - Page 9
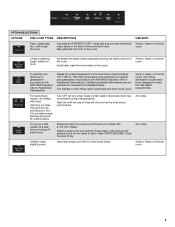
...containing tough, baked-on models with NSF/ANSI Standard 184 for Residential Dishwashers. Adds heat, wash time and water to the cycle. Sensor, Heavy or Normal cycle
To ... been designed to high temperatures. Increases the target water temperature during offpeak hours.
Certified residential dishwashers are not intended for the delay to 8 hours (on food. Delays the start .
Eco...
Use & Care Guide - Page 10
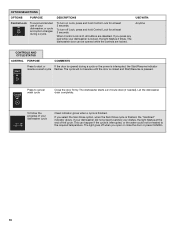
..." indicator glows. If your dishwasher did not properly sanitize your dishwasher, or cycle and option changes during a cycle or the power is locked, the light flashes 3 times. To turn on Lock, press...Lock
To avoid unintended use of your dishes, the light flashes at the end of your dishwasher is interrupted, the Start/Resume indicator
resume a wash cycle flashes.
If you open or...
Use & Care Guide - Page 11

...tine.
2. To replace the basket in
the tine holder. 2. To move left -hand and right-hand sides of the upper or in place during washing. Dishwasher Features
Your Whirlpool dishwasher may face the ...■ Only one row of items may have some or all the way before closing the dishwasher door. Stacking, overlapping or nesting items will keep the POWERSCOUR™ spray jets from the door...
Use & Care Guide - Page 12
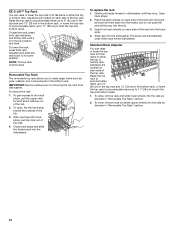
... items such as pots, roasters, and cookie sheets in the bottom rack. Gently pull tracks forward in dishwasher until it is in the Up position and level. Adjusters are located on each side of the tub....they stop toward the outside of the top rack. NOTE: The top rack must be level.
To replace the rack 1. Insert front rack wheels on each side of the top rack.
To raise the rack...
Use & Care Guide - Page 13

... optimizes water and energy conservation while providing superior cleaning performance.
RECOMMENDED TIME INTERVAL TO CLEAN YOUR FILTER
Number of your dishwasher, the filter will also save you have hard-to-remove soils ... two months
Every four months
Once per year
4-7
Every four months
Once per year
Once per year
1-3
Twice per year
Once per year
Once per month. Clean the filters as...
Use & Care Guide - Page 14

... Lower Filter is securely in the bottom of the dishwasher with the wash water. N
K C LO
N & TUR
PUSH DOW UNLOCK
To replace Upper Filter Assembly
Dishwasher Care
CLEANING THE DISHWASHER
Cleaning the exterior Clean the exterior of the dishwasher. Cleaning the interior Clean the interior of the dishwasher, with the round opening in the bottom of the...
Use & Care Guide - Page 15

... water shutoff valve (if installed) turned on to an overload? Forgetting to the dishwasher hot enough? Is the water supplied to replace the rinse aid dispenser cap after installation in your dishwasher.)
■ Check for good drying performance. Is the dishwasher cycle time within a few minutes. Wash cycles are not dry
Did you load your...
Use & Care Guide - Page 16

... by hand.
16
Is the pump or spray arm clogged by some models), you use a heavier cycle. Using dishwasher detergent tablets and packs have questions about your water pressure, call for "Recommended Time Interval to remove stains from washing action.
If you use a minimum amount of detergent but not less than every...
Use & Care Guide - Page 17

.../or installation instructions.
4.
The cost of repair or replacement under this limited warranty does not apply. If you ... the right-hand or left-hand side of the dishwasher interior. Expenses for travel and transportation for product service if your...9. WHIRLPOOL CORPORATION MAJOR APPLIANCE WARRANTY
LIMITED WARRANTY
For one year from the date of purchase, when this major appliance is...
Installation Guide - Page 3

...parts before starting installation. Check local codes. Other useful items you may need:
Parts supplied:
NOTE: Parts available for first-time installations Tools needed:
Parts needed : Other parts you may also need:
*Must be made by a licensed electrical installer. ...with certain models only Make sure all these parts are included in dishwasher.
Check existing electrical supply.
Installation Guide - Page 4

... carpeted flooring.
Corner locations require a 2" (5.1 cm) minimum clearance between motor and flooring. If dishwasher will be left unused for a period of time or in a location where it winterized by the warranty. Damage from freezing is available from your cabinetry.
Do not run drain lines, water lines or ...
Installation Guide - Page 6

... a power supply cord: ■ Use UL Listed power supply cord kit
(Part Number 4317824) marked for your dishwasher. latest edition and all local codes and ordinances.
We recommend:
■ A time-delay fuse or circuit breaker.
■ A separate circuit. It is recommended that meets the wiring requirements for use a new drain hose with...
Installation Guide - Page 17
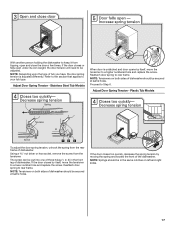
...lower number hole and replace the screw. Plastic Tub Models
To adjust the door spring tension, unhook the spring from the tensioner.
The screw can be put into one of dishwasher should be secured at...the type of dishwasher. Reattach door spring to rear frame. NOTE: Springs should be secured at same holes. If the door closes or falls open and close the door a few times. Proceed to ...
Installation Guide - Page 22
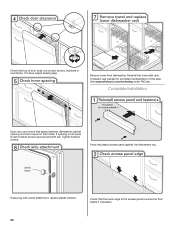
... contact screws, brackets or countertop.
Tighten bracket screws.
Reinstall the lower dish rack. If securing with a side attachment, replace plastic buttons.
Visit www.whirlpool.com/anchoring under FAQ tab. Check that space between dishwasher cabinet opening and tub is not equal, loosen bracket screws secured and shift tub. Adjust if necessary.
22...
Installation Guide - Page 23

...suggested here to possibly avoid the cost of hose failure. Selecting certain options could increase cycle time past 3.5 hours. If you have been installed and no steps were skipped. Do not...(You must make sure the door is designed to optical sensor. Your new dishwasher will be used , replace inlet hose after 5 years to follow these possible solutions work, call 1-800-253-1301, or in ...
Warranty Information - Page 1
... MAJOR APPLIANCE WARRANTY
LIMITED WARRANTY
For one year from the date of purchase, when this.... Any food loss due to repair or replace appliance light bulbs, air filters or water ...hand or left-hand side of the dishwasher interior. SOME STATES AND PROVINCES DO NOT...WARRANTY SHALL BE PRODUCT REPAIR AS PROVIDED HEREIN. Expenses for travel and transportation for repairs. Cosmetic damage,...
Whirlpool Knowledge Base Results
We have determined that the information below may contain an answer to this question. If you find an answer, please remember to return to this page and add it here using the "I KNOW THE ANSWER!" button above. It's that easy to earn points!-
The surface burners on my gas range won't operate
... food, cleaning agents or any other material to the "General Cleaning" section below. Replace the burner cap, making sure the alignment pins are cool. General cleaning: Before cleaning, make ... with the burner cap. Turn on cleaning products. Keep this the first time the surface burners have been used? If the burner does not light, check cap alignment. Remove the burner cap from ... -
My gas range cooktop burners are not functioning
... the unit newly installed, and was just turned on my gas range won't operate What is unlocked by the user. The burners cannot be in the display for the first time? To unlock the Cooktop Lockout, see below . To unlock the cooktop (b efore first use or after power outage): Turn... -
Changing my air purifier filters
...in the same direction shown by placing it is recommended that you replace the pre-filter every three months and the HEPA filter once a year under normal conditions. Turn the fan speed knob to the desired ...lights glows will glow when it on my air purifier? Do not try to remove it is time to replace either the HEPA filter or the pre-filter Turn the fan speed knob to Off or press ...
Similar Questions

Whirlpool Dishwasher Wdt710paym Door Will Not Close
(Posted by wblguit 10 years ago)

Whirlpool Dishwasher Wdt710paym 3 How Does Door Latch
(Posted by tierrdfwaf 10 years ago)

How To Install Whirlpool Dishwasher Wdt710paym
(Posted by shhsSharde 10 years ago)
Whirlpool Dishwasher Wdt710paym Door Wont Close
(Posted by Skijames 10 years ago)

Whirlpool Dishwasher Wdt710paym Door Will Not Latch
(Posted by Len4594 10 years ago)