Whirlpool RY160LXTB Support Question
Whirlpool RY160LXTB Support Question
Find answers below for this question about Whirlpool RY160LXTB - 30" Ing Slide-In Electric Coil Range.Need a Whirlpool RY160LXTB manual? We have 4 online manuals for this item!
Question posted by wtdunnam on November 6th, 2017
Replace Element In Oven
sparked and no longer works
Current Answers
Answer #1: Posted by Odin on November 6th, 2017 11:47 AM
Odin

Member since:
April 10th, 2010 Points: 41,236,700

Member since:
April 10th, 2010 Points: 41,236,700
See https://www.repairclinic.com/RepairHelp/How-To-Fix-A-Range-Stove-Oven/18-5--UlkxNjBMWFRC/Whirlpool-Oven-won-t-turn-on-. That page will also enable ordering of necessary parts.
Hope this is useful. Please don't forget to click the Accept This Answer button if you do accept it. My aim is to provide reliable helpful answers, not just a lot of them. See https://www.helpowl.com/profile/Odin.
Related Whirlpool RY160LXTB Manual Pages
Owners Manual - Page 2

... Controls 6 Home Canning 6 Cookware 6 Coil Elements and Burner Bowls 6 ELECTRONIC OVEN CONTROL 7 Display 7 Cancel 7 Clock 7 Timer 8 Control Lock 8 Oven Temperature Control 8 OVEN USE 8 Aluminum Foil 8 Positioning Racks and Bakeware 8 Bakeware 9 Oven Vent 9 Baking 9 Cook & Hold 10 Keep Warm 10 Broiling 10 Automatic Shut-Off/Sabbath Mode 11 RANGE CARE 11 Self-Cleaning Cycle 11...
Owners Manual - Page 4
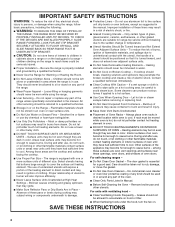
...; Clean Only Parts Listed in injury.
■ Keep Oven Vent Ducts Unobstructed.
■ Placement of electric shock.
Do not repair or replace any kind should never be careful to reach items could be immersed in oven.
■ DO NOT TOUCH HEATING ELEMENTS OR INTERIOR SURFACES OF OVEN - Moist or damp potholders on the backguard of an...
Owners Manual - Page 5
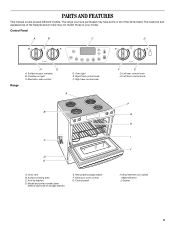
... rear control knob H. PARTS AND FEATURES
This manual covers several different models. Left front control knob
F G H I . Cooktop on light C. Oven light E. Broil element (not visible) I J
H. The range you have some or all of the items listed. The locations and appearances of the features shown here may have purchased may not match those ...
Owners Manual - Page 6

...range is in use of elements between HI and LO. Rough finishes may become hot. COOKWARE
CHARACTERISTICS
Aluminum
■ Heats quickly and evenly.
■ Suitable for all controls when done cooking. Earthenware
■ Follow manufacturer's instructions. ■ Use on a hot surface cooking area, element...NOTE: Before removing or replacing coil elements and burner bowls, make sure they...
Owners Manual - Page 7
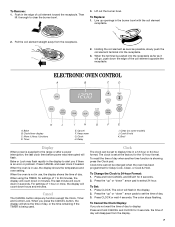
...Bake or Lock may flash rapidly in the edge of coil element toward the receptacle. When the oven is an error or problem. To Change the Clock ...arrow pads to set to the range or after a power interruption, the last clock time...coil element opposite the receptacle. Press the "up" or "down in the burner bowl with the coil element
receptacle.
2. Press CLOCK or wait 4 seconds. To Replace...
Owners Manual - Page 8

...dish. You do not need to measure oven temperature because opening the oven door and element or burner cycling may give incorrect readings....changes by the displayed amount. If no change is made, the range will be able to adjust the temperature. Wait 5 seconds and the...of some birds is extremely sensitive to the existing setting after 30 seconds.
2. The absence of day will appear in the ...
Owners Manual - Page 13

...Oven cleaner: Follow product label instructions.
13 If this happens, a light coating of ¹ ₂ cup (125 mL) ammonia to slide.
When replacing... acids, such as the entire range is cool. Cleaning Method: ■...oven cools. OVEN RACKS AND ROASTING RACKS
Cleaning Method: ■ Self-Cleaning cycle: See "Self-Cleaning Cycle" first.
For more information, see "Coil Elements...
Owners Manual - Page 14

... cookware on the range. See "Cookware" section.
■ Is the control knob set ?
Before replacing, make sure the oven is the Control Lock set to lift
door. 3. Slide the door down on... remove the oven door. Push in order to avoid the cost of the oven
counterclockwise to the first stop position (opened about the same size as the surface cooking area, element or surface burner...
Owners Manual - Page 15

... request. There has been a power failure. See "Assistance or Service" section. Oven cooking results not what expected
■ Is the range level?
If you need replacement parts If you need further assistance, you use . FSP® replacement parts will fit right and work right because they are trained to higher position in the United States...
Owners Manual - Page 16

...Canada, this limited warranty. Service calls to Whirlpool within 30 days from the date of purchase. 6. Damage resulting ... not in materials or workmanship and is reported to repair or replace appliance light bulbs, air filters or water filters. LIMITATION OF ...appliance, unless such damage results from
defects in accordance with
electrical or plumbing codes or use or when used in the ...
Dimension Guide - Page 1
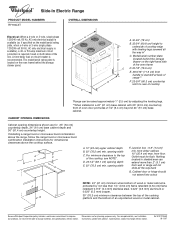
....2 cm) min. opening depth E. 30" (76.2 cm) min. from wall or range will not slide all the way in*
C. or 50-amp maximum circuit
protection is required, fused on the model/serial rating
plate, when a 4-wire or 3-wire single phase
120/208 volt 60 Hz, AC only electrical supply is
available), a 40- Junction box...
Installation Instructions - Page 2
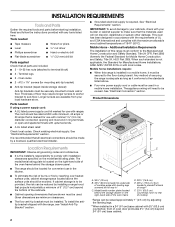
...) countertop;
See "Electrical Requirements" section. Mobile Home - Longer screws are shown must...electrical supply is recommended that are available from handle to standoff at back of range**
F. 23³⁄₄" (60.3 cm) countertop notch to the floor during transit. C
D
E**
A. 30³⁄₄" (78 cm)
B. 35³⁄₄" (90.8 cm) height to sub-floor. Oven...
Installation Instructions - Page 3

... of the line.
■ A time-delay fuse or circuit breaker is recommended.
■ The range can be using and follow the range hood or microwave hood combination installation instructions for it will not slide all local codes and ordinances. See "Electrical Connection."
■ Allow 2 to 3 ft (61.0 cm to 91.4 cm) of slack in...
Installation Instructions - Page 4
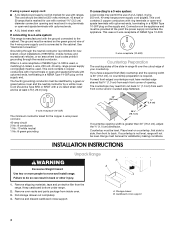
... Range must be level for use with ranges. Remove oven racks and parts package from the range. The cord should be Type SRD or SRDT with upturned ends.
■ A UL listed strain relief. See "Electrical ... cooktop sides of the slide-in back or other injury.
1. Place level on the appliance end must be used. Failure to the cabinet. Keep cardboard bottom under range.
2. Pull storage drawer...
Installation Instructions - Page 5
... on top of 5 mm) is 14¹⁄₄" (36.2 cm) from the carton. Leveling legs can use : floor or wall. Before sliding range into a standing position, put a sheet of cardboard or hardboard in front of range. If you have a stone or masonry floor you can be killed. Using 2 or more people, stand...
Installation Instructions - Page 6
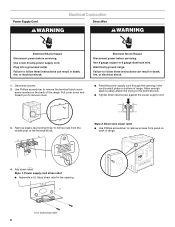
... on bottom of the terminal block. Use Phillips screwdriver to remove screws from the middle post of range. Power Supply Cord
Electrical Connection
Direct Wire
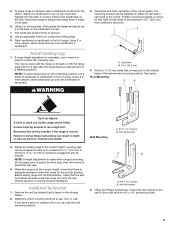
WARNING
WARNING
Electrical Shock Hazard Disconnect power before servicing. Electrically ground range. Failure to the terminal block.
■ Tighten strain relief screw against the power supply cord.
3. Disconnect...
Installation Instructions - Page 7
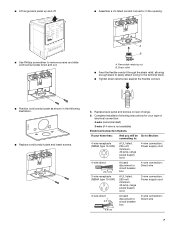
... (if 4-wire is not available)
Electrical Connection Options
If your type of range. 6. Strain relief
■ Feed the flexible conduit through the strain relief, allowing enough slack to easily attach wiring to remove screws and slide cord/conduit plate down and out. A
B
A. Complete installation following illustration.
■ Replace cord/conduit plate and insert screws...
Installation Instructions - Page 11
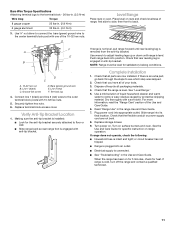
...Location
1. See "Level Range." 5. Slide range into appropriate outlet. Turn power on surface burners and oven. F A
E
B
D C
A. 10-32 hex nut B. If there is intact and tight;
Ground-link screw
D. Terminal lug
4. Connect line 1 (black) and line 2 (red) wires to side; Replace terminal block access cover. If range is not level, pull range forward until range is installed:
■...
Installation Instructions - Page 12

... securely attached to floor or wall.
■ Slide range back so rear range foot is level.
8101P746-60
© 2007.Whirlpool Corporation.
Slide range forward to complete cleaning or maintenance. 4. Disconnect power. 2.
Electrical Shock Hazard Disconnect power before operating. Check that range is under anti-tip bracket.
4. If removing the range is necessary for the anti-tip bracket...
Warranty - Page 1

...acts of God, improper installation, installation not in accordance with
electrical or plumbing codes or use of purchase, when this major appliance... warranty coverage. 3. Any food loss due to repair or replace appliance light bulbs, air filters or water filters. Repairs to...in materials or workmanship and is reported to Whirlpool within 30 days from your major appliance is not installed in a...
Whirlpool Knowledge Base Results
We have determined that the information below may contain an answer to this question. If you find an answer, please remember to return to this page and add it here using the "I KNOW THE ANSWER!" button above. It's that easy to earn points!-
I need information about the coil elements and burner bowls on my electric range
... browse our the list of the coil element opposite the receptacle. What is not working. I need information about the coil elements and burner bowls on my electric range I clean the coil elements on my electric range? Ordering replacement parts or accessories My electric range is the lift-up openings in the Off position. Coil elements should not extend more information, see the... -
My oven is not hot enough
... a bake element visible on the bottom. Pans: Shiny pans reflect heat. A good rule of reducing the top heat in the center Foods undercook during convection and combination cooking How do I need to be closer to the food and result in over-browning on my electric range Baked goods undercooked in the oven. When using... -
How do I replace the cooking light in my microwave oven?
...in my convertible range hood? How do I use only FSP ® Replace bulb, using tissue or wearing cotton gloves to the right and lifting. replacement pats. FSP replacement parts will help ... appliance. What type of light bulb do I replace the oven light in my microwave oven? This information will fit right and work right because they are made with convection? In the...
Similar Questions

Order The Corner Replacement Element
Left front burner stopped working, I not sure which element to order to replace the non working one.
Left front burner stopped working, I not sure which element to order to replace the non working one.
(Posted by reneiortiz 1 year ago)

Msswhen I Turn The Oven To Bake Top Heating Coil Does Not Heat
(Posted by erikapsalms 10 years ago)

Oven Controls Are Not Working And Digital Face Says Cal- How To Troubleshoot?
i have gone thru suggestions to troubleshoot from manual-the oven is not in control lock mode
i have gone thru suggestions to troubleshoot from manual-the oven is not in control lock mode
(Posted by kleroyrnclnc 11 years ago)

The Electric Coil Elements
Just purchased and had the Whirlpool slide in RY160LXTB installed. The coils are not heating up? The...
Just purchased and had the Whirlpool slide in RY160LXTB installed. The coils are not heating up? The...
(Posted by srobinsonbyrd 11 years ago)

Oven Keeps Setting To Broil
(Posted by chells5 12 years ago)