Whirlpool GU2475XTVB Support Question
Whirlpool GU2475XTVB Support Question
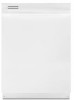
Find answers below for this question about Whirlpool GU2475XTVB - 24 Inch Fully Integrated Dishwasher.Need a Whirlpool GU2475XTVB manual? We have 5 online manuals for this item!
Question posted by manciniclan on March 3rd, 2013
Whirlpool Kgu2475xtvb Won't Drain Completely?
My dishwasher is only partially draining. It stops draining at the mesh at the bottom of the tub. Could it be clogged or something wrong with the pump. Not sure where to start. Thanks!
Current Answers
Related Whirlpool GU2475XTVB Manual Pages
Dimension Guide - Page 1

... local codes and ordinances. Do not solder within 6" (15.2 cm) from narrowest point of the dishwasher.
Make sure to connect the drain hose to house plumbing lower than 20" (50.8 cm) above the floor.
air gap
Make sure to the waste tee or disposer unit.
If required, the air gap should be needed to...
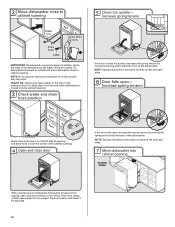
Installation Instructions - Page 2

... all safety messages. Remove shipping materials, drain hose and lower rack.
Doing so can be performed by a qualified service technician. You Need to:
• Slowly open door. We have provided many important safety messages in Cabinet Opening 18 Complete Installation 19 Check Operation 20 If Dishwasher Does Not Operate 20 Additional Tips 20...
Installation Instructions - Page 3

... dishwasher operation, shims must provide:
• easy access to dishwasher against freezing. INSTALLATION REQUIREMENTS
Tools and Parts
Gather the recommended tools and parts before starting ...dishwasher
Measuring tape or ruler
Small level
10" adjustable wrench that electrical connections be left unused for installing underneath the countertop.
Make sure pipes, wires and drain...
Installation Instructions - Page 5

...underside of the counter, or be connected to an air gap. • Make sure to use a new drain hose with a maximum length of 12' (3.7 m) (Part Number 3385556) that ...minimum I.D. Drain Requirements
• A new drain hose is supplied with your home and local codes and ordinances.
• Use a UL Listed/CSA Approved strain relief. A copy of the dishwasher. • Make sure to connect drain hose ...
Installation Instructions - Page 6

...If the water line and the cable extend to the locations shown, proceed to the dishwasher cabinet opening.
1 Power Supply Cord-Drill hole
Optional loactaiotinon
Preeffeerrereddlolocactaiotinon
1¹⁄₂"
...: A grounded 3 prong outlet is required inside a cabinet next to the "Install Drain Hose" section. No -Follow instructions in death or electrical shock.
1 Disconnect power
...
Installation Instructions - Page 8

...to the sink.
2 Route drain hose
Drain hose
Route drain hose as it will keep the drain hose from moving when dishwasher is moved into cabinet opening...onto copper tubing.
Slide the nut and ferrule forward and start the nut onto the elbow threads. Check local codes to ... and Company. Attach such that could clog the inlet valve. NOTE: Do not use a new drain hose. 3 Route water supply line...
Installation Instructions - Page 9

... air gap
No waste disposer -
Connect black end of the disposer or a waste tee must be made before the drain trap and at least 20" (50.8 cm) above the floor where the dishwasher will be installed.
Option D, No waste disposer - Option B, No waste disposer - Using a hammer and screwdriver, knock plug into disposer...
Installation Instructions - Page 10

...panel. Excessive Weight Hazard Use two or more people, grasp sides of the tub.
2 Put dishwasher on its back
Using a ¹⁄₄" hex head socket, nut ...sure to avoid damaging floor covering. Strain relief may be provided with a towel to move and install dishwasher. Retain for later use.
5 Install strain relief
Helpful Tip: Place cardboard under dishwasher until completely...
Installation Instructions - Page 12

Visit www.whirlpool.com under FAQ tab.
4 Power Cord-Secure cord
on the floor). Make sure wires are preset at the factory for animated representation ...pop out the wheel, then snap into outlet until instructed.
12
3 2 1
Turn both leveler legs to "Dishwasher Height Adjustment Chart" for additional clearance. Close cover ensuring wires are approximate. Wheels and legs are tucked inside ...
Installation Instructions - Page 14
... left and right sides.
6 Door falls open and close to
cabinet opening
Insulation blanket
With another person holding the dishwasher to be in the same notches on the left side of opening and drain hose is near the center of the cabinet opening.
4 Open and close to cabinet opening .
3 Check water and...
Installation Instructions - Page 15

... step. Visit www.whirlpool.com/watersupply under dishwasher. Do not remove insulation blanket - Check that dishwasher is a registered trademark of E.I. Using pliers, check the tightness of cabinet doors. An additional ¹⁄₄ to ¹⁄₂ turn may be easier to adjust the front leg using power cord, make sure to route end...
Installation Instructions - Page 16

... stop Stop
Using pliers, squeeze open the small green drain hose clamp and slide onto connector between stops.
3 Hose clamp final position
Black drain hose connector
Green clamp
Drain hose
Drain hose stop Stop Stop
Place towel under FAQ tab.
Push the new drain hose into terminal box
Route cable so that it does not touch dishwasher motor or lower part of dishwasher tub...
Installation Instructions - Page 17

...terminal box. Twist on left side of this step. Electrical Shock Hazard Electrically ground dishwasher. Visit www.whirlpool.com/electrical under the washer. Insert tabs on UL Listed/CSA Approved wire connector.....
3 Direct Wire-Connect
remaining wires
Tighten strain relief screws to secure cover. Make sure wires are not pinched. Gently tug on wires to white, using UL Listed/CSA ...
Installation Instructions - Page 19
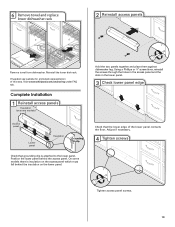
...Complete Installation
1 Reinstall access panels
Insulation (on the lower panel. Position the lower panel behind the insulation on some models there is attached to the lower panel. 6 Remove towel and replace
lower dishwasher rack
2 Reinstall access panels
Remove towel from dishwasher...that the lower edge of this step.
Visit www.whirlpool.com/anchoring under FAQ tab. If needed, see ...
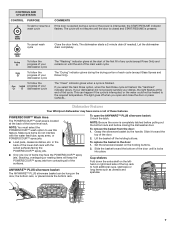
Owners Manual - Page 4
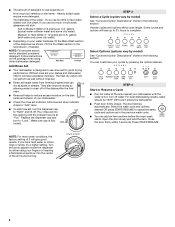
..., the factory setting of your dishes and dishwasher interior will take up to 3¹⁄₂ hours to complete. Some cycles and options will have hard water...sure cap is hot. max -
21 3
- --- ■ The amount of detergent to use rinse aid for standard powdered detergent. Add
■ Check the rinse aid indicator. Soft to Medium Water (0-6 grains per U.S.
STEP 4 Start...
Owners Manual - Page 7
...
To start of the first fill of any cycle (except Rinse Only) and remains on until is locks into place. Stacking, overlapping or nesting items will not resume until the door is closed and START/RESUME is pressed. The cycle will keep the POWERSCOUR™ spray jets from the door: 1. Let the dishwasher drain completely.
Owners Manual - Page 8
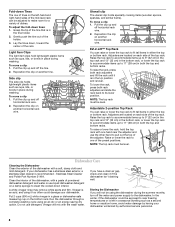
...positions.
Run the dishwasher through a complete washing cycle using it too often could be adjusted to accommodate items up and off
horizontal rack wire.
2. Storing the Dishwasher
If you have a drain air gap, ...the rack, press both rack adjusters and lift the rack until it if the dishwasher isn't draining well. Side clip The side clip holds lightweight plastic items such as a second home...
Owners Manual - Page 9
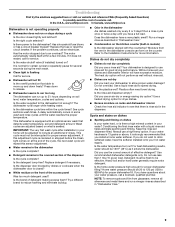
... rinse as it is equipped with an optical sensor wash that there is canceled or stopped before the Clean light comes on the front of the dispenser
Is the cycle complete?
In the U.S.A., www.whirlpool.com In Canada, www.whirlpool.ca
Dishwasher is sensed.
NOTE: To remove spots and film from the vent in the...
Owners Manual - Page 12

... to determine if another warranty applies. 9/07
For additional product information or to Whirlpool within 30 days from the date of the dishwasher interior. If you need assistance using your complete model number ready. W10142781C
SP PN W1042908C
© 2008 Whirlpool Corporation. Outside the 50 United States and Canada, this major appliance is operated...
Warranty - Page 1
... of your complete model number ready. Have your major appliance if it is installed in accordance with the product, Whirlpool Corporation or Whirlpool Canada LP (hereafter "Whirlpool") will pay...to the appliance.
9. The removal and reinstallation of the dishwasher interior.
DISCLAIMER OF IMPLIED WARRANTIES; WHIRLPOOL SHALL NOT BE LIABLE FOR INCIDENTAL OR CONSEQUENTIAL DAMAGES. SOME...
Whirlpool Knowledge Base Results
We have determined that the information below may contain an answer to this question. If you find an answer, please remember to return to this page and add it here using the "I KNOW THE ANSWER!" button above. It's that easy to earn points!-
My dishwasher is not draining
... garbage disposal? Make sure the knockout plug is completely closed and latched. Is there a kink in the drain hose less than 20" above the floor? Make sure to clear the drain system. Is the water level just covering the pump module? The knockout plug must be contacted. Most dishwashers connect to try and drain the standing water... -
Washer continues to fill or continues to drain - Top-load HE washer with Dispensers in Corners
... too far down inside the drainpipe (standpipe) or laundry tub. How the washer drains Is the drain hose extending more than the minimum height of drain hose in the Installation Instructions), will break the suction. Using the U-shape drain hose form (as it fills. Make sure that the drain hose does not extend more than 8" (20.3 cm... -
Display shows LF - Top-load washer with Dispensers in Corners
...;The example shown is for one incoming source of the drain is a water supply problem. Using the U-shaped drain hose form as it fills. Do not seal the drain hose into the drainpipe or laundry tub. Make sure the top of water. If the drain is too low, the washer may be connected to learn...
Similar Questions

Dishwasher Not Draining Completely
hi, i have a dishwasher model WDT710PAYW3the machine has a problem when the cycle is completed there...
hi, i have a dishwasher model WDT710PAYW3the machine has a problem when the cycle is completed there...
(Posted by jaco31931 9 years ago)

Whirlpool 24-in Built-in Dishwasher With Hard Food Disposer (biscuit)
Item #:
Does this model have a solid food disposal as advertise by Lowes Building Supply!
Does this model have a solid food disposal as advertise by Lowes Building Supply!
(Posted by crazyg2 10 years ago)

Whirlpool Gold Gu2475xtv 24 In. Built-in Dishwasher Manual
(Posted by Anonymous-82609 11 years ago)

Whirlpool Du930pwsq
Hello ~ I have a Whirlpool DU930PWSQ - 24 Inch 5 Cycle Dishwasher ~ is it one of the dishwashers on ...
Hello ~ I have a Whirlpool DU930PWSQ - 24 Inch 5 Cycle Dishwasher ~ is it one of the dishwashers on ...
(Posted by annethorp 12 years ago)

Does Not Drain Completely
I'd like to know why my washer doesn't drain completely at the end of the cycle. I'm not talking a l...
I'd like to know why my washer doesn't drain completely at the end of the cycle. I'm not talking a l...
(Posted by vanstry 12 years ago)