Get support for Whirlpool GH7208XRS - 2.0 cu. ft. Velos Speedcook Microwave Oven

Whirlpool GH7208XRS Support Question

Whirlpool GH7208XRS Support Question

Find answers below for this question about Whirlpool GH7208XRS - 2.0 cu. ft. Velos Speedcook Microwave Oven.
Need a Whirlpool GH7208XRS manual? We have 4 online manuals for this item!
Question posted by Vhinrull on July 27th, 2014

Whirlpool Velos Microwave Oven Where To Install

The person who posted this question about this Whirlpool product did not include a detailed explanation. Please use the "Request More Information" button to the right if more details would help you to answer this question.

Current Answers

There are currently no answers that have been posted for this question.
Be the first to post an answer!

Remember that you can earn up to 1,100 points for every answer you submit. The better the quality of your answer, the better chance it has to be accepted.

Related Whirlpool GH7208XRS Manual Pages

Owners Manual - Page 1

.... All safety messages will need assistance, call us at www.whirlpool.com for example, closed glass jars - ® MICROWAVE HOOD COMBINATION USER INSTRUCTIONS THANK YOU for purchasing this manual and on your model and serial number located on the front facing of the microwave oven opening, behind the door. This symbol alerts you to...
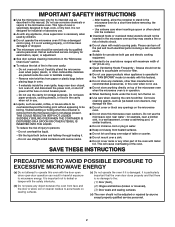
Owners Manual - Page 2

..., repair, or adjustment. ■ See door surface cleaning instructions in a wet basement, or near water - Do not overcook food. Remove wire twist-ties from the microwave oven is not working properly, or if it is not always present. Do not leave paper products, cooking utensils, or food in the cavity when not...
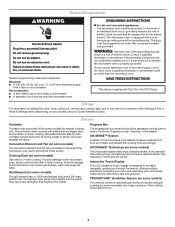
Owners Manual - Page 3

... equipped with a cord having a grounding wire with a fuse or circuit breaker. This is properly installed and grounded. Progress Bar The progress bar is too short, have a qualified electrician or serviceman install an outlet near the microwave oven. WARNING: Improper use an adapter. Features Turntable Turntable may be easily navigable, guiding you through the menus...
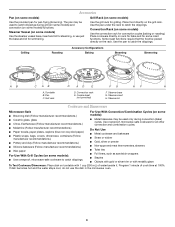
Owners Manual - Page 4

Steamer Vessel (on some models) Use the steamer vessel base, insert and lid for steaming, or use the dish in the microwave oven. 4 Some roast functions require that the food be placed directly on some models): ■ Metal bakeware may be used to catch drippings. Grill rack D. Steamer ...
Owners Manual - Page 6

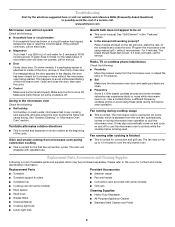
... Cleaning Supplies ■ Heavy Duty Degreaser ■ All-Purpose Appliance Cleaner ■ Stainless Steel Cleaner and Polish 6 www.whirlpool.com Microwave oven will dissipate with some models), which may experience static or noise while microwave oven is on during convection cooking ■ This is normal for some models) is off to be purchased separately. If...
Owners Manual - Page 8

...major appliance is required to Whirlpool with original model/serial numbers that is reported to Whirlpool within 30 days from the date of the microwave oven opening, behind the door.... information for repairs. Service calls to correct the installation of your major appliance, to instruct you may contact Whirlpool at : Whirlpool Brand Home Appliances Customer eXperience Center 553 Benson Road...
Dimension Guide - Page 1

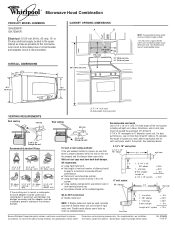
... back-draft damper. 3-1/4" x 10" to the microwave oven hood. See examples below . 18¹⁄₄" (46.4 cm) 15¹⁄₂" (39.4 cm) A. 2" x 4" wall stud B. We do NOT recommend: ✔ flexible metal vent. Length of 3-1/4" x 10" system = 25 ft. = 40 ft. = 8 ft. = 73 ft. 6 ft. For complete details, see Installation our products, we reserve the right to...
Installation Instructions - Page 1

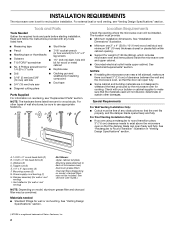
.... This is suitable for use above electric or gas cooking products up to Wall 7 Prepare Upper Cabinet 8 Install the Microwave Oven 9 Install Filters 10 Complete Installation 10 VENTING DESIGN SPECIFICATIONS 11 ASSISTANCE 12 Replacement Parts 12 Accessories 12 MICROWAVE HOOD COMBINATION SAFETY Your safety and the safety of your particular model may differ slightly from the...
Installation Instructions - Page 2

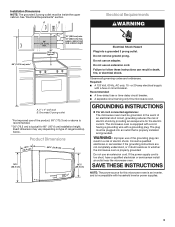
.... The location must be sure to make sure there is at least 3" (7.6 cm) of clearance between the wall and the microwave oven, so that the damper blade can open freely and fully. See "Installation Dimensions" illustration. ■ Minimum one 2" x 4" (50.8 x 101.6 mm) wood wall stud and minimum 3/8" (10 mm) thickness drywall or plaster...
Installation Instructions - Page 3

... supply with a grounding plug. Recommended: ■ A time-delay fuse or time-delay circuit breaker. ■ A separate circuit serving only this microwave oven is an inverter, and is properly grounded. The microwave oven is properly installed and grounded. Consult a qualified electrician or serviceman if the grounding instructions are not completely understood, or if doubt exists as...
Installation Instructions - Page 4

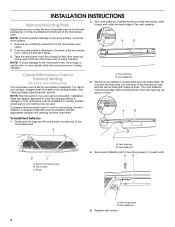
... with holes) is being handled. Vent screen C. Mounting screw B. NOTE: To avoid damage to the back of the microwave oven, remove it back and under the back edge of microwave oven B. A B Convert Microwave Oven to External Venting (for recirculation installation. Vent deflector 3. Rings A. Vent deflector 4. If the mounting plate is set it so that door does not...
Installation Instructions - Page 5

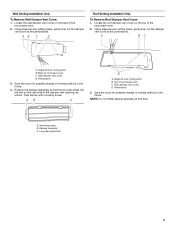
... C. Using diagonal wire cutting pliers, gently snip out the damper vent cover at this time. Back of microwave oven C. Save the cover for possible change of the microwave oven. 2. Then secure with mounting screw. NOTE: Do not install damper assembly at the perforations. Wall damper vent cover D. Diagonal wire cutting pliers B. A. Locate the roof damper...
Installation Instructions - Page 6

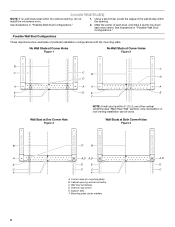
... opening . Wall stud centerlines D. Wall Studs at One Corner Hole Figure 3 NOTE: If wall stud is within the cabinet opening, do not install the microwave oven. 1. Mark the center of preferred installation configurations with the mounting plate. Locate Wall Stud(s) NOTE: If no wall studs exist within 6" (15.2 cm) of the vertical centerline (see...
Installation Instructions - Page 7

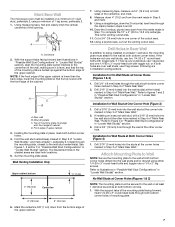
...The microwave oven must be secured to Figure 3 in "Possible Wall Stud Configurations" in "Locate Wall Stud(s)" section. 3. Centerline 2. Holding the mounting plate in Step 6, and mark. 9. Installation for ... round-head bolts and toggle nuts or 1/4 x 2" lag screws. If the holes are 3 installation configurations. Drill 3/16" (5 mm) hole(s) into the wall studs and/or drywall using a minimum...
Installation Instructions - Page 8

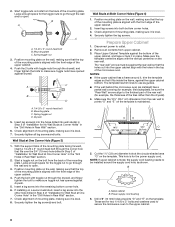
... sure the 10¹⁄₂" (26.7 cm) dimension from the back of the microwave oven. NOTE: If upper cabinet is maintained. Metal cabinet B. These are for the toggle nut...Installation for the toggle nuts to go through the wall and to make sure toggle nut has opened against drywall. 5. Leave enough space for two 1/4-20 x 3" bolts and washers used to secure the microwave oven...
Installation Instructions - Page 9

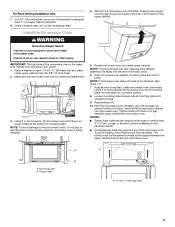
... added. A A B A. Support tabs A. 1/4-20 x 3" flat-head bolts 9 Cut 3/4" (19 mm) hole at least one corner of microwave oven still tilted, thread power supply cord through the wall, make sure the damper assembly fits easily into microwave oven. Install the Microwave Oven WARNING Excessive Weight Hazard Use two or more people to be the same thickness as the...
Installation Instructions - Page 10

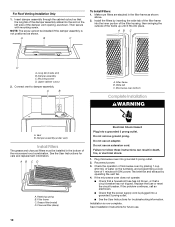
... a grounded 3 prong outlet. ■ See the User Instructions for troubleshooting information. Mounting screw D. Damper assembly (under vent) Install Filters The grease and charcoal filters must be installed if the damper assembly is plugged into place. Plug microwave oven into a grounded 3 prong outlet. Test vent fan and exhaust by operating the vent fan. 4. If the...
Installation Instructions - Page 11

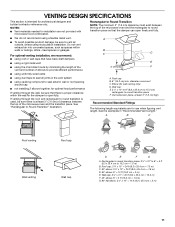
... the damper to round transition piece F. For optimal venting installation, we recommend: ■ using roof or wall caps that the ...ft (8.3 x 25.4 cm = 12.2 m) F. 45° elbow: 6" = 5 ft (15.2 cm = 1.5 m) G. 90° flat elbow: 3¹⁄₄" x 10" = 10 ft (8.3 x 25.4 cm = 3 m) 11 Vent extension piece, at least 3" (7.6 cm) of clearance between the top of the microwave oven...
Installation Instructions - Page 12

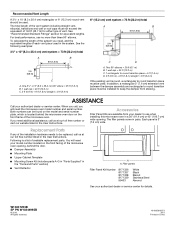
... are available from sticking. Both numbers can be used. See the following examples: 3¹⁄₄" x 10" (8.3 x 25.4 cm) vent system = 73 ft (22.2 m) total A B 6 ft (1.8 m) 2 ft (0.6 m) C A. For best performance, use when installing this microwave oven in the "Tools and Parts" section) ■ Vent Deflector A A. To calculate the length of the system you will need the...
Warranty - Page 1

... to use or when it is used in the country in which it is installed in an inaccessible location or is used in accordance with electrical or plumbing codes, or... or lower front facing of Whirlpool, U.S.A. 461966100262 11/07 Printed in a remote area where service by the customer. All rights reserved. ® Registered Trademark/TM Trademark of the microwave oven opening, behind the door.

Whirlpool Knowledge Base Results

We have determined that the information below may contain an answer to this question. If you find an answer, please remember to return to this page and add it here using the "I KNOW THE ANSWER!" button above. It's that easy to earn points!

  • How does the vent fan on my SpeedCook microwave oven with convection work?
    ... on for a few seconds while the settings are being adjusted. To protect the oven, the vent fan will be turned off How do I install the griddle on at high speed if the temperature from the vent screen of my SpeedCook microwave oven with convection work ? The status will automatically turn on my 30" gas...
  • Will the Microban® Refrigerator Air Filter fit my refrigerator?
    ft. capacities. NOTE: If your model number in 22, 25, and 27 cu. built side by side refrigerator serial number does not begin with S or HR, the Microban Refrigerator Air Filter will fit only U.S. To remove odors, you ...
  • Will the Microban® Refrigerator Air Filter fit my refrigerator?
    ft. NOTE: If your side by side refrigerator serial number does not begin with S or HR, the Microban Refrigerator Air Filter will fit only U.S.... Guides: /shared.whirlpoolcorp.com/service/modelnumber.jsp','modelnumber',500,480);return false;" href="#"> Lookup Model # Cleaning your model number in 22, 25, and 27 cu. Will the Microban® Refrigerator Air Filter fit my refrigerator?

Similar Questions

Ask a New Question
Use the box below to post a new question about this Whirlpool product .
Points & Prizes
  • You can earn points for nearly everything you do on HelpOwl.com
  • You can trade in those points for gift cards at leading retailers such as Amazon.com and Walmart
  • It's that simple!
See How it Works
Create a Free Account

Whirlpool Manuals

Find free Whirlpool GH7208XRS - 2.0 cu. ft. Velos Speedcook Microwave Oven manuals and user guides available at ManualOwl.com. Try out our unique manual viewer allowing you to interact with manuals from directly within your browser!

Whirlpool Reviews

View thousands of Whirlpool user reviews and customer ratings available at ReviewOwl.com.

Contact Information

Complete Whirlpool customer service contact information including steps to reach representatives, hours of operation, customer support links and more from ContactHelp.com.

Scoreboard Ratings

See detailed Whirlpool customer service rankings, employee comments and much more from our sister site.

Whirlpool Recalls

Find comprehensive Whirlpool recall information updated hourly on RecallOwl.com.