Whirlpool DU1345XTVQ Support Question
Whirlpool DU1345XTVQ Support Question
Find answers below for this question about Whirlpool DU1345XTVQ.Need a Whirlpool DU1345XTVQ manual? We have 5 online manuals for this item!
Question posted by smccabe on February 22nd, 2013
The Black - Yellow Lined Hose That Runs Up The Left Side Of The Dishwasher
Hi,
I recently instealled my parents whirlpool dishwasher. There was a black yellowlined hose on the left hand side of it. I have attached ran it, along with the corragated main drain hose into an S trap, the water supply line is hooked up properly as well, now there is no water coming into teh dishwasher when they try to run it???
Current Answers
Related Whirlpool DU1345XTVQ Manual Pages
Dimension Guide - Page 1

... cm) by removing wheels from dishwasher.
**Minimum, measured from water inlet valve. external pipe threads on the underside of cabinet walls show where utility connections may be installed in house plumbing and 20" (50.8 cm) minimum above drain trap in accordance with dishwashers. drain line fittings. Make sure to connect the drain hose to change without notice.
NOTE: Shaded...
Installation Instructions - Page 2

... 6 Prepare Cabinet Opening-New Utilities 6 Prepare and Route Water Line 7 Install Drain Hose 8
Installation Instructions (cont.) Prepare Dishwasher 10 Make Power Cord Electrical Connection 11 Determine Cabinet Opening 12 Choose Attachment Option 13 Move Dishwasher into Cabinet Opening 13 Connect to Water Supply 15 Connect to Drain 16 Make Direct Wire Electrical Connection 16 Secure...
Installation Instructions - Page 3

... Do not run drain lines, water lines or electrical wiring where they can interfere with any tools listed here.
A moisture barrier accessory (Part Number 4396277) is recommended that opens to 16 gauge wiring in dishwasher
Other useful items you may also need :
Flashlight
Bath towel
Shallow pan
Wood block
Parts supplied:
Drain hose clamps (2) (1 large and 1 small)
Drain hose
Phillips...
Installation Instructions - Page 5

... supply.
• copper wire only. If connecting dishwasher with direct wiring: • Use flexible, armored or nonmetallic sheathed, copper wire with grounding wire that the drain hose either be needed to connect to waste tee or disposer inlet above the floor. Water Supply Requirements
• A hot water line with dishwasher. • Power supply cord must have:
•...
Installation Instructions - Page 6

...Water line
Cable
Prepare Cabinet Opening-Existing Utilities
1 Check water and electrical
placement
Water line
(15.2
6" cm)
Cable
If the water line and the cable extend to the locations shown, proceed to the dishwasher...Install Drain Hose" section. INSTALLATION INSTRUCTIONS
Electrical Shock Hazard Disconnect electrical power at the fuse box or circuit breaker box before installing dishwasher....
Installation Instructions - Page 7

Attach to the right front side of cabinet opening .
See product and cabinet opening dimensions.
2 Direct Wire-Prepare hole
(15.2 c6m")
Route cable from power supply through the left side of cabinet opening from moving when dishwasher is in the cabinet side or rear.
2 Measure water supply line
Wood cabinet
Metal cabinet
Wood cabinet: Sand the...
Installation Instructions - Page 8

... in cabinet wall or side of the opening closest to the sink.
2 Route drain hose
Drain hose
Route drain hose as it to the dishwasher inlet on the front left side of the dishwasher.
4 Flush water supply line
Connect the ³⁄₈" compression fitting to the water supply line prior to get rid of particles that the ³⁄₄" connection is...
Installation Instructions - Page 9

... at least 20" (50.8 cm) above the floor where the dishwasher will be installed. Option A, Waste disposer - no air gap • Option C, Waste disposer - Attach drain hose to squeeze clamp open and move into disposer.
2
2. no air gap
SLcarregwe-stiylvpeer drain chloamsepclamp Waste tee
Drain hose
1 Black end 2
Drain trap
1. no air gap
No waste disposer - Use pliers to disposer...
Installation Instructions - Page 12

...: white black ground connector
If needed . Wheels and legs are tucked inside terminal box. Close cover ensuring wires are approximate. Visit www.whirlpool.com under FAQ tab.
4 Power Cord-Secure cord
on left side of this step. Refer to secure cover.
Use ¹⁄₄" nut driver and previously removed screw to "Dishwasher Height...
Installation Instructions - Page 13

... slots on the left and right-hand top of the dishwasher collar as needed
(140."1 cm)
(52c"m)
2(³7⁄₄c"m)
Built-up floors (Kitchen floor height is in the area shown to bring the dishwasher up to do so. 13 3 Built-up . NOTE: Save the buttons to the cabinet. Option 1, Countertop attachment 1. NOTE: Shims must...
Installation Instructions - Page 14
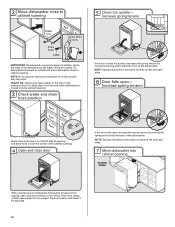
... and close to keep it from moving when dishwasher is near the center of the cabinet opening .
3 Check water and drain
hose position
If the door closes too quickly, decrease the spring tension by moving the spring end toward the back of utilities. Decrease spring tension
Water line
Drain hose
Cable
Direct Wire Only
IMPORTANT: Double-check correct...
Installation Instructions - Page 15

... front of dishwasher
with front of cabinet doors
Align front of dishwasher door panel with...Hand tighten until dishwasher is a registered trademark of dishwasher. NOTE: Do not use Teflon † tape with your cabinets.
9 Check for plumb and
adjust legs if needed , see website for leaks
Place paper towel under 90° elbow fitting.
Do not kink or pinch water line, drain hose...
Installation Instructions - Page 16

... drain hose clamp and slide onto connector between stops.
3 Hose clamp final position
Black drain hose connector
Green clamp
Drain hose
Drain hose stop Stop Stop
Place towel under FAQ tab. Option B, Direct Wire:
1 Direct Wire-Route cable
into the black drain hose connector up to "Secure Dishwasher in drain hose. Visit www.whirlpool.com/drain under drain hose to 16-gauge dishwasher...
Installation Instructions - Page 17

...whirlpool.com/electrical under the washer. Securely tighten ground connector.
3 Direct Wire-Connect
remaining wires
Tighten strain relief screws to white, using UL Listed/CSA Approved twist-on left side of this step. Connect wires black to black... ensuring wires are secured. Electrical Shock Hazard Electrically ground dishwasher. Use ¹⁄₄" nut driver and previously removed...
Installation Instructions - Page 20

... you must also do not, the Start/Resume light will run longer to calibrate to start the dishwasher? • Is the water turned on? Check that you press it again. (You must... than older models. Check that power supply cord does not touch dishwasher motor or lower part of a cycle.)
NOTE: If a braided supply hose is water in death, fire, or electrical shock.
1 Power supply cord-Plug...
Owners Manual - Page 1
...left-hand side of the dishwasher interior. Para obtener acceso a las "Instrucciones para el usuario de la lavavajillas" en español, o para obtener información adicional acerca de su producto, visite: www.whirlpool...more. If the hot water system has not been used for use .
■ Do not operate the dishwasher unless all instructions before using the dishwasher turn on all safety ...
Owners Manual - Page 4

.... Vinegar is an acid, and using it if the dishwasher isn't draining well. If you will not be using an air-dry or an energy-saving dry option. In U.S.A., www.whirlpool.com In Canada, www.whirlpool.ca
Dishwasher is not operating properly
■ Dishwasher does not run up and down freely? Is there power to an overload...
Owners Manual - Page 5

... the pump or spray arm clogged by some models). Do not use a heavier cycle.
Does the dishwasher have questions about your dishwasher. Run a vinegar rinse as well without rinse aid.
■ Dishes are not dry
Did you install a home water softener. Refer to see that describes the most difficult soil in models)
Is the...
Owners Manual - Page 6

... U.S.A.:
Whirlpool Brand Home Appliances Customer eXperience Center 553 Benson Road Benton Harbor, MI 49022-2692
Please include a daytime phone number in the U.S.A., call 1-800-807-6777. If you need assistance using your model number and serial number on the label located near the door on the right-hand or left-hand side of the dishwasher...
Warranty - Page 1

... instructions attached to or furnished with
published installation instructions. 11.
All rights reserved.
® Registered Trademark/TM Trademark of products not approved by a Whirlpool designated ... the door on the right-hand or left-hand side of your complete model number ready. W10130986A SP PN W10133161A
© 2007 Whirlpool Corporation. Whirlpool Canada LP licensee in Canada
...
Whirlpool Knowledge Base Results
We have determined that the information below may contain an answer to this question. If you find an answer, please remember to return to this page and add it here using the "I KNOW THE ANSWER!" button above. It's that easy to earn points!-
Washer is not cleaning laundry - Cabrio® washer with agitator
... softener by attaching to the hot faucet and that the hot water fill hose is connected...run - Softener is on. Guides: /shared.whirlpoolcorp.com/service/modelnumber.jsp','modelnumber',500,480);return false;" href="#"> Lookup Model # Washer is not cleaning laundry - Cabrio® washer with most cycles. Check your loads have a yellow or orange tint, you have hard water... -
Washer will not fill or start - Cabrio® washer with agitator
... sure to continue. Is there oversudsing? Is a water inlet hose kinked? Remove any accumulated film or particles from the washer. Was the lid left closed again to see if a household circuit breaker or Ground Fault Circuit Interrupt (GFCI) outlet has tripped. To properly run, the washer should not be opened between cycles... -
Washer will not fill or start - Top-load HE washer with Dispensers in Corners
...water. Is the indicator on the water and check for one incoming source of water. Slightly turn on the Cycle Control knob properly lined up with dry items only. Press and hold Start for leaks. For best results, determine load size with a cycle? Select Drain... unlock the lid. To run properly, the washer should seem ...the water and remove the inlet hoses from the water inlet...
Similar Questions

Whirlpool Dishwasher Turns On And Water Comes In But Wont Start
(Posted by danyalav 9 years ago)

Whirlpool Dishwasher Du1345xtvq Will Not Fill With Water
(Posted by mic65 9 years ago)

What Size Braided Flex Hose Should Be Used Water Supply Line?
(Posted by NanceMorin4 12 years ago)
How To Connect Drain Hose From Dishwasher To Garbage Disposal
Changed faucet, sink and garbage disposal. No longer have an overflow valve on the sink top.
Changed faucet, sink and garbage disposal. No longer have an overflow valve on the sink top.
(Posted by conjo 12 years ago)