
Weider Pro 9930 Support Question
Weider Pro 9930 Support Question
Find answers below for this question about Weider Pro 9930.Need a Weider Pro 9930 manual? We have 1 online manual for this item!
Question posted by Cosmiccranks on December 9th, 2017
Flex Gym 2000
i have correctly assembled the flex gym 2000 but I have no exercise poster showing any workouts and without pictures to guide me the machine is useless. Lay on the bench and pull the lat bar down or sit on the end of the bench and do leg lifts is that all this flex gym 2000 is good for???
Current Answers
Answer #1: Posted by BusterDoogen on December 9th, 2017 12:28 PM
BusterDoogen

Member since:
October 30th, 2011 Points: 28,565,407

Member since:
October 30th, 2011 Points: 28,565,407
THERE ARE FOUR BASIC TYPES OF WORKOUTS.
Go to page 13.
I hope this is helpful to you!
Please respond to my effort to provide you with the best possible solution by using the "Acceptable Solution" and/or
the "Helpful" buttons when the answer has proven to be helpful. Please feel free to submit further info for your question, if a solution was not provided. I appreciate the opportunity to serve you!
Related Weider Pro 9930 Manual Pages
User Manual - Page 2
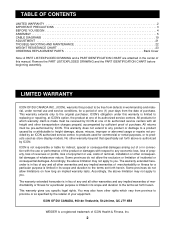
... of removal, installation or other warranties and any implied warranties of merchantability or fitness for commercial or rental purposes, or to products used for a particular purpose ...whatsoever nature. TABLE OF CONTENTS
LIMITED WARRANTY 2 IMPORTANT PRECAUTIONS 3 BEFORE YOU BEGIN 4 ASSEMBLY 5 CABLE DIAGRAMS 19 ADJUSTMENT 21 TROUBLE-SHOOTING AND MAINTENANCE 22 WEIGHT RESISTANCE CHART 23 ...
User Manual - Page 3
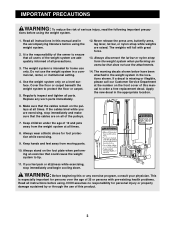
... only on the front cover of the pulleys.
7. Never release the press arm, butterfly arms, leg lever, lat bar, or nylon strap while weights are on all times.
8. Always disconnect the lat bar or nylon strap from the weight system when performing an exercise that the cables remain on the foot plate when performing an...
User Manual - Page 4
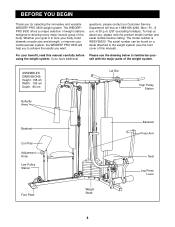
... attached to familiarise your-
ASSEMBLED DIMENSIONS: Height: 198 cm Width: 165 cm Depth: 86 cm
Lat Bar
High Pulley Station
Butterfly Arms
Backrest
Curl Pad Adjustment Knob Low Pulley Station
Foot Plate
Weight Stack
Backrest Press Arm
Seat Leg Press
Lever
4
For your cardiovascular system, the WEIDER® PRO 9930 will help us assist you...
User Manual - Page 5
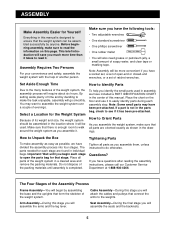
... Four Stages of the packing materials until you identify the small parts used .
Make sure you assemble it.
Select a Location for that the weight system can be more time than it takes to open -end or closed-end wrenches, or a set of time and by anyone. Place the chart on this manual. If...
User Manual - Page 6

... in the Butterfly Base (61). Place the Butterfly Base and
the Press Base flat on the lower end of the Press
62
59
Frame Upright (59) over the indicated 5/16" x 2 1/2" Carriage ... the Butterfly Base (61)
and the Press Base (60). Position the Butterfly Upright (62) as shown. Frame Assembly
1
1.
Hand tighten two 5/16" Nylon Locknuts (2) onto the Bolts. Hand tight- en two 5/16" Nylon...
User Manual - Page 7
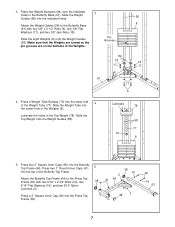
... x 2 3/4" Bolts (20), two
38
5/16" Flat Washers (19), and two 5/16" Nylon
Locknuts (2). Attach the Weight Guides (58) to the Press Top
Frame (63) with two 3/8" x 2 1/2" Bolts (6), four 3/8" Flat Washers (17), and...19
2 41 64
38
2
20
19 63
7 Press a 2" Square Inner Cap (38) into the lower end 4 of the Weight Tube (77).
Press two 1" Round Inner Caps (41)
5
into the indicated holes. ...
User Manual - Page 8
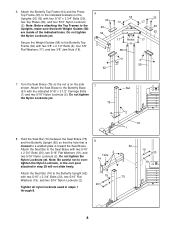
... the Butterfly Upright (62) so that the hole that both Weight Guides (58)
46
46
are inside of the indicated holes. Attach the Seat Bar (74) to the Butterfly Upright (62) with two 5/16" ...two 5/16" Nylon Locknuts (2).
Tighten all nylon locknuts used in step 38 will not slide freely. Secure the Weight Guides (58) to the Seat Brace with two 5/16" x 2 3/4" Bolts (20), two 5/16" Flat Washers ...
User Manual - Page 9
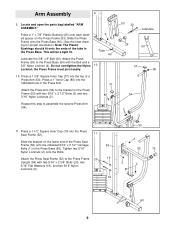
... Press Base (60). (See the inset drawing for proper orientation.) Note: The Plastic Bushings should fit onto the ends of a Press Arm (54). Attach the Press Frame (53) to assemble the second Press Arm (54).
11. Press a 1 3/4" Square Inner Cap (37) into ... the bracket on the Press Frame (53). Tighten two 5/16"
Nylon Locknuts (2) onto the Bolts. Arm Assembly
9
9. This will be a tight fit.
User Manual - Page 10
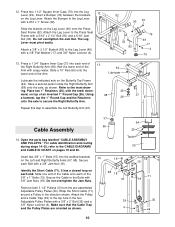
...) between the brackets
12
on the Leg Lever (49) onto the Press Seat Frame (52).
Open the parts bag labelled "CABLE ASSEMBLY AND PULLEYS." Slide one end of the Cable onto each end. Attach the Pulley and a Cable Trap (39) to the inset draw-
Slide the bracket on the Leg Lever. Do not...
User Manual - Page 11
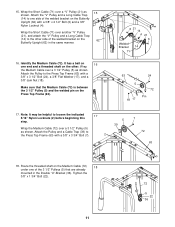
... welded bracket on the
62
Butterfly Upright (62) in the Double "U"-Bracket (36).
Route the threaded shaft on the Medium Cable (72)
18
under one end and a threaded shaft on the Press Top Frame (63).
6 21 14 4 21 6
Welded Bracket 14
71
63
24
5 18 17
72 Pin
17. Attach the...
User Manual - Page 12
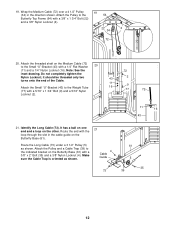
... a loop on the
Butterfly Base (61). Note: See the
72
inset drawing.
Route the end with the
loop through the slot in the direction shown. Route the Long Cable (73) under a 3 1/2" Pulley (5) as shown.
4 Cable
Guide
73
61 5
35 39
12 Attach the Pulley and a Cable Trap (39) to the indicated bracket...
User Manual - Page 14
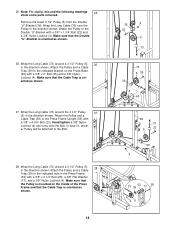
... the Double "U"-Bracket (36). 25. Attach the Pulley and a Cable Trap (39) to the Bolt.
28.
Note: For clarity, this and the following drawings 25 show some parts removed.
User Manual - Page 15

... the Nylon Locknut. Attach the Long Cable (73) to create slack in order to the Leg Lever (49) by slipping the looped end of the Cable onto the looped end of the Press Frame and that was inserted in the direction shown. Note: Lift the Top Weight (78) on the weight stack...
User Manual - Page 16
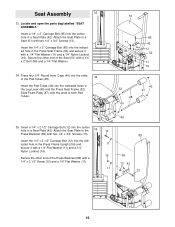
...Assembly
33
33.
Insert the 1/4" x 2" Carriage Bolt (85) into the center
hole in a Seat Plate (42). Insert a 1/4" x 2 1/2" Carriage Bolt (12) into the indicated hole in the Press Seat Frame (52) and secure it with a 1/4" Flat Washer (11) and a 1/4"
Nylon Locknut (16).
16 Secure the other end... Locate and open the parts bag labelled "SEAT ASSEMBLY." Attach the Seat Plate to a Seat (51...
User Manual - Page 17

Secure the other end of the Seat (51) with two 1/4" x 2 1/2" Screws (10) and two 1/4" Flat
37
Washers (11).
51
82 13
42...(69) to the Curl Post (70) with two 38
1/4" x 3/4" Screws (13).
69
Insert the Curl Post (70) into the center 36 hole in the Seat Bar (74) and secure it with a 1/4" Flat Washer (11) and a 1/4" Nylon Locknut (16). Insert a 1/4" x 1 1/2" Carriage Bolt (82) into the Seat...
User Manual - Page 18
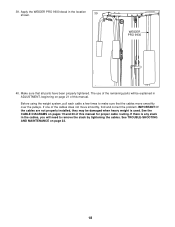
... smoothly, find and correct the problem. If one of this manual for proper cable routing. See TROUBLE-SHOOTING AND MAINTENANCE on pages 19 and 20 of the remaining parts will need to make sure that all parts have been properly tightened. WEIDER PRO 9930
40.
Before using the weight system, pull each cable a few...
User Manual - Page 19
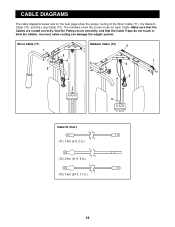
... that the Cable Traps do not touch or bind the Cables. CABLE DIAGRAMS
The cable diagrams below and on the next page show the correct route for each Cable.
The numbers show the proper routing of the Short Cable (71), the Medium Cable (72), and the Long Cable (73). Incorrect cable routing can...
User Manual - Page 21

... length of the Chain between the Lat Bar and the Medium Cable so the Lat Bar will be in the correct starting position for the exercise to be reduced. Adjust the length of the Chain between the Lat Bar and the Long Cable so the Lat Bar will be in the correct starting position for the exercise to be performed.
CHANGING THE...
User Manual - Page 23
... well as friction between the cables, pulleys, and weight guides. PLACE STAMP HERE
ICON of Canada Inc. 900 de l'Industrie St-Jérôme, Québec Canada, J7Y 4B8
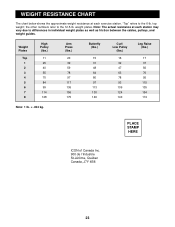
23 WEIGHT RESISTANCE CHART
The chart below shows the approximate weight resistance at each exercise station. Weight Plates
Top 1 2 3 4 5 6 7 8
High Pulley (lbs.)
11...
User Manual - Page 24
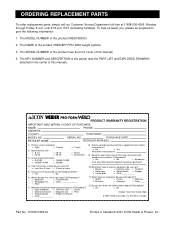
...be prepared to give the following information:
1. o Bicycle
o Exercise cycle o Treadmill
o Home gym
o Weight bench o Stepper
o Cardio glide
o Other____________
11) Which types of... reason for purchasing this manual).
™ ®
of the product (WEIDER® PRO 9930 weight system)
3. o Sports
o Fitness
o Motoring
o Business
o Computer
o Other_____
12) Do you purchase?
10) What ...
Similar Questions

Where Do I Go To See Replacement Parts For The Joe Weider 9640 Pro?
I am looking for a replacement cable for the leg lift on my weider 9640 pro.
I am looking for a replacement cable for the leg lift on my weider 9640 pro.
(Posted by frankuchler 3 years ago)

Where Can I Find A Short Cable For A Weider Pro 9930?
where can I find a short cable for a weider pro 9930?
where can I find a short cable for a weider pro 9930?
(Posted by pastorglb2 4 years ago)

Hi I’m Looking For The Cable Diagram For The Weider 9930. Not Any Assembly I
I need the cable guide for the Weider 9930. Not assembly instructions just the routing guide for the...
I need the cable guide for the Weider 9930. Not assembly instructions just the routing guide for the...
(Posted by bmcoyle 5 years ago)

How To Adjust The Weight Resistance
How do I vary the weight amounts for the various exercises?
How do I vary the weight amounts for the various exercises?
(Posted by plantguy 6 years ago)

Can You Show Me Page 31 Of The Weider Pro 9930 Manual
can you show me page 31 of the weider pro 9930 manual
can you show me page 31 of the weider pro 9930 manual
(Posted by rdnehus 10 years ago)