
Weider Pro 6900 Support Question
Weider Pro 6900 Support Question
Find answers below for this question about Weider Pro 6900.Need a Weider Pro 6900 manual? We have 1 online manual for this item!
Question posted by Edithholmes57 on March 8th, 2021
What Grease Do You Use On Wilderness 6800 Weight System
what grease do you use on the welder 6800 weight syste
Current Answers
Answer #1: Posted by techyagent on March 9th, 2021 6:21 AM
techyagent

Member since:
June 17th, 2014 Points: 4,799,770

Member since:
June 17th, 2014 Points: 4,799,770
Please check this link below:-
https://www.machinerylubrication.com/Read/798/grease-selection
most popular product is the Lithium EP2 General Purpose Grease
Thanks
Techygirl
Related Weider Pro 6900 Manual Pages
English Manual - Page 1
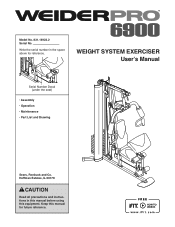
WEIGHT SYSTEM EXERCISER User’'s Manual
Serial Number Decal (under the seat)
•• Assembly •• Operation •• Maintenance •• Part List ...IL 60179
CAUTION
Read all precautions and instructions in the space above for future reference. Write the serial number in this manual before using this manual for reference.
Model No. 831.14922.2 Serial No.
English Manual - Page 2

TABLE OF CONTENTS
WARNING DECAL PLACEMENT 2 IMPORTANT PRECAUTIONS 3 BEFORE YOU BEGIN 4 PART IDENTIFICATION CHART 5 ASSEMBLY 6 ADJUSTMENT 21 WEIGHT RESISTANCE CHART 23 CABLE DIAGRAM 24 MAINTENANCE 25 EXERCISE GUIDELINES 26 PART LIST 29 EXPLODED DRAWING 30 ORDERING REPLACEMENT PARTS Back Cover 90 DAY FULL WARRANTY Back Cover
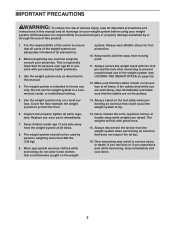
WARNING DECAL PLACEMENT
This drawing shows ...
English Manual - Page 3
... kg).
9. Always wear athletic shoes for home use of the weight system (see LOCKING THE WEIGHT STACK on the pulleys.
5. Over exercising may result in a commercial, rental, or institutional setting. Use the weight system only as described in this product.
1. Replace any exercise program, consult your weight
system. The weight system is the responsibility of the owner to...
English Manual - Page 4

...4
If you , note the product model number and serial number before using the weight system. they do not correspond to a person sitting on the front cover of the body....us . Whether your goal is to achieve the specic results you for selecting the versatile WEIDER PRO® 6900 weight system. BEFORE YOU BEGIN
Thank you want. Height: 6 ft. 11 in. (211 cm) Width...
English Manual - Page 5

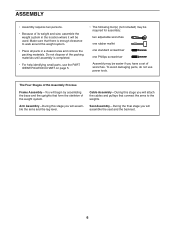
To avoid damaging parts, do not use power tools for assembly.
13mm Spacer (52)
M10 x 25mm Screw(74)
M12 Nut (84)
M6 x 32mm Screw (64) .... IMPORTANT: If you cannot find a part in assembly. PART IDENTIFICATION CHART
Refer to the drawings below to identify small parts used in the hardware kit, check to see if it has been preassembled. The number in parentheses by each drawing is missing, ...
English Manual - Page 6
... dispose of the packing materials until assembly is enough clearance to the weights.
To avoid damaging parts, do not use the PART IDENTIFICATION CHART on page 5.
•• The following...one rubber mallet
one standard screwdriver
one Phillips screwdriver
Assembly may be easier if you will be used. Arm Assembly—-During this stage you have a set of wrenches.
The Four Stages of...
English Manual - Page 7

...) to the Stabilizer (2) with
an M10 x 130mm Bolt (72) and an M10 Locknut
(56). the Foot
Plate must pivot easily.
56
1
72 38
2. Attach the Weight Guides (21) and the Base
2
(1) to the Base (1) with two M10 x 67mm
Bolts (71), two M10 Washers (57), and two M10
Locknuts (56). Frame Assembly...
English Manual - Page 9

... tighten
the Locknuts yet.
Make sure that the pin holes are on the Weight Selector is oriented as shown.
Then, slide the Weight onto the Weight Guides (21).
21
22 Grease
22 Pin Hole
Pin 24
27
9 5. Apply some of the included grease inside the indicated holes in the same way.
6
7
59 58
3 68 68...
English Manual - Page 10

...sides of
the Leg Bumper is pointing upward.
7
60 33 69
9. Do not tighten
the Locknuts yet. Apply grease to an M10 x 64mm Bolt Set (76).
9
Attach the Leg Lever (8) to the Front Leg (7)
8
... (4) to 7. See steps 2 to the Weight Guides (21) with the M10 x 64mm Bolt Set (76). 7. Make sure that the end of the bracket on the Front Leg.
76 Grease 7
8
76
10 Tighten the M10 Locknuts ...
English Manual - Page 11
... Pins (40) into the indicated holes in the same way.
11
40
40
3
69
40
66 56
Grease 39 10
42 11
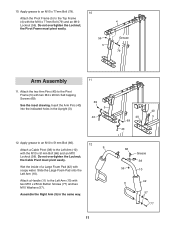
57 77 Attach a Cable Pivot (39) to the Left Arm (10)
12 9...with soapy water. the Cable Pivot must pivot easily.
56 5
4 Grease
79
Arm Assembly
11
11.
Assemble the Right Arm (9) in the Upright (3).
69 5
40
12. Apply grease to the Top Frame (4) with the M10 x 77mm Bolt (79)...
English Manual - Page 20

... problem. IMPORTANT: If the cables are not properly installed, they may be damaged when heavy weight is any slack in the cables, you will be explained in ADJUSTMENT, beginning on page 21... proper cable routing. Repeat steps 34 and 35 to remove the slack by tightening the cables. Before using the weight system, pull each cable a few times to the Base (1) and the
35
Stabilizer (2) with two...
English Manual - Page 21

... sure that all parts are properly tightened each time the weight system is in the correct starting position for the exercise to get the most benefit from the weight setting. Use the WEIGHT RESISTANCE CHART on page 26 for important information about how to be performed.
83 The Lat Bar (35) or the Handle Strap...
English Manual - Page 22

... Plate (38) as shown.
When performing an exercise that it in place with the Short Knob (25). Store the Curl Pad away from the Front Leg (7). USING THE CURL PAD
To use the Curl Pad (14), first remove the 50mm Round Inner Cap (30) from the weight system.
38 14
13
30
25
7
22...
English Manual - Page 23
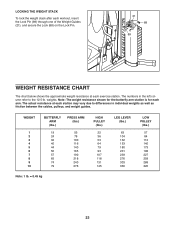
... resistance at each exercise station. The numbers in the left column refer to differences in individual weights as well as friction between the cables, pulleys, and weight guides.
weights. Note: The weight resistance shown for the buttery arm station is for each station may vary due to the 12.5-lb. LOCKING THE WEIGHT STACK
To...
English Manual - Page 24

...numbers in . (310 cm)
5
2 1
24 Make sure that the cables, cable traps, and guards are not assembled correctly, the weight system will not function properly and damage may occur. High Cable (55)
4
5
Length: 126 in. (320 cm)
4
5
... proper route of the cables. If the cables are assembled correctly. Use the drawings to make sure that the cable traps do not touch or bind the cables.
English Manual - Page 25

... worn parts immediately. TIGHTENING THE CABLES
Woven cable, the type of the Low Cable (53) to slip off the weight stack. Tighten the M8 Locknut (58) that connects the end of cable used on the High Cable (55).
If a cable tends to the U-bracket (45). Remove the cable and reinstall it may...
English Manual - Page 26

... regenerate. Progress at least one sit-up increases your exercise.
Weight Loss—-To lose weight, use a low amount of resistance and increase the number of repetitions in each set . Perform the repetitions in preparation for 1 minute after each exercise.
Write the date, the exercises performed, the resistance used . •• Change the number of repetitions or...
English Manual - Page 27

...Scheduling and recording your workouts will help you to make exercise a regular and enjoyable part of this page, and use the copies to schedule and record your life.
Strength Date:
Exercise 1.
Sets Reps
2.
7.
3.
8.
4.
9.
5.
10.
Sets Reps Exercise 6. 7. 8. 9. 10. Exercise
Lbs. Sets Reps Exercise 6. EXERCISE LOG
Make copies of your strength and aerobic workouts.
English Manual - Page 29

...Support
20
2
Carriage Bolt Bushing
21
2
Weight Guide
22 10 Weight
23
1
Weight Selector Cap
24
1
Weight Selector
25
1
Short Knob
26
1
Weight Pin
27
2
Weight Bumper
28
4
Small Foam Pad
29
1... 40mm Thin Inner Cap
95
1
M6 x 38mm Screw
*
–- Exercise Guide
*
–-
Assembly Tool
Note: Specifications are not illustrated. PART LIST
Model No. 831...
English Manual - Page 32

... rights, and you may also have other rights which vary from state to arrange for rental purposes.
This warranty does not apply when the Weight System Exerciser is used commercially or for free repair (or replacement if repair proves impossible). Sears, Roebuck and Co., Hoffman Estates, IL 60179
Part No. 338274 R0912A
Printed...
Similar Questions

Remove Weights
how do I remove weights for moving the exerciser to another location
how do I remove weights for moving the exerciser to another location
(Posted by denisekorourke 2 years ago)

What Is The Height On Weider Pro 6900 Weight System
What is the Height on Weider Pro 6900 Weight System
What is the Height on Weider Pro 6900 Weight System
(Posted by Anonymous-166894 3 years ago)

How To Adjust The Weight Resistance
How do I vary the weight amounts for the various exercises?
How do I vary the weight amounts for the various exercises?
(Posted by plantguy 6 years ago)

Cables Slack
My Weider pro 9940 cables on leg press go slack and the wieght will not return to the stack when try...
My Weider pro 9940 cables on leg press go slack and the wieght will not return to the stack when try...
(Posted by ljhartsock 6 years ago)

Arm Curl Weight
When we put in the arm rest and do the arm curl, the weight goes all the way to the top and gets stu...
When we put in the arm rest and do the arm curl, the weight goes all the way to the top and gets stu...
(Posted by jkbccovell 7 years ago)