
Weider Pro 4100 Support Question
Weider Pro 4100 Support Question
Find answers below for this question about Weider Pro 4100.Need a Weider Pro 4100 manual? We have 1 online manual for this item!
Question posted by jabewo79 on October 8th, 2020
Problem With Cabling
good morning... I'm trying to figure it out where the end of the cable goes to... did everything by the manual but the pictures, the diagram doesn't show clearly where!! I need your help!!
Current Answers
Answer #1: Posted by INIMITABLE on October 8th, 2020 4:10 PM
INIMITABLE

Member since:
April 3rd, 2020 Points: 2,069,620

Member since:
April 3rd, 2020 Points: 2,069,620
Hello here is a video guide on how to solve this problem: https://www.youtube.com/watch?v=XK-KHJW4OQk
I hope this is helpful? PLEASE "ACCEPT" and mark it "HELPFUL" to complement my little effort. Hope to bring you more detailed answers
-INIMITABLE
Related Weider Pro 4100 Manual Pages
English Manual - Page 1
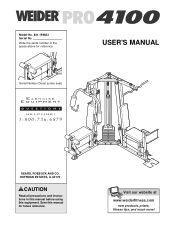
... AND CO. HOFFMAN ESTATES, IL 60179
CAUTION
Read all precautions and instructions in the space above for future reference. Write the serial number in this manual before using this manual for reference.
Visit our website at
www.weiderfitness.com
new products, prizes, fitness tips, and much more! Model No. 831.159823 Serial No.
English Manual - Page 2
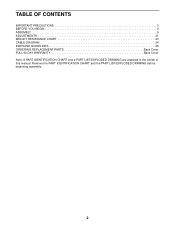
... and the PART LIST/EXPLODED DRAWING before beginning assembly.
2 TABLE OF CONTENTS
IMPORTANT PRECAUTIONS 3 BEFORE YOU BEGIN 4 ASSEMBLY 5 ADJUSTMENTS 21 WEIGHT RESISTANCE CHART 23 CABLE DIAGRAM 24 EXERCISE GUIDELINES 26 ORDERING REPLACEMENT PARTS Back Cover FULL 90 DAY WARRANTY Back Cover Note: A PART IDENTIFICATION CHART and a PART LIST/EXPLODED DRAWING are attached in...
English Manual - Page 3
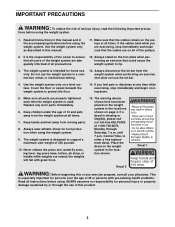
... system. Decal 2
Decal 1
Keep hands and fingers clear of serious injury, read the following important precau- Use...manual.
11. If the cables bind while you feel pain or dizziness at 1-800-736-6879, Monday through the use the lat bar.
4. Replace any exercise...weights will fall with pre-existing health problems.
Read all instructions in this manual and in the locations shown on ...
English Manual - Page 4
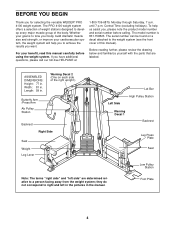
... terms "right side" and "left in the pictures in .
For your cardiovascular system, the weight system will help us assist you for selecting the versatile WEIDER® PRO 4100 weight system. The model number is to right and left side" are labeled. Width: 81 in the manual. Foot Plate
4
The serial number can be found...
English Manual - Page 10
...23
22
30
70 61
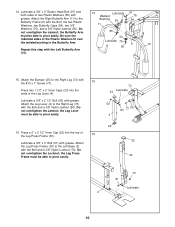
Lubricate 2
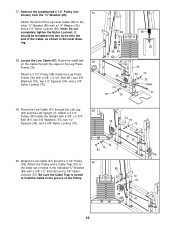
10 Press a 2" x 2 1/2" Inner Cap (22) into the ends of
16
the Leg Press Frame (30). the Butterfly Arm
55
must be able to the Left Base (2)... the Leg Lever (4). Lubricate a 3/8" x 3" Button Head Bolt (97) and both sides of the Plastic Washers fit over the welded bushing in the Butterfly Arm. Do
not overtighten the Jamnut; Be sure the indented sides of two ...
English Manual - Page 11

...the weight system, with the
Left Top Frame (3) removed for proper cable routing and help identifying the cables. Remove the preassembled 3 1/2" Pulleys (38) from
20
the ... to turn freely. Refer to the single hole side of the Pulley. Be sure the Cable Trap is completed.
19. Attach the Pulley to the CABLE DIAGRAMS and CABLE ID CHART on the Center Top Frame (14) with a 3/8" x 2 3/4" Bolt ...
English Manual - Page 12
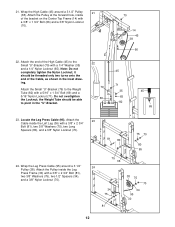
...and a 1/4" Nylon Locknut (65). 21. Attach the end of the High Cable (45) to pivot in the inset drawing. Locate the Leg Press Cable (95). Wrap the Leg Press Cable (95) around a 3 1/2" Pulley
21
(38). ...
22
79 69
70
14 45
38
66
45
71 35 65 82
45 65
23. Wrap the High Cable (45) around a 3 1/2" Pulley (38). Do not overtighten the Locknut;
the Weight Tube should be able...
English Manual - Page 13
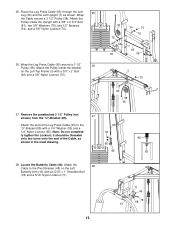
... 85
95 65
28. Note: Do not completely tighten the Locknut; Remove the preattached 3 1/2" Pulley (not
27
shown) from the "U"-Bracket (85).
Attach the end of the Cable, as shown. Attach the Pulley inside the Upright with a 3/8" x 2" Bolt
(62) and a 3/8" Nylon Locknut (70).
38
75 34
81
34
70
75
7 95 36...
English Manual - Page 14

...). Attach the Pulley to the Pivot Bracket (48) on the Right Butterfly Arm (11) with a 3/8" x 2" Bolt (62) and a 3/8" Nylon Locknut (70).
31. Attach the Butterfly Cable (46) to the single hole side of the other Double "U"-Bracket (56) with a
32
5/16" x 1" Shoulder Bolt (78) and an 5/16" Nylon
Locknut (71).
46...
English Manual - Page 15
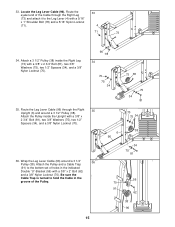
...
2 3/4" Bolt (81), two 3/8" Washers (75), two 1/2"
Spacers (34), and a 3/8" Nylon Locknut (70).
36. Attach the Pulley and a Cable Trap
(91) to the Leg Lever (4) with a 3/8" x 2 3/4" Bolt (81), two 3/8" Washers (75), two 1/2" Spacers (34), and ... 3/8" x 2" Bolt (62)
and a 3/8" Nylon Locknut (70).
33. Route the eyelet end of the Pulley.
70 75 34
6 96
38
34 75
81
56 70 91
62
38
96
15
English Manual - Page 16
...), two 1/2"
Spacers (34), and a 3/8" Nylon Locknut (70).
34
38
75
70
34
75 81
7
47 36
40.
Attach the end of the Leg Lever Cable (96) to hold the Cable in the groove of the Cable, as shown in the indicated "U"-Bracket
(85) with a 1/4" Washer (35) and a 1/4" Nylon Locknut (65).
it should be threaded...
English Manual - Page 17
... Locknut (70).
47 38
70
62 2
47 2
62
38 70
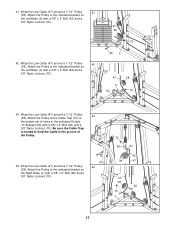
43. Wrap the Low Cable (47) around a 3 1/2" Pulley
44
(38). Wrap the Low Cable (47) around a 3 1/2" Pulley
43
(38). Attach the Pulley to
the bottom set of...56) with a 3/8" x 2" Bolt (62) and a
3/8" Nylon Locknut (70).
42. Be sure the Cable Trap
is turned to the indicated bracket on
the Left Base (2) with a 3/8" x 2" Bolt (62) and...
English Manual - Page 18
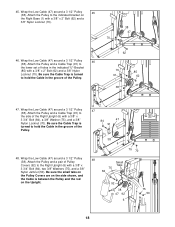
... (6) with a 3/8" x 2" Bolt (62) and a
3/8" Nylon Locknut (70).
38 47
70
46. Be sure the Cable Trap is between the Pulley and the rod
on
the Right Base (1) with a 3/8" x
Tabs
3 3/4" Bolt (84), two... 3/8" Washers (75), and a 3/8"
75
Nylon Jamnut (50). 45. Wrap the Low Cable (47) around a 3 1/2" Pulley
45
(38). Attach the Pulley and a pair of Pulley
Small
Covers (...
English Manual - Page 20
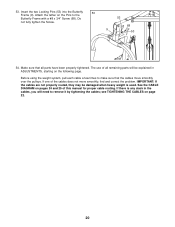
.... Attach the tether on page 22.
20 see TIGHTENING THE CABLES on the Pins to make sure that all remaining parts will need to remove it by tightening the cables; See the CABLE DIAGRAM on the following page. If one of this manual for proper cable routing. The use of all parts have been properly tightened. Insert...
English Manual - Page 21
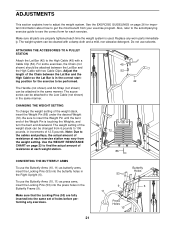
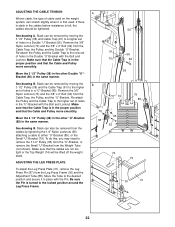
... the Weights, and turn the bent end downward. The weight setting of the weight stack can be attached between the Lat Bar and the High Cable so the Lat Bar is in the...Lat Bar and the High Cable with a Cable Clip (52). The accessories can be performed.
For some exercises, the Chain (not shown) should be attached to the High Cable (45) with two Cable Clips. CHANGING THE WEIGHT SETTING...
English Manual - Page 22
... Double "U"-Bracket with the Bolt and Locknut. To do this, you may need to the desired position and secure it is felt, the cables should be tightened. Be sure the Pin is slack in the proper position and that the cables are not too tight or the Top Weight (74) will be removed...
English Manual - Page 23
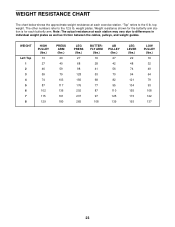
The other numbers refer to the 6 lb. Weight resistance shown for the butterfly arm station is for each exercise station. WEIGHT
Left Top 1 2 3 4 5 6 7 8
HIGH PULLEY
(lbs.) 13 27 46 59 74... may vary due to differences in individual weight plates as well as friction between the cables, pulleys, and weight guides. top weight. "Top" refers to the 12.5 lb.
Note: The actual resistance ...
English Manual - Page 24
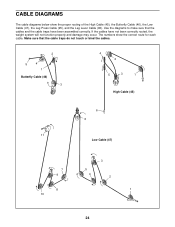
... correctly. CABLE DIAGRAMS
The cable diagrams below show the correct route for each cable. Make sure that the cables and the cable traps have not been correctly routed, the weight system will not function properly and damage may occur. Use the diagrams to make sure that the cable traps do not touch or bind the cables.
2
5
4
1
Butterfly Cable (46)
3
4 2
5
3
1
High Cable (45...
English Manual - Page 26
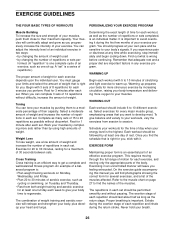
... after each set . Rest for you want to get a complete and well-balanced fitness program. Cross Training Cross training is important. Remember that you , stick with it during...increase the number of day when your breath.
26
Select exercises for each set . On the exercise guide accompanying this manual you will leave you find photographs showing the correct form...
English Manual - Page 30
...
92
2
Pulley Cover
93
1
Ab Strap
94
1
Short Pad Tube
95
1
Leg Press Cable
96
1
Leg Lever Cable
97
2
3/8" x 3" Button Head Bolt
98
1
Rubber Bumper
99
4
Nut Clips
#
1
User's Manual
#
1
Exercise Guide
#
1
Allen Wrench
#
1
Grease Packet
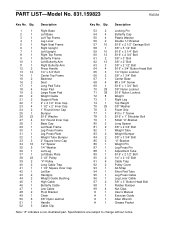
Note: "#" indicates a non-illustrated part. Qty. Description
Key No. PART LIST-Model No. 831.159823
R0203A
Key No...
Similar Questions

Weider Pro 4100
what is the weight for shipment of a Weider pro 4100
what is the weight for shipment of a Weider pro 4100
(Posted by Byroncemail 1 year ago)


I'm Having Cable Routing Problems
I bought a Weider Pro 4100 machine pre built, it had one or two cables out of place but even when I ...
I bought a Weider Pro 4100 machine pre built, it had one or two cables out of place but even when I ...
(Posted by hc12900 3 years ago)

My Questions Is Mostly About Exercises And Instructions.
I would like the instructions on what exercises I can do with pro 9645 please let me know
I would like the instructions on what exercises I can do with pro 9645 please let me know
(Posted by ckripp6 7 years ago)
