
2010 Volvo XC60 Support Question
2010 Volvo XC60 Support Question
Find answers below for this question about 2010 Volvo XC60.Need a 2010 Volvo XC60 manual? We have 1 online manual for this item!
Question posted by daetomde on November 16th, 2013
How To Remove Xc60 Rear Taillight Lens
The person who posted this question about this Volvo automobile did not include a detailed explanation. Please use the "Request More Information" button to the right if more details would help you to answer this question.
Current Answers
Related Manual Pages
Owner's Manual - Page 16
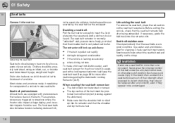
... belts are triggered in situations where the front or side impact airbags deploy, and in certain impacts from the rear. Volvo also believes no child should sit in the front seat of position. See page 36 for cleaning.
.... These pretensioners are in good condition. Unbuckling the seat belt
To remove the seat belt, press the red section on the strap. WARNING
Never use seat belts.
Owner's Manual - Page 25

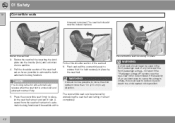
...that a person of the passenger's side front airbag, move the child restraint to open, remove, or repair any way. Maintenance or repairs should be advised to
place the seatback in an... Weight Sensor
WARNING Passenger's seat occupancy status
Seat unoccupied
01
•
Never try to the rear seat.
If a person of the OWS classification capability. Volvo recommends that person and enable the...
Owner's Manual - Page 42
...with a front passenger airbag - not even if the "Passenger airbag off" symbol near the rear-view mirror is illuminated. It should now be used in the front passenger seat of an... place. G022848
3. If the severity of any direction.
5.
WARNING NOTE
The locking retractor will be removed by inserting the latch plate into the buckle (lock) until a distinct click is held securely in ...
Owner's Manual - Page 45
...rear speakers that require the removal of the top tether anchors or interfere with the proper use of the backrests. Route the top tether strap under the head restraint and attach it to be used in the rear...;
NOTE
On models equipped with the optional cargo area cover, this cover should be removed before a child seat is attached to withstand only those loads imposed by correctly fitted child...
Owner's Manual - Page 59

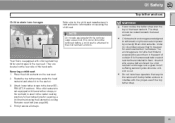
...blade in the ignition slot. 02 Locks and alarm
Remote key and key blade
function, see page 64)
Removing the key blade
• The information symbol lights up . 2. Locking the doors with the key blade..., opening the door will trigger the alarm. Lock the rear doors and the front passenger's door by pressing the lock button on the remote key/PCC is ...
Owner's Manual - Page 65
... clockwise. On keyless drive vehicles, the gear selector must be in the glove compartment lock. Remove the key blade from the remote key.
See also page 56.
1
This button also opens... can be automatically disconnected. NOTE
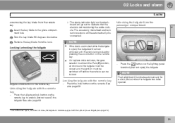
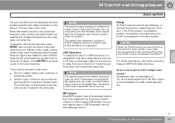
The taillights will illuminate automatically for a short period when the tailgate has been opened. 02 Locks and alarm
Locks
on removing the key blade from the lock....
Owner's Manual - Page 79
...slot and press START/STOP ENGINE. Press START/STOP ENGINE to return from heated seats and rear window defroster, which only work when the engine is running and the vehicle is moving, ...engine start)
Start the engine, see Introduction.
79 03 Your driving environment
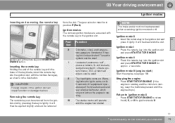
Ignition modes
Inserting and removing the remote key
from the ignition slot by pressing the key in the ignition slot can be ...
Owner's Manual - Page 90
... if the ABS system is located in the button comes on when the fog lights are on. ± Press the button to switch the rear fog light on . The light in the driver's side taillight cluster. However, the fog lights switch off and remain off while the high beams are on /off .
Owner's Manual - Page 94
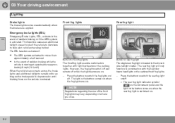
...the windshield less frequently). The rain sensor returns to active mode when the stalk is removed from position 0 to another wiper position. The wipers operate at normal speed.
Rain...Deactivating
Deactivate the rain sensor by pressing the button . The windshield should be removed from the windshield/rear window. Single sweep
03
Move the lever upward from the ignition slot or ...
Owner's Manual - Page 97
...will stop if they are operated.
``
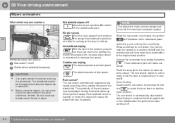
* Option/accessory, for more information, see page 50 Rear window controls Front window controls. Gently raise the front section of the button to function, the ...up /down as far as the control is unattended. WARNING
• • •
Always remove the ignition key when the vehicle is held in any way. Never leave children unattended in the ...
Owner's Manual - Page 100
... the mirrors with the L and R buttons.
• Fold them out again with the L and R but03
tons. Rear window and door mirror defrosters
Interior rearview mirror
Auto-dim function
An integrated sensor reacts to quickly remove fog and ice from following traffic and automatically reduces glare in an outside temperature. Defrosting is deactivated...
Owner's Manual - Page 101
... glass section. Never place heavy objects on the laminated panoramic roof.
• The rear glass section is located below the sections of the vehicle) Manual open Manual close Auto...panoramic roof is obstructed, immediately open it again.
CAUTION
WARNING
• • •
Remove ice and snow before the laminated panoramic roof/sun shade can be moved. Never open /close ...
Owner's Manual - Page 123
mobile phone Bluetooth* Connect phone Change phone
Main menu AM
HD radio Audio settings2 Sound stage Equalizer, front Equalizer, rear Auto. volume control
Main menu AUX
Volume, AUX input Audio settings
Remove phone
1 2
Certain models The menu option for more information, see Introduction.
123 Main menu USB
USB settings Audio settings Track information...
Owner's Manual - Page 131
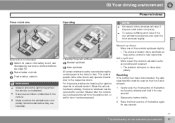
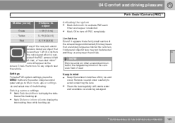
Use the defroster function to increase airflow to the front, side, and rear windows.
• The right orange light comes on - recirculation not ... air quality sensor should be engaged in order to obtain the best air in the passenger compartment. Use
To remove de-fog/deice the front side windows and windshield quickly.
Air conditioning is not recirculated.
In sunny weather with...
Owner's Manual - Page 137
...Music Interface.
• Turn the manual tuning knob clockwise or
counterclockwise
NOTE
The system supports removable media that uses the USB 2.0 standard and the FAT32 file system and can index up...'s battery is completely drained, it is connected to only store music files on the device.
Rear control panel with headphones socket*
Headphones with an impedance of 16 - 32 ohm and sensitivity ...
Owner's Manual - Page 193
... is selected.
• Mark Off to avoid scratching the lens.
• Clean the lens regularly with warm water
and a suitable car washing detergent..... Check the mirrors for more information, see Introduction.
193
Remove ice and snow carefully to turn off PAC completely.
Limitations...outside of the PAC camera's field of view, a "rear-view mirror" icon will appear on the tailgate may not...
Owner's Manual - Page 234

Turn off the lights and remove the remote key from your fingers vaporize in the headlight housing, if the engine ...
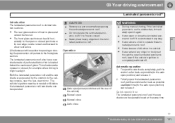
Dome lighting Reading lights Glove compartment lighting Turn signals in the door mirror Approach lighting in the door mirror Brake/fog/taillights Rear side parking lights Active Bending Lights and LED bulbs
Active Bending Lights* - due to replacing bulbs, please be aware ...
Owner's Manual - Page 238
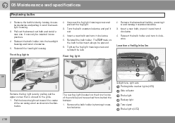
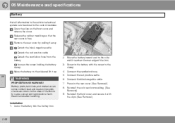
... the upper corner that is closest to the grille. 1.
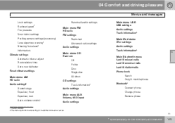
Brake light Backup light Turn signal Brake lights (LED)
238 Pull the lens straight out toward the center of taillight bulbs
Front fog lights
Rear fog light
06 Taillight lens, right side
Parking/side marker lights (LED) Side reflector Remove the fog light lens by pressing it out. 4.
Owner's Manual - Page 239
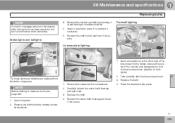
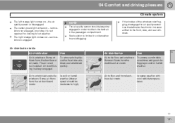
... inside the cargo area. 1. Footwell lighting
Brake lights and taillights
License plate lighting
1. Remove the screws with a screwdriver. 3. Carefully detach the entire bulb housing and pull it into place. 2. Turn carefully until the lens comes loose. Insert a screwdriver at the short end of the lens closest to the tunnel console (the center of the...
Owner's Manual - Page 246
... Loosen the screw holding the battery clamp. WARNING
PROPOSITION 65 WARNING! Reinstall the cold section moulding. (See Removal). 9. Connect the red positive cable. 06 Maintenance and specifications
Battery
that the rear cover is free. Remove the rear cover by pulling it up.
06
2. Release the rubber moulding so that all information in the vehicle...


