Toro 38025 Support Question
Toro 38025 Support Question
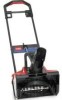
Find answers below for this question about Toro 38025 - 18" Power Curve Electric Snow Thrower.Need a Toro 38025 manual? We have 2 online manuals for this item!
Question posted by JFMiller on February 17th, 2015
Rotor Stopped Spinning
The rotor on my snow blower stopped spinning, I could not find a shear pin. I downloaded the parts list and could not find a shear pin for the rotor. What marries the rotor to the drive train?
Current Answers
Answer #1: Posted by TechSupport101 on February 17th, 2015 10:14 PM
TechSupport101

Member since:
May 24th, 2013 Points: 12,171,305

Member since:
May 24th, 2013 Points: 12,171,305
Hi. Go here http://www.repairclinic.com/RepairHelp/How-To-Fix-A-Snowblower/134---/Snowblower-auger-won-t-turn for possible causes.
Related Toro 38025 Manual Pages
Operation Manual - Page 2

...area.
• Do not operate machine barefooted or while wearing sandals. Safety
This lawn mower meets or exceeds the CPSC blade safety requirements for walk-behind before and ... thrown by the manufacturer. Failure to a complete stop the engine and check for the cause immediately. never run.
• Disengage the drive system, if so equipped, before operating. The following...
Operation Manual - Page 3

...before storing.
• If you strike a foreign object, stop and inspect the machine.
Children
Tragic accidents can kill you. ...; Never remove gas cap or add fuel with manufacturer's recommended parts, when necessary.
• Mower blades are explosive.
•... Allow engine to cool before filling.
• Remove gas-powered equipment from a gasoline dispenser nozzle.
• Keep the nozzle...
Operation Manual - Page 4

...
Important: Safety and instruction decals are located near areas of hand or foot, mower blade-stay away from moving parts.
5. Manufacturer's Mark
1. contains lead; Unlock
114-7982
1. Cutting/dismemberment hazard of potential danger. stop the engine before servicing or performing maintenance.
4. operate side to side on charging the battery;
Warning-read the...
Operation Manual - Page 6

... (not shown) 13. Grass bag 2.
Side-discharge deflector
models only)
4. Handle knob (2)
6. Recoil start 10. Product Overview
3
Charging the Battery
No Parts Required
Procedure
Electric-start models only)
6 Figure 5
1. Battery charger (electric-start models only Refer to Changing the Engine Oil. Refer to Charging the Battery in the Maintenance section. Important: Change the...
Operation Manual - Page 8

... you into contact with the moving blade, causing serious injury.
• Stop the engine and wait for all moving parts to stop.
• Do not put your fingers under the housing when adjusting the cutting height. Turn the ignition key (Figure 11) (electric-start models only) or pull the recoil start handle, pull it...
Operation Manual - Page 9

...pace handle to recycle the grass and leaf clippings back into the lawn. Stop the engine and wait for all moving parts to the operator or bystanders. Note: If the mower does ... personal injury.
Using the Self-propel Drive
To operate the self-propel drive, simply walk with you leave the mower (electric-start after self-propelling, stop before recycling the clippings. Bagging the Clippings...
Operation Manual - Page 10

... the notches on the handle (Figure 14).
3. Install the grass bag, ensuring that the pins on the bag rest in bagging position)
1. WARNING
The blade is attached to the mower.... recycle grass and leaf clippings while the grass bag is sharp; Grass bag pin (2)
2.
Stop the engine and wait for all moving parts to stop before cleaning the bag-on-demand door and the surrounding opening (Figure 16)...
Operation Manual - Page 11

... leaving the operating position.
Clean here
Figure 16
Side-discharging the Clippings
Use the side discharge for all moving parts to Operating the Bag-on-Demand Lever).
Stop the engine and wait for cutting very tall grass.
Installing the Side Discharge Chute
Lift up the side deflector, remove the side discharge chute...
Operation Manual - Page 12

... when grass growth begins to vibrate, immediately stop the engine, disconnect the wire from the spark plug, and examine the mower for the best lawn appearance.
This helps disperse the clippings over...
• Clear the area of sticks, stones, wire, branches, and other debris that half of the lawn shows through the cut leaf cover.
then mow again at a lower setting for damage.
• For...
Operation Manual - Page 13

... normal usage. never siphon. Note: Replacement parts are available from the spark plug (Figure 18) before annual storage.
• Change the... conditions. Preparing for 24 hours (electric-start models only).
• Empty the fuel tank before ... Check the engine oil level. • Ensure that the engine stops within 3 seconds after releasing the blade control bar. • Clean...
Operation Manual - Page 15

... Your battery charger may be blown. Charging the Battery
Service Interval: Every 25 hours
Electric-start models only
If the battery does not charge or the engine does not run with... charger is fully charged or the charger is charging the
battery.
2. Replacing the Fuse
Electric-start models only
WARNING
CALIFORNIA Proposition 65 Warning Battery posts, terminals, and related accessories contain...
Operation Manual - Page 16

... a spare fuse in step 3. 6.
Install the new blade and all mounting hardware (Figure 25).
5. Wear gloves when servicing the blade.
1. Figure 26
Important: Position the curved ends of wood to 60 ft-lb (82 N-m).
Operation Manual - Page 17

Adjusting the Self-propel Drive Cable
Whenever you have completed mowing. 1.
Refer to its lowest cutting height setting.
Stop the engine.
8. Pull down the cable jacket (... Shut off the water and disconnect the garden hose from the housing to overtighten. Start the engine and run it for the purpose of adjustment, adjust the self-propel drive cable. 1.
Move the mower onto ...
Operation Manual - Page 18

... Loosen the handle knobs until the engine stops from running out of the handle knobs as shown in a heated area, you must charge the battery every 90 days (electric-start the engine, it is damaged, contact... pull the starter rope slowly several times to distribute oil throughout the cylinder to the spark plug.
18 Remove the spark plug, add 1 oz. (30 ml) of any unused fuel properly. Start ...
Operation Manual - Page 20

...problem and determine if it stops functioning due to an Authorized... a dealer convenient to you , is covered under "Lawn Mowers") or access our web site at Toro Warranty ... to the failure of parts and labor, but you may also call the numbers listed in item #3 to the... full warranty
Limited Warranty for Commercial Use*
Gas-powered Toro Products used for residential purposes*; The Toro GTS...
Parts Catalog - Page 1

Original Instructions (EN)
Form No. 3362-566 Rev A
1800 Power Curve® Snowthrower
Model No. 38025-Serial No. 310000001 and Up
Parts Catalog
Register at www.Toro.com.
Parts Catalog - Page 2

...part individually.
Ordering Replacement Parts
To order replacement parts, please supply the part number, the quantity, and the description of each part within the service assembly. Service Assembly Reference Numbers Parts in service assemblies have reference numbers in parts lists... phillips round head PTH: phillips truss head
PTO: power-take-off RH: right hand ROPS: roll-over ...
Parts Catalog - Page 3

Contents
Housing and Rotor Assembly 4 Handle Assembly 5 Chute Assembly 6
3
Parts Catalog - Page 4

... 256-307
1 Bushing
14 73-0280
1 Tube-Lower Handle
15 73-3630
1 Wire Harness
17 73-1800
1 Filter-Foam
18 32144-88
4 Screw-Pan Head
19 73-0120
1 Strap-Motor
20 73-3520
1 Motor
21 73-8680
1 Motor Plate...
1 Idler Pulley ASM (Incl. Description
30 73-3530
1 Bolt-Idler
31 61-8802
1 Belt-Drive
33 73-5730
1 Bearing ASM (Incl. Part Number Qty. Housing and Rotor Assembly
Ref.
Parts Catalog - Page 5
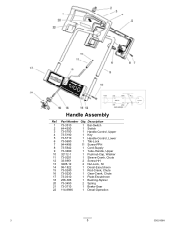
Handle Assembly
Ref. Part Number Qty. Description
1 73-3510
1 Bar-Switch
2 64-4930
1 Switch
3 73-5700
1 Handle-Control, Upper
4 73-5190
1 Key
5 73-...Lock, NI 1 Decal-Escutcheon
15 73-0240 16 73-0230
1 Rod-Crank, Chute 1 Gear-Crank, Chute
17 73-0310 18 256-306
1 Plate-Escutcheon 1 Bushing-Nyliner
20 73-3450
2 Spring
21 73-3710
1 Brake-Gear
22 114-8986
1 Decal-Operation
3
5
3362...
Similar Questions


Small Belt On 1800 Power Curve Snowthrower Model 38025 Keeps Shredding
The small belt on the small pulley on my Toro 1800 Power curve snowthrower model 38025 shreds after ...
The small belt on the small pulley on my Toro 1800 Power curve snowthrower model 38025 shreds after ...
(Posted by yebos 8 years ago)

Why Has My New Toro 38361 Power Shovel Suddenly Stopped Working
(Posted by ttaylor895 11 years ago)

15 Amp Circuit Breaker Blowing
I have one of the early Power Curve 1800’s. It has run flawlessly until this week. Yesterday, ...
I have one of the early Power Curve 1800’s. It has run flawlessly until this week. Yesterday, ...
(Posted by edabar 13 years ago)
Circuit Breaker Blowing (15 Amp)
I have one of the first Power Curve 1800's. This year, for the first time, after 30-60 minutes of us...
I have one of the first Power Curve 1800's. This year, for the first time, after 30-60 minutes of us...
(Posted by edabar 13 years ago)