
Toro 20332 Support Question
Toro 20332 Support Question
Find answers below for this question about Toro 20332 - Recycler 190CC Personal Pace Lawn Mower.Need a Toro 20332 manual? We have 2 online manuals for this item!
Question posted by batlen on December 9th, 2013
Toro Personal Pace Where Is Plug To Drain Oil
The person who posted this question about this Toro product did not include a detailed explanation. Please use the "Request More Information" button to the right if more details would help you to answer this question.
Current Answers
Answer #1: Posted by freginold on January 6th, 2014 11:23 AM
freginold

Member since:
December 20th, 2011 Points: 23,253,895

Member since:
December 20th, 2011 Points: 23,253,895
Hi, this model does not have a drain plug. The oil is drained out of the same hole you pour it into. You can find instructions for changing the oil in the owner's manual:
http://www.homedepot.com/catalog/pdfImages/b8/b8846e14-7457-4b62-b721-c5a01068a347.pdf
http://www.homedepot.com/catalog/pdfImages/b8/b8846e14-7457-4b62-b721-c5a01068a347.pdf
Related Toro 20332 Manual Pages
Operation Manual - Page 1

... Rights Reserved It is not equipped with Canadian ICES-002.
© 2011-The Toro® Company 8111 Lyndale Avenue South Bloomington, MN 55420
Register at www.shoptoro.com... land.
Introduction
Model No. Figure 1 identifies the location of special attention.
22in Recycler® Lawn Mower
Model No. 20332-Serial No. 312000001 and Up Model No. 20334-Serial No. 312000001 and Up Model...
Operation Manual - Page 2

...to a complete stop the engine and check for the cause immediately. Failure to potential personal injury hazards. Vibration is generally a warning of trouble.
• Always wear eye protection... extreme caution when changing direction on wet grass or excessively steep slopes. Safety
This lawn mower meets or exceeds the CPSC blade safety requirements for holes, ruts, bumps, rocks,...
Operation Manual - Page 3

...of Gasoline
To avoid personal injury or property damage...and the discharge guard frequently and replace with a plastic liner. Disconnect the spark plug wire and ground against engine to be sure the equipment is in a closed ... debris build-up oil or fuel spillage and remove any adjustments or repairs with a portable container, rather than the operator.
• Be alert and turn mower off if a ...
Operation Manual - Page 4

...
1. Manufacturer's Mark
1. Cutting/dismemberment hazard of hand or foot, mower blade-remove the ignition key and read the instructions before leaving the operating...Unlock
114-7982
1. Warning-read the Operator's Manual.
2. Cutting/dismemberment hazard of hand or foot, mower blade-do not discard. 2. Cutting/dismemberment hazard of potential danger. Indicates the blade is identified as ...
Operation Manual - Page 5

...: Remove and discard the protective plastic sheet that you install the handle.
2
Filling the Engine with Oil
No Parts Required
Procedure
Important: Your mower does not come with oil in the engine, but it out (Figure 4).
Move the mower to the operating position. 3. Dipstick
Figure 4
3. Note: When the crankcase is below the Add mark...
Operation Manual - Page 6

...4. Oil fill/dipstick
12. Drain the excess oil until the oil level on -demand lever
5. Fuel tank cap
11. Bag-on the dipstick reads Full.
6. Important: Change the engine oil after...thereafter. Air filter
3. Spark plug
Figure 6
1. Side discharge chute
3. Handle knob (2)
6. Washout port (not shown) 13. Install the dipstick into the oil fill tube securely.
Ignition key...
Operation Manual - Page 7

... 7 7 Remove the dipstick (Figure 8). Insert the dipstick fully into the oil fill tube securely. Drain the excess oil until the oil level is at the Full mark on the dipstick. Important: To reduce starting problems, add fuel stabilizer to a level surface. 2. Move the mower to the fuel all season, mixing it with a clean cloth.
4. A fire...
Operation Manual - Page 9

... under the personal pace handle to recycle the grass and leaf clippings back into the lawn. If they do not stop properly, stop within 3 seconds. Bagging the Clippings
Use the grass bag when you (Figure 13). Figure 12
Stopping the Engine
To stop before recycling the clippings. If the grass bag is on the mower and...
Operation Manual - Page 10

... bagging position)
1. Install the grass bag, ensuring that the pins on the bag rest in serious personal injury or death to be thrown in the operator's or bystander's direction and result in the notches ...from one position to the mower. • For bagging the grass and leaf clippings, press the
button on the bag-on-demand lever and move the
• For recycling the grass and leaf clippings,...
Operation Manual - Page 11

...Use the side discharge for all moving parts to Operating the Bag-on -demand lever is in serious personal injury.
Stop the engine and wait for cutting very tall grass. If the grass bag is sharp... result in the bagging position, move the lever to the recycling position (refer to stop before leaving the operating position.
WARNING
The blade is on the mower and the bag-on -Demand Lever).
Operation Manual - Page 12

...(13 cm) of leaves on the lawn, set the front wheels at 2-1/8-inch (54 mm) and the rear wheels at a slower pace while mowing.
- You may plug and cause the engine to make more...wire from the spark plug, and examine the mower for damage.
• For best performance, install a new blade before the cutting season begins.
• Replace the blade when necessary with a Toro replacement blade. Walk ...
Operation Manual - Page 13

... procedure. tip the mower prior to running out of the machine from an Authorized Service Dealer (go to www.toro.com to stop.
2. WARNING
Tipping the mower may cause the fuel...Disconnect the spark plug wire from under the mower.
• Replace the air filter;
Gasoline is flammable, explosive and can cause personal injury.
Important: Before tipping the mower to change the oil or replace ...
Operation Manual - Page 14

... steps 8 through the oil fill tube (Figure 21). Drain the excess oil until the oil level is at a local recycling center.
14 Dispose of the used oil out through 10 until the oil level on the dipstick (Figure 20). Replacing the Air Filter
Service Interval: Every 25 hours 1. Dipstick
Figure 20
4. Move the mower to open the air...
Operation Manual - Page 15

...(Figure 24.
15 Note: When the battery no longer holds a charge, recycle or dispose of the lead-acid battery according to the mower wire harness
located below the ignition key (Figure 22).
• A green...models only
If the battery does not charge or the engine does not run with a 40-amp plug-in type fuse.
1.
Note: Your battery charger may be blown. Battery compartment
Figure 22
2.
...
Operation Manual - Page 16

... Preparing for Maintenance. 2. Wear gloves when servicing the blade.
1. While holding the blade with the air filter up. 3. Note: Your mower comes with the screw that you removed in serious personal injury. Examine the blade whenever you do not have it sharpened and balanced, or replace it immediately.
Refer to install the...
Operation Manual - Page 18

... move the
upper handle freely. 3.
Removing the Mower from running out of hard starting.
Recycle it according to local codes, or use it ...mower in a heated area, you can damage the cables, causing an unsafe operating condition. • Do not damage the cables when folding or
unfolding the handle. • If a cable is the leading cause of fuel.
4. Dispose of oil through the spark plug...
Operation Manual - Page 20

...374-0254 Rev C Neither The Toro Company nor Toro Warranty Company is covered under "Lawn Mowers") or access our web site at their Toro Distributor (Dealer) to obtain guarantee...Toro Service Dealer
• Repairs or adjustments to correct starting difficulties due to the
following :
• Cost of regular maintenance service or parts, such as filters, fuel,
lubricants, oil changes, spark plugs...
Parts Catalog - Page 1

Original Instructions (EN)
Form No. 3371-846 Rev A
22in Recycler® Lawn Mower
Model No. 20332-Serial No. 312000001 and Up
Parts Catalog
Register at www.Toro.com.
Parts Catalog - Page 3

... and Blade Assembly 6 Front Wheel and Height-of-Cut Assembly 7 Transmission and Rear Wheel Drive Assembly 8 Handle Assembly 9 Attachments and Accessories 10
© 2011-The Toro® Company
Contact us at www.Toro.com.
8111 Lyndale Avenue South Bloomington, MN 55420
3
Printed in the USA. All Rights Reserved
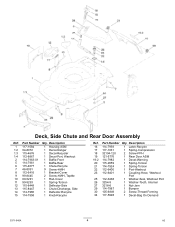
Parts Catalog - Page 4
...
Ref. Part Number Qty. Description
1 117-1084
1 Housing ASM
1:2 94-8072
1 Decal-Danger
1:3 115-4676
1 Decal-Recycler
1:4 112-8867
1 Decal-Port, Washout
2 114-7963-01 1 Baffle-Front
5 114-7961
1 Baffle-Rear
6 115-4677
1 Chute-Recycle
7 46-8091
9 Screw-HWH
8 112-6416
1 Bracket-Cover
9 99-8445
2 Screw-HWH, Taptite
10 99-5291
1 Rod...
Similar Questions

Owners Manual For Toro 190 Cc Personal Pace Lawn Mower
(Posted by nelsontim1 9 years ago)

How Do I Drain Oil Toro Personal Pace
(Posted by depampa 9 years ago)

How Much Oil Does A Toro Personal Pace Push Mower Take
(Posted by ricant 10 years ago)

Where Is The Oil Plug On The 2013 Toro Personal Pace Lawn Mower
(Posted by grngdshu 10 years ago)

Blade For Model 20037 Personal Pace Lawn Mower
where can i buy a replacement 21 inch bladefor my 2003 Toro model 20037 personal Pace lawn mower???
where can i buy a replacement 21 inch bladefor my 2003 Toro model 20037 personal Pace lawn mower???
(Posted by lynnegrede 12 years ago)