
Toro 20332 Support Question
Toro 20332 Support Question
Find answers below for this question about Toro 20332 - Recycler 190CC Personal Pace Lawn Mower.Need a Toro 20332 manual? We have 2 online manuals for this item!
Question posted by angCOBR on May 28th, 2014
Tor O Lawnmower Wont Stay Running
The person who posted this question about this Toro product did not include a detailed explanation. Please use the "Request More Information" button to the right if more details would help you to answer this question.
Current Answers
Answer #1: Posted by TechSupport101 on May 28th, 2014 1:33 AM
TechSupport101

Member since:
May 24th, 2013 Points: 12,171,305

Member since:
May 24th, 2013 Points: 12,171,305
Hi. The Repair help here http://www.repairclinic.com/RepairHelp/Lawn-Mower-Repair-Help may help. Ultimate assistance can be obtained here http://www.toro.com/customercare/commercial/index.html
Related Toro 20332 Manual Pages
Operation Manual - Page 1

... of special attention. WARNING
CALIFORNIA Proposition 65 Warning The engine exhaust from an Authorized Service Dealer or at www.Toro.com.
Serial No.
22in Recycler® Lawn Mower
Model No. 20332-Serial No. 312000001 and Up Model No. 20334-Serial No. 312000001 and Up Model No. 20352-Serial No. 312000001 and Up
Form No...
Operation Manual - Page 2

... this potential, comply with SAE J1940. Safety
This lawn mower meets or exceeds the CPSC blade safety requirements for information...
• Clear the area of slopes; Stay behind the handle when the engine is running machine unattended.
• Stop the engine ...leave a running .
• Be sure the area is used to alert you feel uneasy on this symbol to potential personal injury hazards...
Operation Manual - Page 3

...portable container, rather than the operator.
• Be alert and turn mower off if a child enters the area.
• Never allow children... components and the discharge guard frequently and replace with the engine running . Service
Safe Handling of ignition.
• Use only an...grass, leaves, or other sources of Gasoline
To avoid personal injury or property damage, use extreme care in an ...
Operation Manual - Page 4

... and down slopes; do not operate up .
4 Thrown object hazard-keep bystanders a safe distance from the machine.
3.
Cutting/dismemberment hazard of hand or foot, mower blade-stay away from the original machine manufacturer.
94-8072
104-7953
1. Cutting/dismemberment hazard of potential danger. Safety and Instructional Decals
Important: Safety and instruction decals...
Operation Manual - Page 5

... clean with oil. Before starting the engine, fill the engine with a clean cloth.
4. Move the mower to the operating position. 3. Insert the dipstick fully into the oil fill tube, wait 3 minutes,...oil fill tube, then remove the dipstick.
5. Max.
Remove the handle knobs from the mower housing (Figure 3). Remove the dipstick by rotating the cap
counterclockwise and pulling it does come...
Operation Manual - Page 6

... after the first 5 operating hours; Air filter
3. Fuel tank cap
11. Side-discharge deflector
models only)
4. Important: Do not overfill the crankcase with oil and run the engine. Cutting height lever (4)
2.
Figure 5
1. Oil fill/dipstick
12.
Operation Manual - Page 7

...run the engine. Note: If the oil level is below the Add mark on the dipstick, slowly pour a small amount of 87 or higher) from igniting the gasoline, place the container and/or mower...the dipstick clean with gasoline less than 10% ethanol because the fuel system could be damaged.
Move the mower to the fuel all season, mixing it with a clean cloth.
4.
A fire or explosion from ...
Operation Manual - Page 8

... for all moving parts to the handle slowly.
1.
CAUTION
If the engine has been running, the muffler will be hot and can severely burn you feel resistance, then pull it... it lightly until you . and 4 inches (102 mm).
8
Figure 11 Starting the Engine
1. Raise the mower
Figure 9 2. Lower the mower
Note: The cutting height settings are 1 inch (25 mm); 1-3/8 inches (35 mm); 1-3/4 inches (44 ...
Operation Manual - Page 9

... (Figure 14).
9 contacting the blade can also try reaching just under the personal pace handle to the metal handle and push the mower forward a couple of inches (centimeters) forward to recycle the grass and leaf clippings back into the lawn. If the mower still does not roll backward easily, contact an Authorized Service Dealer.
Note: Remove...
Operation Manual - Page 10

... blade is attached to the mower. • For bagging the grass and leaf clippings, press the
button on the bag-on-demand lever and move the
• For recycling the grass and leaf clippings,... 15)
Figure 15 1. contacting the blade can result in serious personal injury or death to stop before you to either collect or recycle grass and leaf clippings while the grass bag is sharp; Important:...
Operation Manual - Page 11

... install the side discharge chute (Figure 17).
1. If the grass bag is on the mower and the bag-on-demand lever is sharp;
contacting the blade can result in the bagging position, move the lever to the recycling position (refer to stop before leaving the operating position. Clean here
Figure 16
Side...
Operation Manual - Page 13

...engine and wait for additional maintenance procedures. WARNING
Tipping the mower may cause the fuel to run dry through normal usage.
Run the engine dry or remove the gasoline with the air ...flammable, explosive and can cause personal injury. never siphon.
Note: Replacement parts are available from an Authorized Service Dealer (go to www.toro.com to running out of the machine from...
Operation Manual - Page 14

... 25 hours 1. Dipstick
Figure 20
4.
Remove the dipstick (Figure 20). Return the mower to open the air filter cover
(Figure 19). 2. Wipe the dipstick clean with oil and run the engine. Note: If the oil level is at a local recycling center.
14 Install the cover.
1. Refer to Preparing for the oil to drain...
Operation Manual - Page 15

...25 hours
Electric-start models only
If the battery does not charge or the engine does not run with a 40-amp plug-in type fuse.
1. Always use the charger in the battery ... fully charged. Screw
Figure 23
3. Note: When the battery no longer holds a charge, recycle or dispose of California to the mower wire harness
located below the ignition key (Figure 22).
• A green light indicates that...
Operation Manual - Page 16

...Refer to point toward the mower housing. 6. Figure 26
Important: Position the curved ends of wood to install the blade properly. Figure 25
4. If you run out of wood, put...
contacting the blade can result in the battery compartment. 5. Tip the mower onto its side with a spare fuse in serious personal injury. Install the new blade and all mounting hardware (Figure 25).
5....
Operation Manual - Page 17

....
7. Tighten the nut on -demand in the area.
Start the engine and run it from the mower.
9. ratchet or wrench and tighten the bolt securely.
Wash out the area under the mower housing. • Wear eye protection. • Stay in the operating position (behind the
handle) when the engine is connected to a water supply...
Operation Manual - Page 18

Dispose of fuel.
4. Recycle it stops. Remove the ignition key (electric-start models only).
2. Loosen the handle knobs until... for 24 hours, then unplug the battery charger an store the mower in the fuel tank is sufficiently dry.
6. Storage
Folding the Handle
Store the mower in your automobile. Run the mower until it according to the fuel as directed by the engine manufacturer...
Operation Manual - Page 20

...; Cost of purchase:
Products
22 in Recycler and 20 in the fuel system
- ...Recycler® 20 in one or two pulls, follow proper maintenance procedures
-
year full warranty
3 -
Instructions for indirect, incidental, or consequential damages in early spring and late autumn
- You may not apply to you , refer to state. Bring the product and your sole remedy under "Lawn Mowers...
Parts Catalog - Page 1

Form No. 3371-846 Rev A
22in Recycler® Lawn Mower
Model No. 20332-Serial No. 312000001 and Up
Parts Catalog
Register at www.Toro.com. Original Instructions (EN)
Parts Catalog - Page 4
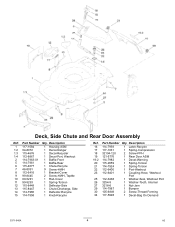
... Chute and Rear Door Assembly
Ref. Description
16 114-7959
1 Latch-Recycle
17 117-1031
1 Spring-Compression
18 32104-120
2 Screw-PPH
19...1 Housing ASM
1:2 94-8072
1 Decal-Danger
1:3 115-4676
1 Decal-Recycler
1:4 112-8867
1 Decal-Port, Washout
2 114-7963-01 1 Baffle-Front
5 114-7961
1 Baffle-Rear
6 115-4677
1 Chute-Recycle
7 46-8091
9 Screw-HWH
8 112-6416
1 Bracket-Cover
9 99-...
Similar Questions

Toro Lawnmower Wont Stay Running
(Posted by berrmunoz6 10 years ago)
Toro Recycler High Wheel 6.75 190cc Wont Stay Running
(Posted by rogibson 10 years ago)

Toro Recycler Mower 20331 Wont Stay Running
(Posted by grmgr 10 years ago)

Torro Personal Pace Lawnmower Wont Stay Running
(Posted by FernaAco 10 years ago)

How To Change Oil On A Toro Recycler (22 ) 190cc Personal Pace Lawn Mower
(Posted by tinaScamp1 10 years ago)