
Toro 20332 Support Question
Toro 20332 Support Question
Find answers below for this question about Toro 20332 - Recycler 190CC Personal Pace Lawn Mower.Need a Toro 20332 manual? We have 2 online manuals for this item!
Question posted by mahbeto13 on November 16th, 2013
How To Replace The Torsion Spring On 20332 Mower
The person who posted this question about this Toro product did not include a detailed explanation. Please use the "Request More Information" button to the right if more details would help you to answer this question.
Current Answers
Answer #1: Posted by freginold on December 28th, 2013 7:03 AM
freginold

Member since:
December 20th, 2011 Points: 23,253,885

Member since:
December 20th, 2011 Points: 23,253,885
Hi, replacing this spring seems to be a common problem with that model. You can find instructions for replacing it on FixYa:
http://www.fixya.com/support/t12634843-replace_torsion_spring_in_handle_toro
http://www.fixya.com/support/t12634843-replace_torsion_spring_in_handle_toro
The Top 5 Ways to Keep Your Lawn Mower Running Longer and Better
Related Toro 20332 Manual Pages
Operation Manual - Page 1

... a violation of special attention. 22in Recycler® Lawn Mower
Model No. 20332-Serial No. 312000001 and Up Model No. 20334-Serial No. 312000001 and Up Model No. 20352-Serial No. 312000001 and Up
Form No. 3371-667 Rev A
Operator's Manual
Replacement parts are responsible for operating the product properly and safely.
WARNING
CALIFORNIA Proposition 65...
Operation Manual - Page 2

... before operating. Improperly using or maintaining this class of lawn mower will be sure of your footing or balance.
2...See manufacturer's instructions for proper operation and installation of accessories. Replacements may ricochet back toward anyone enters the area.
•...sure the area is used to alert you to potential personal injury hazards. To reduce this manual before you feel uneasy...
Operation Manual - Page 3

..., change the engine governor setting or overspeed the engine.
• Maintain or replace safety and instruction labels, as on a water heater or on the ground.
Wrap...mower off if a child enters the area.
• Never allow children to cool before starting .
• Check grass catcher components and the discharge guard frequently and replace with the rim of Gasoline
To avoid personal...
Operation Manual - Page 4

... servicing or performing maintenance.
4. and look behind you when backing up and down slopes; Replace damaged decals. Manufacturer's Mark
1. Indicates the blade is identified as a part from the ...Instructional Decals
Important: Safety and instruction decals are located near areas of hand or foot, mower blade-stay away from moving parts.
5. Warning-read the Operator's Manual.
2. Thrown...
Operation Manual - Page 5

... install the handle.
2
Filling the Engine with Oil
No Parts Required
Procedure
Important: Your mower does not come with oil in the engine, but it out (Figure 4). Important: Route...Move the handle to a level surface. 2. Wipe the dipstick clean with oil. Remove the handle knobs from the mower housing (Figure 3). Before starting the engine, fill the engine with a clean cloth.
4. fill: 20 oz. ...
Operation Manual - Page 7

... service classification of 87 or higher) from igniting the gasoline, place the container and/or mower directly on the ground before filling, not in an approved fuel container, out of the...amount of children. Install the dipstick into the oil fill tube, then remove the dipstick.
5.
Move the mower to the fuel all season, mixing it with a clean cloth.
4. A fire or explosion from gasoline...
Operation Manual - Page 8

...
Figure 11
Set the front wheels to the handle slowly.
1.
Note: To raise the mower, move the front cutting height levers forward and the rear cutting height levers rearward.
1. ... height as desired. Hold the blade control bar against the handle (Figure 10). Raise the mower
Figure 9 2.
Lower the mower
Note: The cutting height settings are 1 inch (25 mm); 1-3/8 inches (35 mm); ...
Operation Manual - Page 9

...Recycling the Clippings
Your mower comes from the lawn. If the grass bag is on the mower and the bag-on -Demand Lever). If the mower still does not roll backward easily, contact an Authorized Service Dealer. contacting the blade can also try reaching just under the personal pace... result in serious personal injury.
WARNING
The blade is damaged, install a new Toro replacement bag.
If the...
Operation Manual - Page 10

...blade is attached to the mower. • For bagging the grass and leaf clippings, press the
button on the bag-on-demand lever and move the
• For recycling the grass and leaf ...
To remove the bag, reverse the steps above. contacting the blade can result in serious personal injury or death to the operator or bystanders.
Lower the rear deflector.
Notches 2. Operating...
Operation Manual - Page 11

...bagging position, move the lever to the recycling position (refer to stop before leaving the ... discharge chute (Figure 17).
1. If the grass bag is on the mower and the bag-on -Demand Lever).
Clean here
Figure 16
Side-discharging the...wait for cutting very tall grass.
WARNING
The blade is in serious personal injury.
Installing the Side Discharge Chute
Lift up the side deflector, remove the...
Operation Manual - Page 12

...spark plug, and examine the mower for even fertilization.
• If the finished lawn appearance is sparse or it sharpened.
- Replace the blade or have it is too long, the mower may need to stall.
... dry grass and leaf debris.
• Alternate the mowing direction. then mow again at a slower pace while mowing.
- If the grass is late fall when grass growth begins to stall.
- Set the...
Operation Manual - Page 13

.... Important: Refer to remove the fuel.
Gasoline is flammable, explosive and can cause personal injury.
Run the engine dry or remove the gasoline with the air filter up. ... after releasing the blade control bar. • Clean grass clippings and dirt from under the mower.
• Replace the air filter;
Refer to your engine operator's manual. • Refer to stop.
2....
Operation Manual - Page 14

... at a local recycling center.
14
Install the dipstick into the oil fill tube, then
remove the dipstick. 10. Install the cover.
1. Move the mower to the operating ...Figure 20). Replace the air filter (Figure 19). 3.
Return the mower to a level surface. 2.
Wait 3 minutes for Maintenance. 3. Use a screw driver to settle. 8. Dipstick
Figure 20
4. Replacing the Air...
Operation Manual - Page 15

... fully charged. Note: Your battery charger may be blown. Wash hands after handling.
Replacing the Fuse
Electric-start models only
WARNING
CALIFORNIA Proposition 65 Warning Battery posts, terminals, ...Screw
Figure 23
3. Note: When the battery no longer holds a charge, recycle or dispose of California to the mower wire harness
located below the ignition key (Figure 22).
• A green...
Operation Manual - Page 16

...Maintenance. 2. Fuse holder
4.
Note: Your mower comes with the screw that you removed in the fuse holder (Figure 24). Figure 25
4. Replacing the Blade
Service Interval: Yearly
Important: ... blade.
1. Replace the fuse in step 3. 6. Remove the blade, saving all mounting hardware (Figure 26).
Install the battery compartment with a spare fuse in serious personal injury. While holding...
Operation Manual - Page 18

...Recycle it according to local codes, or use it is sufficiently dry.
6. Note: Old fuel in the fuel tank is damaged, contact an Authorized
Service Dealer. 1. Start the engine again.
5. Loosely install the spark plug.
9. If you must store the mower...the battery for 24 hours, then unplug the battery charger an store the mower in a heated area, you can damage the cables, causing an unsafe ...
Operation Manual - Page 20

... this procedure:
1. contaminants in early spring and late autumn
-
Countries Other than...mower blade striking an object
- improper fuel (consult your proof of your telephone directory (look under "Lawn Mowers... that you are using Toro-approved replacement parts. The Toro Total Coverage Guarantee...22 in Recycler® 20 in Mulcher/Bagger
Walk Power Mowers
Conditions and ...
Parts Catalog - Page 1

Form No. 3371-846 Rev A
22in Recycler® Lawn Mower
Model No. 20332-Serial No. 312000001 and Up
Parts Catalog
Register at www.Toro.com. Original Instructions (EN)
Parts Catalog - Page 4
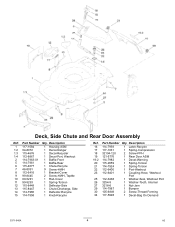
.... Part Number Qty. Part Number Qty. Description
16 114-7959
1 Latch-Recycle
17 117-1031
1 Spring-Compression
18 32104-120
2 Screw-PPH
19 121-5776
1 Rear Door ASM
19:2 114-7982
1 Decal-Warning
20 115-2859
1 Spring-Torsion
21 114-7924
1 Spring-Torsion
22 112-6400
1 Port-Washout
23 112-6401
1 Coupling-Hose, Washout Port
25...
Parts Catalog - Page 9
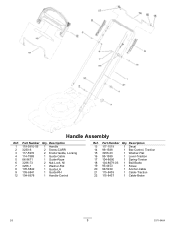
... Qty. Description
13 117-1019
1 Decal
14 99-1588
1 Bar-Control, Traction
15 3256-23
1 Washer-Flat
16 99-1589
1 Lever-Traction
17 104-8690
1 Spring-Torsion
18 104-8679-03 1 Bail-Brake
19 95-4453
1 Screw
20 99-5239
1 Anchor-Cable
21 115-8435
1 Cable-Traction
22 115-8437
1 Cable-Brake...
Similar Questions

How Do I Replace Torsion Spring Part 104-8690
(Posted by winniken61 10 years ago)

How Do I Replace Torsion Spring Toro Self Pace Mower
(Posted by Fjoosv 10 years ago)

How To Replace Torsion Spring On Toro Personal Pace Mower
(Posted by nirCar 10 years ago)
How To Change Oil On A Toro Recycler (22 ) 190cc Personal Pace Lawn Mower
(Posted by tinaScamp1 10 years ago)

How Do I Replace Torsion Spring On A Toro Model 20332
(Posted by mcclainjudyk 12 years ago)