
Toro 20332 Support Question
Toro 20332 Support Question
Find answers below for this question about Toro 20332 - Recycler 190CC Personal Pace Lawn Mower.Need a Toro 20332 manual? We have 2 online manuals for this item!
Question posted by sjgraf5 on April 3rd, 2013
How Do I Remove The Brass Plate That Holds The Left Rear Wheel On?
The person who posted this question about this Toro product did not include a detailed explanation. Please use the "Request More Information" button to the right if more details would help you to answer this question.
Current Answers
Related Toro 20332 Manual Pages
Operation Manual - Page 1

...identifies potential hazards and has safety messages identified by residential homeowners. Model and serial number plate
Write the product model and serial numbers in the USA
All Rights Reserved It is ... serial numbers on any forest-covered, brush-covered, or grass-covered land. 22in Recycler® Lawn Mower
Model No. 20332-Serial No. 312000001 and Up Model No. 20334-Serial No. 312000001 and Up...
Operation Manual - Page 2

..., discharge guard, rear guard, or other hidden objects. walk; If you feel uneasy on the machine and in the manual(s) before cleaning the machine, removing grass catcher, or.... Safety
This lawn mower meets or exceeds the CPSC blade safety requirements for proper operation and installation of lawn mower will be sure of production. Failure to potential personal injury hazards. Stop...
Operation Manual - Page 3

...or container opening at all cigarettes, cigars, pipes, and other sources of Gasoline
To avoid personal injury or property damage, use a nozzle lock-open flame, spark, or pilot light ...Use only an approved gasoline container.
• Never remove gas cap or add fuel with manufacturer's recommended parts, when necessary.
• Mower blades are explosive.
• Extinguish all times until ...
Operation Manual - Page 4

...; Warning-read the Operator's Manual for information on slopes; Warning-read the instructions before leaving the operating position; Cutting/dismemberment hazard of hand or foot, mower blade-remove the ignition key and read the Operator's Manual.
2. Replace damaged decals. contains lead; stop the engine before servicing or performing maintenance.
4. Unlock
114-7982...
Operation Manual - Page 5

...1. Figure 3
2. Dipstick
Figure 4
3. Read the oil level on the dipstick (Figure 4).
5 Move the mower to the operating position. 3. Note: If the oil level is below the Add mark on the dipstick, slowly...of oil in the crankcase, then do the following: 1.
Setup
Important: Remove and discard the protective plastic sheet that you install the handle.
2
Filling the Engine with...
Operation Manual - Page 8

... height. Hold the blade control bar against the handle (Figure 10). Note: To raise the mower, move the front cutting height levers forward and the rear cutting height...mower, move the front cutting height levers rearward and the rear cutting height levers forward. Set the front wheels to the same height as desired.
Adjust the cutting height as the rear wheels (Figure 9).
Raise the mower...
Operation Manual - Page 9

... reaching just under the personal pace handle to the metal handle and push the mower forward a couple of inches (centimeters) forward to stop before recycling the clippings.
Note: If the mower does not start models only). If the grass bag is on the mower and the bag-on the mower, remove it is in serious personal injury or death...
Operation Manual - Page 10

..., remove any grass clippings and debris from one position to the operator or bystanders. Also, an open rear discharge...personal injury or death to another. Bag-on the handle (Figure 14).
3. Removing the Grass Bag
To remove the bag, reverse the steps above. Stop the engine and wait for all moving parts to the mower...recycle grass and leaf clippings while the grass bag is sharp; Lower the...
Operation Manual - Page 11

... is on the mower and the bag-on -Demand Lever). Figure 17
Removing the Side Discharge Chute
To remove the side discharge chute, lift up the side deflector and install the side discharge chute (Figure 17).
1.
contacting the blade can result in the bagging position, move the lever to the recycling position (refer to...
Operation Manual - Page 12

...lawn, set the front wheels at 2-1/8-inch (54 mm) and the rear wheels...If the mower strikes an ...mower free of cutting a full swath with each pass.
- If the grass is too long, the mower...mower for even fertilization.
• If the finished lawn...the lawn shows through ...mow over the lawn for damage....8226; After cutting the lawn, ensure that half of ...to slow down your mower.
- Replace the blade or...
Operation Manual - Page 13

... and wait for any maintenance procedure. never siphon. Maintenance
Note: Determine the left and right sides of fuel, use or daily
Every 25 hours Before storage
Yearly...mower to change the oil or replace the blade, allow the fuel tank to leak.
Gasoline is flammable, explosive and can cause personal injury.
Preparing for additional maintenance procedures. Run the engine dry or remove...
Operation Manual - Page 14

... Note: If the oil level is at a local recycling center.
14 Drain the excess oil until the oil ... of oil in
the crankcase. 7. Move the mower to the operating position. 6. Return the mower to a level surface. 2.
Wipe the dipstick clean...Full mark on the dipstick. Remove the dipstick (Figure 20).
Install the dipstick into the oil fill tube, then
remove the dipstick. 10.
Wait ...
Operation Manual - Page 15

...).
1. Rear deflector 2. Remove the screw that secures the battery compartment, pull out the battery, and locate the fuse (Figure 24.
15 Charge the battery for 24 hours initially, then monthly (every 25 starts) or as needed. Always use the charger in the battery compartment area.
3. Note: When the battery no longer holds a charge, recycle...
Operation Manual - Page 16

...mower comes with the air filter up. 3.
WARNING
The blade is damaged or cracked, replace it . Figure 26
Important: Position the curved ends of wood, put your weight behind the
16 Lower the rear deflector. If the blade is sharp; While holding... personal injury. Install the battery compartment with a block of the blade to hold the blade steady
(Figure 25). Figure 25
4. Remove ...
Operation Manual - Page 18

... mower in a heated area, you can damage the cables, causing an unsafe operating condition. • Do not damage the cables when folding or
unfolding the handle. • If a cable is sufficiently dry.
6. Recycle ... engine, it is damaged, contact an Authorized
Service Dealer. 1. Remove the ignition key (electric-start models only). Figure 29
4. Removing the Mower from the spark plug.
7.
Parts Catalog - Page 2
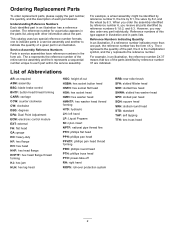
... example, a wheel assembly might be identified by reference number 6, the tire by 6:1, the valve by 6:2, and the wheel by reference number... head HWHTF: hex washer head thread forming HYD: hydraulic LH: left hand LP: Liquid Propane NI: nylon insert NPTF: national pipe...off RH: right hand ROPS: roll-over protection system
RRB: rear roller brush SFH: slotted fillister head SHH: slotted hex head SHWH...
Parts Catalog - Page 3

Contents
Deck, Side Chute and Rear Door Assembly 4 Rear Bag Assembly 5 Engine and Blade Assembly 6 Front Wheel and Height-of-Cut Assembly 7 Transmission and Rear Wheel Drive Assembly 8 Handle Assembly 9 Attachments and Accessories 10
© 2011-The Toro® Company
Contact us at www.Toro.com.
8111 Lyndale Avenue South Bloomington, ...
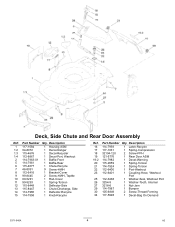
Parts Catalog - Page 4
...-8449
1 Deflector-Side
13 115-8447
1 Chute-Discharge, Side
14 114-7960
1 Deflector-Recycle
15 114-7958
1 Knob-Recycle
Ref. Description
16 114-7959
1 Latch-Recycle
17 117-1031
1 Spring-Compression
18 32104-120
2 Screw-PPH
19 121-5776
1 Rear Door ASM
19:2 114-7982
1 Decal-Warning
20 115-2859
1 Spring-Torsion
21 114...
Parts Catalog - Page 7

...Plate-HOC, Front
2 322-3
4 Screw-HH
3 3296-29
6 Nut-Lock, NI
4 105-1818
2 Bushing-Mount, HOC
5 105-1807
2 Arm-Pivot, Front
6 105-1809
2 Arm-Spring
7 110-0549
2 Knob-HOC
8 105-3048
2 Washer-Flat
9 322-6
2 Screw-HH
10 40-1940
2 Washer
11 614650
2 Bolt-Shoulder
12 115-2894
2 8 Inch Wheel... ASM
C2
7
3371-846A Front Wheel and Height-of-Cut Assembly
Ref.
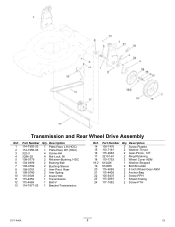
Parts Catalog - Page 8
...
19 614650
2 Bolt-Shoulder
20 115-4695
2 8 Inch Wheel Gear ASM
21 115-8406
2 Anchor-Bag
22 105-9437
2 Screw-PPH
23 115-2893
1 Shield-Trailing
24 117-1092
2 Screw-PTH
3371-846A
8
C3 Description
1 114-7955-03 1 Plate-Rear, LH (HOC)
2 114-7956-03 1 Plate-Rear, RH (HOC)
3 322-3
4 Screw-HH
4 3296-29
4 Nut...
Similar Questions

Rear Wheels Lock
My rear wheels on my Toro Personal Pace 20333 lock when I pull it backward. What would cause this an...
My rear wheels on my Toro Personal Pace 20333 lock when I pull it backward. What would cause this an...
(Posted by weks3 9 years ago)

Is There Traction In Both Rear Wheels Of A Toro Personal Pace Lawn Mower
(Posted by moccooli 10 years ago)

Toro Recycler Personal Pace Lawn Mower Wont Start
(Posted by barnejon 10 years ago)

2011 Toro Recycler Personal Pace Lawn Mower Wont Stay Running
(Posted by EssTss4 10 years ago)

How To Change Oil On A Toro Recycler (22 ) 190cc Personal Pace Lawn Mower
(Posted by tinaScamp1 10 years ago)