Thermador T30IR800SP Support Question
Thermador T30IR800SP Support Question
Find answers below for this question about Thermador T30IR800SP.Need a Thermador T30IR800SP manual? We have 2 online manuals for this item!
Question posted by peterelaning on December 17th, 2015
Carbon Filter Location On A T30ib800sp/17
I looked in the manual that came with the unit, but the little door holding the filter near the top of the inside on the left is not there.
Current Answers
Answer #1: Posted by waelsaidani1 on December 27th, 2015 10:39 PM
waelsaidani1

Member since:
May 12th, 2013 Points: 19,501,797

Member since:
May 12th, 2013 Points: 19,501,797
Related Thermador T30IR800SP Manual Pages
Installation Manual - Page 7

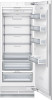
Appliance is very heavy:
Refrigerator 24" approx. 310 Ibs/140 kg
Refrigerator 30" approx. 350 Ibs/158 kg
Freezer 18"
approx. 255 Ibs/115 kg*
Freezer 24"
approx. 300 Ibs/135 kg*
Freezer 30"
approx. 335 Ibs/150 kg*
Wine unit 18
"approx. 300 Ibs/135 kg
Wine unit 24
"approx. 360 Ibs/160 kg...
Installation Manual - Page 8

... receptacle. Appliance
Refrigerator 24" Refrigerator 30" Freezer... not use an adapter. Do not use a self-piercing valve!
IceMaker) Wine unit 18" Wine unit 24"
Maximal load at the side on the right (a), at one time 2.0 Ampere 2.0 ...Do not use an extension cord.
The receptacle must be located at the side on the left (b) or underneath (c). A cold water connection is recommended...
Installation Manual - Page 10

...beam (cross section min. 3" x 4") as an
alternative tip protection, length according to Refrigerator. Panel unification part (Metal strip) FPCONNTS10 For connection of the water pipe (without further ...4' (1,2 m) Can be used for standard height door panels without fittings): 13/32" (10 mm). Maximum outer diameter of two door panels.
Other required accessories
Ice maker installation kit...
Installation Manual - Page 11

...for various appliance types:
Refrigerator units
Freezer units
Freezer units with ice maker
Freezer units with ice maker). If in transit...door again. Check the floor. Check location of the adjacent cabinet/fixtures.
Check location of your dealer. Check attachment of the socket.
Save adhesive tape which protect the shelves and storage compartments inside...
Installation Manual - Page 12

... raise up the appliance, observe the required minimum height at the installation location according to prevent it in an upright position, the appliance can be transported... strips for a wine unit, see "Attaching the cover strips"
Door limitation pin, see "Preparing to connect the water" an "Connecting the water to a suitable installation location with the manual sections.
5.
If the...
Installation Manual - Page 14
...ensure that the beam can be attached securely.
4. 2. Depending to the subsurface: Locate wall studs in the rear of screws according to the installation enclosure width, thereby ...the
installation enclosure.
14
These are provided after section C.
Change over door hinge, see "Changing over the door hinges".
Sealing mat, see "Removing/ changing over the sealing mat"...
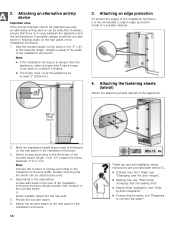
Installation Manual - Page 17
... top of the appliance fix the attachment plate side lugs (top) to the side of the fastening sheets (lateral) with the cabinet parts located next to the appliance".
17 Note: In the case of a side-by-side installation connect both cover rails to the bolt included in the installation accessories for side...
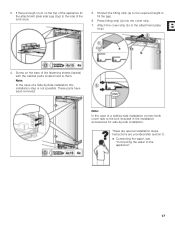
Installation Manual - Page 30
... by leaking water.
1. Preparing to connect the water
(only for appliances which require a water connection)
Note:
Turn off valve according to the attachment plate (top):
17. Install the water line. 14.
Installation Manual - Page 31
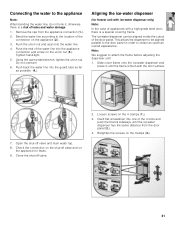
...We suggest to attach the frame before adjusting the dispenser unit!
1. Push back the water line into one of the 4...inside the cutout of the connection on the 4 clamps (1.).
3. Loosen screws on the appliance (2.).
3.
Using the open-ended wrench, tighten the union nut.
Close the shut-off valve and main water tap.
8. Bend the water line according to the location of the door...
Use and Care Manual - Page 3
...location 5
Ventilation 5 Connecting the appliance 5
Electrical connection 5 Getting to know your appliance 6
Controls 7 Switching the appliance on 7
Operating tips 7 Set the language 7 Setting the temperature 8
Refrigerator...Interior fittings 10 Removing the shelves 10 Drawer in the refrigerator compartment 10 Removing the humidity filter in the "cool-fresh" container 11
Switching off ...
Use and Care Manual - Page 4

...Do not use any adapter plugs.
This appliance is intended for subsequent use electrical appliances inside the appliance (e.g. en-us
, Safety and warning information
Safety and warnin g information
Definition...damage the refrigerant tubes. Leaking refrigerant may be purchased from the power cord. Do not pull out the mains plug by an electrician only. Otherwise, parts and door seal ...
Use and Care Manual - Page 5
...refrigeration unit is ventilated only via a correctly installed socket with regard to set-up .
Connecting the appliance
After installing the appliance, wait at least two persons are connected directly to direct sunlight and not placed near... cord. Connect the appliance to electronic energy saver plugs. The location of the appliance (see chapter "Cleaning the appliance"). Sine-controlled...
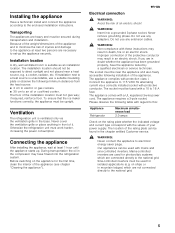
Use and Care Manual - Page 6

The diagrams may differ.
1 Light switch 2 Controls 3 Glass shelf in the refrigerator compartment 4 Snack-box 5 Fruit and vegetable container 6 Selection buttons "cool-fresh" container 7 "Cool-fresh" container 8 Ventilation 9 Butter and cheese compartment 10 Door shelf 11 Storage compartments for large bottles
6 en-us
Getting to know your appliance
These operating instructions refer to...
Use and Care Manual - Page 7
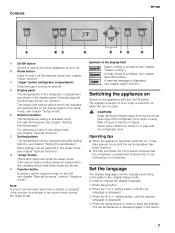
... on the display panel in the display field Super cooling is open.
, CAUTION:
Keep hands and fingers away from front and rear openings of the refrigerator door when closing. The appliance begins to store the settings. Press the setup button, in the chapter Setup mode.
G "setup" button This button starts and ends...
Use and Care Manual - Page 8
....
2. en-us
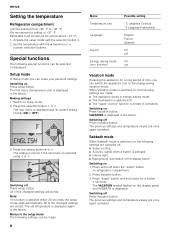
Setting the temperature
Refrigerator compartment
(can switch the appliance over to +46 °F) We recommend a setting of +37 °F. The first menu (temperature unit) is ended (if activated). Switch on Press setup button.
The previous settings and temperature values are stored. Press and hold down the "super" button
on the display...
Use and Care Manual - Page 9

...¿, until ECO MODE
and the current setting (ON) is the ideal storage location for ready products and bottled products. Switching off 1.
Observe the best-before date ... placing large quantities of your food. Remedial action Press the alarm button and close the door. The refrigerator compartment is displayed. 3.
When purchasing food, please note:
The "purchase freshness" is ...
Use and Care Manual - Page 10

...which sets the ideal humid climate. The ideal storage location for the shelf-life of your food.
Shelves inside the appliance and the door shelves as tomatoes, aubergines, zucchini, capsicums, cucumbers...selection is covered by a special filter which are fresh and are to cold (e.g. en-us
"Cool-fresh" container
The temperature in the refrigerator compartment
1. Selection buttons for ready ...
Use and Care Manual - Page 11

...the On/Off button. The rinsing water must not run into the light. 4. Wipe the door seal with a steam cleaner!
, CAUTION:
■ Do not use abrasive or acidic cleaning ...
water and a little pH neutral washing-up liquid. Refrigeration unit and light switch off . 2. Clean the appliance. 4. Before cleaning: Switch the appliance off . Then, pull out the humidity filter. Defrosting
Defrosting is...
Use and Care Manual - Page 12

... not free-standing Please move the appliance away from each other Move the bottles or receptacles slightly away from adjacent units or appliances. refrigeration units, fan). Bottles or receptacles are touching each other .
12 en-us
Light (LED)
Your appliance features a ... them.
Tips for saving energy
■ Install the appliance in direct sunlight or near a heat source (e.g.
Use and Care Manual - Page 14
...in a shop (not as an exhibit, "as is in a remote location (more than the normal, usual and designated way (including inter alia ... would have the product repaired by somebody other structures or objects near the product. Expired warranty: Thermador is neither legally nor in ...for the product if it was purchased in the United States or Canada and has never left the country in which it is " or ...
Similar Questions

Water Filter Stuck
I have removed several in the past; this one is stuck. Why can't I get the filter to exit the sleeve...
I have removed several in the past; this one is stuck. Why can't I get the filter to exit the sleeve...
(Posted by erichoffman2000 2 years ago)


Thermador Frig.
i need to buy the odor filter. what is the part number? where is filter located in the frig?
i need to buy the odor filter. what is the part number? where is filter located in the frig?
(Posted by QTRMANSD 7 years ago)

Part Number For Water And Carbon Air Filters
Part number for water and carbon air filters for the Thermador Refrigerator T36BT810NS
Part number for water and carbon air filters for the Thermador Refrigerator T36BT810NS
(Posted by cs61078 8 years ago)
