2007 Suzuki Grand Vitara Support Question
2007 Suzuki Grand Vitara Support Question
Find answers below for this question about 2007 Suzuki Grand Vitara.Need a 2007 Suzuki Grand Vitara manual? We have 1 online manual for this item!
Question posted by Cheekymonkey601 on January 27th, 2014
Where Is The Oil Dipstick Located
Where is the oil dipstick located on a 2007 grand vitara
Current Answers
Related Manual Pages
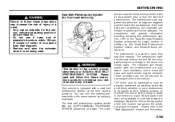
Owner's Manual - Page 3

This owner's manual applies to the GRAND VITARA series:
66J001
NOTE: The illustrated model is one of the GRAND VITARA series.
© COPYRIGHT SUZUKI MOTOR CORPORATION 2006
Owner's Manual - Page 5
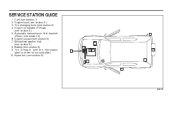
SERVICE STATION GUIDE
1. 2. 3. 4. 5. 6. 7. 8. 9. 10. Fuel (see section 1) Engine hood (see section 5) Tire changing tools (see section 5) Engine oil dipstick (see section 9) Automatic transmission fluid dipstick (see section 9) Engine coolant (see section 9) Windshield washer fluid (see section 9) Battery (see section 9) Tire pressure (see tire information label on driver's door lock pillar) ...
Owner's Manual - Page 7

... cap message 7. Air conditioner warning label 12. Side air bag warning label 14. Rear center seat belt warning label 16. Passenger seat belt warning label 4. LOCATION OF WARNING MESSAGES
Read and follow all of the warnings (labels etc.) on your SUZUKI dealer. 1. If a label comes off or the messages become difficult...
Owner's Manual - Page 8
Be sure to read "Important Vehicle Design Features to recycle, trade in, or properly dispose of, as appropriate, used motor oil, coolant, and other changes, there may result in loss of additional information, or if you start driving. SUZUKI MOTOR CORPORATION believes in structure. If you ...
Owner's Manual - Page 16

... DRIVING
Door Locks
WARNING
Always lock all doors simultaneously, insert the key in the driver's door lock, or • Pushing the power door locking switch located on the door panel of the vehicle. To lock a rear side door from inside the vehicle, turn the key to unlock the door.
Owner's Manual - Page 31

... in the mirrors. BEFORE DRIVING
Outside Rearview Mirrors Power Mirror Control (if equipped)
Seat Adjustment
WARNING
Never attempt to control the power rearview mirrors is located on the driver's door panel. The passenger's side mirror is a convex (curved surface) mirror. To avoid excessive seat belt slack, which you can adjust the...
Owner's Manual - Page 32

... are designed to lock the seatback in the upright position. After adjustment, try to move the seat forward and rearward to ensure that it is located under the front of the seat, move the seatback to the desired position, and release the lever to offer maximum protection when seatbacks are in...
Owner's Manual - Page 36

... shoulder belt irritates the neck or face, move the child closer to secure a child restraint system in the event of seat belt webbing by polishes, oils, chemicals and particularly battery acid. If this happens, let the belt go back to offer maximum protection when seatbacks are properly restrained. under should always...
Owner's Manual - Page 46

... child restraints in the child restraint owner's manual. Take care not to the instructions provided by the child restraint system manufacturer. NOTE: Although there are located where the rear of the seat cushion meets the bottom of the seatback. Tighten the lower straps as described in the rear seat. You can...
Owner's Manual - Page 48

Make sure they are located on
2-34 Install the child restraint system as follows: 1) Remove the luggage compartment ...folded. Some child restraint systems require the use of the rear seat as shown. (Refer to the corresponding anchor located directly behind the child restraint. Incorrectly attached top strap will reduce the intended effectiveness of the child restraint system. An...
Owner's Manual - Page 49
... the shoulder belt to be positioned incorrectly. • Make sure to use by pregnant women, and should be used for the person, vehicle and seating location it is not being used upon approval by their medical advisors. • Remove and stow the extender when it is not long enough, see your...
Owner's Manual - Page 50
... seat belt so the belt fits the occupant's body more snugly in the vehicle. Adjust the belt so the lap portion of the belt is located in addition to the "Seat Adjustment" section and the instruc- Please read and follow ALL these instructions may be released. BEFORE DRIVING
WARNING
Failure to...
Owner's Manual - Page 53

... to the "ON" position, or the "AIR BAG" light stays on, or comes on the instrument cluster does not blink when the ignition switch is located behind the center pad of the
2-39 BEFORE DRIVING
Front Air Bags EXAMPLE
air bag. The front passenger's front air bag is first turned to...
Owner's Manual - Page 54

... seat belts. Also, your protection, ALWAYS WEAR YOUR SEAT BELTS. BEFORE DRIVING
Front air bags will probably not inflate
65D237
64J033
Side air bags are located in the part of the front seatbacks closest to the doors. Remember, since they would offer no system can prevent all possible injuries that no...
Owner's Manual - Page 55

They are molded into the pillar to identify the location of the vehicle that may occur in the roof lining. Be aware that no ... air bags will probably not inflate
64J036 64J034
Side curtain air bags are located in an accident.
54G027
2-41 BEFORE DRIVING
side air bag cover to identify the location of accidents. Remember, since they would offer no system can prevent all ...
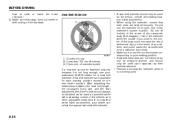
Owner's Manual - Page 151
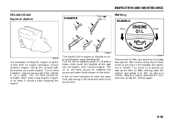
... the way into the engine, then remove it to keep the engine oil at least 5 minutes after stopping the engine. Pull out the oil dipstick, wipe oil off with the vehicle on the dipstick. INSPECTION AND MAINTENANCE
Oil Level Check
Engine oil dipstick
EXAMPLE
FULL ADD
Refilling EXAMPLE
Open Close
52D084 52D030
It is important to idle for...
Owner's Manual - Page 155

... bottom of the hole with gear oil. Set parking brake and stop the engine. 2) Remove the oil filler plug (1). 3) Check the inside of the plug hole, the oil level is low, add gear oil through the filler plug hole (1) until the oil level reaches the bottom of the above locations, use the following procedure: 1) Park the...
Owner's Manual - Page 157

... read the fluid level.
9-16 The fluid level should be correct. 3) Park your foot on the dipstick. 7) Add just enough specified fluid through each range.
Changing Oil
52D032
The handle of the A/T fluid dipstick is recommended that you have just driven the vehicle for easy identification. WARNING
Be sure to the "P" (Park) position...
Owner's Manual - Page 208

...located on the driver's door lock pillar. ITEM: Steering Toe-in Camber angle Caster angle ITEM: Capacities (approx.) Coolant Fuel tank Engine oil (replaced with filter) Transmission oil Differential gear oil...2° 30'
M/T A/T front 2WD 4WD with a transfer switch without a transfer switch rear
Transfer gear box oil Extension case oil
8.2 L (17.3 US pt) 66 L (17.4 US gal) 4.8 L (10.1 US pt) 1.9 ...
Owner's Manual - Page 216
... Mobil ATF 3309 Tire cold pressure: See the "Tire Information Label" located on the driver's door lock pillar.
SERVICE STATION INFORMATION
Fuel recommendation: See page 1-1 Engine oil recommendation: Engine oil with "Starburst" symbol For further details, see "Engine Oil and Filter" in Japan GRAND VITARA 99011-66J21-03E
Made from 100% recycled paper, except for cover.
Similar Questions

What Engine Oil To Use For Grand Vitara 2011
(Posted by LUCIJjho 9 years ago)

Where Is The Rear Washer Fluid For 2007 Grand Vitara
(Posted by CamaJUAN 10 years ago)

