
Stihl MS 251 Support Question
Stihl MS 251 Support Question
Find answers below for this question about Stihl MS 251.Need a Stihl MS 251 manual? We have 1 online manual for this item!
Question posted by bobadams600 on June 15th, 2021
How Do You Remove The Handle Moulding On A Stihl Ms251c?
How do you remove the Handle Moulding on a Stihl MS251C?
Current Answers
Answer #1: Posted by SonuKumar on June 15th, 2021 8:08 AM
SonuKumar

Member since:
May 9th, 2021 Points: 16,633,680

Member since:
May 9th, 2021 Points: 16,633,680
https://www.stihlusa.com/webcontent/cmsfilelibrary/instructionmanuals/stihl-ms-021-023-025-owners-instruction-manual.pdf
https://www.youtube.com/watch?v=jCrHW50H4-U
https://www.youtube.com/watch?v=jCrHW50H4-U&t=9
https://www.youtube.com/watch?v=jCrHW50H4-U&t=58s
Please respond to my effort to provide you with the best possible solution by using the "Acceptable Solution" and/or the "Helpful" buttons when the answer has proven to be helpful.
Regards,
Sonu
Your search handyman for all e-support needs!!
Related Stihl MS 251 Manual Pages
Instruction Manual - Page 2

... Base 69
Handlebar
69
10.
Control Levers
71
10.1 Master Control Lever 71
10.1.1 Removing and
Installing
71
10.2 Throttle Trigger/
Lockout Lever
72
10.3 Throttle Trigger/
Lockout Lever... Fuel Pump 85
12.5 Carburetor
88
12.5.1 Leakage Test
89
RA_737_00_01_01
MS 231, MS 231 C, MS 251, MS 251 C
q
© ANDREAS STIHL AG & Co.
Fuel System
81
12.1 Air Filter
81
12.2...
Instruction Manual - Page 5
...of STIHL press fluid, b 14.
The high voltages which components are not approved and may result in which occur can be identified by hand, to overheating.
4
MS 231, MS 231 C, MS 251, MS 251 C...system. They can cause serious or fatal accidents.
Always perform leakage test after removal. Always replace damaged parts.
The specifications must be performed outdoors only. Avoid ...
Instruction Manual - Page 21
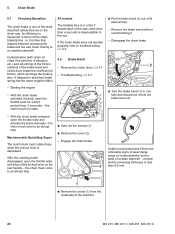
The braking time is in terms of the lockout lever on the rear handle -
If the chain brake does not operate properly, refer to a complete...and smoothing of the friction surfaces of the brake band and clutch drum impair the coefficient of the machine.
20
MS 231, MS 231 C, MS 251, MS 251 C
Remove the clutch drum, b 4.1 -
arrows) and its remaining thickness is less
2 than a second) is ...
Instruction Manual - Page 31
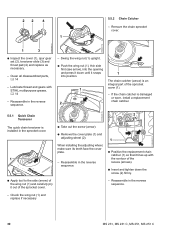
...Remove the cover plate (1) and adjusting wheel (2). Reassemble in the reverse sequence.
- When installing the adjusting wheel, make sure its teeth face the cover plate.
- Check the wing nut (1) and replace if necessary
30
MS 231, MS 231 C, MS 251, MS 251...Insert and tighten down until it lines up with
STIHL multipurpose grease, b 14
- Lubricate thread and gears with the contour of the sprocket...
Instruction Manual - Page 49

...with STIHL press fluid, b 14
: Hold the ignition lead and leg spring together and push them into the pierced hole in a safe place. Remove the...2310RA127 TG
2310RA128 TG
2 34
While using the ZAT 3, hold it only by the handle (4) or position it down firmly.
: Connect spark plug boot to the terminal (2)....48
MS 231, MS 231 C, MS 251, MS 251 C
The engine may start and accelerate during the test. Pull ...
Instruction Manual - Page 51

... out of the guides (arrows) in the air guide shroud.
50
MS 231, MS 231 C, MS 251, MS 251 C Reassemble in a wiring harness. Pull the switch lever off the ... to
"0".
2310RA131 TG
The resistance measured must be
infinitely high. Remove the shroud, b 6.4
- Remove the filter base, b 12.3
- Pull the carburetor towards the control handle - If it is much higher, the
reason is a break ...
Instruction Manual - Page 59

...Before installing, lubricate the rewind spring and starter post with STIHL special lubricant, b 14.
: Take out the screw (1)...removed and disassembled. Rewind Starter
2310RA203 TG
8.1 General
8.2 Fan housing
Installing
If the action of the segment (1) to stick together. Lift the hand guard a little and fit the fan housing in the reverse sequence.
58
MS 231, MS 231 C, MS 251, MS 251...
Instruction Manual - Page 62

...
- MS 231, MS 231 C, MS 251, MS 251 C
61
Reassemble all other parts in rope rotor with ErgoStart -
Check the rope rotor and replace if necessary.
- Tension the rewind spring, b 8.7
- Fit the cover washer. Coat bore in the reverse sequence.
8.6 Starter Rope / Grip
- Remove the fan housing and the segment, b 8.2
Models with STIHL special lubricant, b 14
Installing
- Remove the...
Instruction Manual - Page 64

...shield and work area and pull the rewind spring out of STIHL special lubricant before installing, b 14
: Position the replacement ...Remove any remaining pieces of rewind spring if necessary and remove the rope rotor, b 8.5
- the frame slips off one additional turn of breakage. Even a worn rewind spring is not the case, tension the spring by one turn .
- MS 231, MS 231 C, MS 251, MS 251...
Instruction Manual - Page 65

... with frame with a few drops of STIHL special lubricant before installing, b 14
:...remove the frame and keep it if necessary.
1
2
2310RA225 TG
1
Make sure that has popped out and unwound.
- If necessary, push the rewind spring fully into its seat (arrow) in the fan housing.
2310RA230 TG
: Check the washer (1) and replace it in the reverse sequence.
64
MS 231, MS 231 C, MS 251, MS 251...
Instruction Manual - Page 68

...arrow).
: Unscrew the spring (2) and pull the retainer (arrow) out of the guide (arrow).
: Remove the AV spring (1) between the engine housing and tank housing.
-
1 1
9.3 AV Spring on ...then push it out of the handlebar.
- MS 231, MS 231 C, MS 251, MS 251 C
67 Reassemble all other parts in the tank housing.
1
: Take out the screw (1). - Remove the air filter, b 12.1
2310RA240 TG...
Instruction Manual - Page 69

...sides - The tapered ends must face the engine housing.
- Remove the tank housing,
1
b 12.11.5
: Attach the ...STIHL press fluid to simplify installation. Reassemble all other parts in the reverse sequence.
: Screw the bearing plug (1) into the bores while turning them back and forth to simplify assembly, b 14
9.3.1 Stop Buffers
The stop buffers.
68
MS 231, MS 231 C, MS 251, MS 251...
Instruction Manual - Page 70

... facing the bores (arrows).
- 9.3.2 Buffers on the other parts in the reverse sequence.
9.4 Handlebar
- Use STIHL press fluid to simplify assembly, b 14
: Push the tapered ends of the bores.
: Take out the screw (1). MS 231, MS 231 C, MS 251, MS 251 C
69 Remove the filter base, b 12.3
1
2 1
1 1
2310RA249 TG 2310RA251 TG 2310RA253 TG
2
: Take out the screw (1).
: Press...
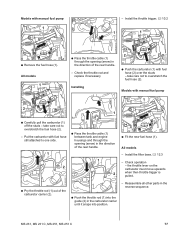
Instruction Manual - Page 73

...MS 231, MS 231 C, MS 251, MS 251 C
Inspect the lockout lever, throttle trigger and torsion spring, replace as necessary.
Installing
: Attach the throttle rod (1) to the throttle trigger (2) and fit it is within the handle and the holes in the throttle trigger and handle...1
: To remove the handle molding, press the tabs (1) on the underside apart and push them through the rear handle.
1
: ...
Instruction Manual - Page 74

..., MS 231 C, MS 251, MS 251 C
73
Check that roller on the underside apart and push them through the rear handle.
1
: Use a drift (2) to the lockout lever (arrow). Reassemble all other parts in the
reverse sequence.
2
1
: Push leg (1) of torsion spring in direction of rear handle.
: Push the lockout lever (2) into position.
2310RA174 TG
: Remove the handle molding (1).
: Remove the...
Instruction Manual - Page 75

Remove the handle molding, b 10.3
1
1
2
2310RA184 TG
2310RA183 TG
2310RA180 TG
: Place the throttle trigger (1) in the rear handle so that the bent leg of handle molding (1) in the guide (... if necessary
74
MS 231, MS 231 C, MS 251, MS 251 C note the installed position (arrow).
: Use a drift (2) to the trigger (2) - Press the lockout lever down the handle
2
molding (1) until...
Instruction Manual - Page 76

...
- Check operation
MS 231, MS 231 C, MS 251, MS 251 C
75 Remove the handle molding, b 10.3
1
2310RA186 TG
: Connect the brake cable (1) to the bore (arrow) in the reverse sequence.
- Take out the lockout lever.
2310RA188 TG
2
: Position the torsion spring (1) and fit it is recessed by operating the lockout lever.
2
1
: Push out the bushing (1). : Remove the torsion spring...
Instruction Manual - Page 78
...in the reverse sequence. Models with fuel hose (2) over the studs - MS 231, MS 231 C, MS 251, MS 251 C
77 take care not to overstretch the fuel hose (2). All models
-...in the direction of the rear handle.
- take care not to overstretch the fuel hose (2).
- Install the throttle trigger, b 10.2
1
1
2310RA294 TG
2310RA297 TG
2310RA199 TG
: Remove the fuel hose (1). Models with...
Instruction Manual - Page 84

... guide shroud.
- Installing
2310RA324 TG
- MS 231, MS 231 C, MS 251, MS 251 C
83 Remove the carburetor, b 12.5
- Pull out the shutter , check it a
1
little.
2310RA325 TG
2310RA319 TG
: Pull the rubber grommet (1) and wiring harness out of manifold flange.
-
Put the wiring harness with filter base to one side with STIHL press fluid to one side.
1
1
2 1
: Push...
Instruction Manual - Page 85

Remove the string.
: Line up grommet (1) of fuel hose (2) so that its straight side (arrow) butts against the manifold flange.
2
- Reassemble all other parts in
position and pull the grommet of
2
3
fuel hose (2) into the bore (arrow) until it is flush with STIHL...
press fluid to simplify installation, b 14
- Install the carburetor, b 12.5
84
MS 231, MS 231 C, MS 251, MS 251 ...
Similar Questions

Ms 251c Oiler Adjustment Screw Location?
Where is the chain bar oiler adjustment on the ms 251C? A supporting image may be helpful...
Where is the chain bar oiler adjustment on the ms 251C? A supporting image may be helpful...
(Posted by support25416 1 month ago)
How Can I Increase To Chain Oil Flow On My Ms 251
I want to increase the flow of oil to the chain of my stihl ms 251
I want to increase the flow of oil to the chain of my stihl ms 251
(Posted by garyvette73 4 years ago)

Stihl Ms 291 Muffler Removal
Stihl MS 291 Muffler Removal the only thing I see on it is to like star rivet that I can remove to g...
Stihl MS 291 Muffler Removal the only thing I see on it is to like star rivet that I can remove to g...
(Posted by panimierda 4 years ago)
Part No For Stihl Km90r On/of Switch
i require 1 new on/of switch for my stihl km90r want part no or where it can be purchased its orange...
i require 1 new on/of switch for my stihl km90r want part no or where it can be purchased its orange...
(Posted by johnnash222 8 years ago)
